Profile
Description
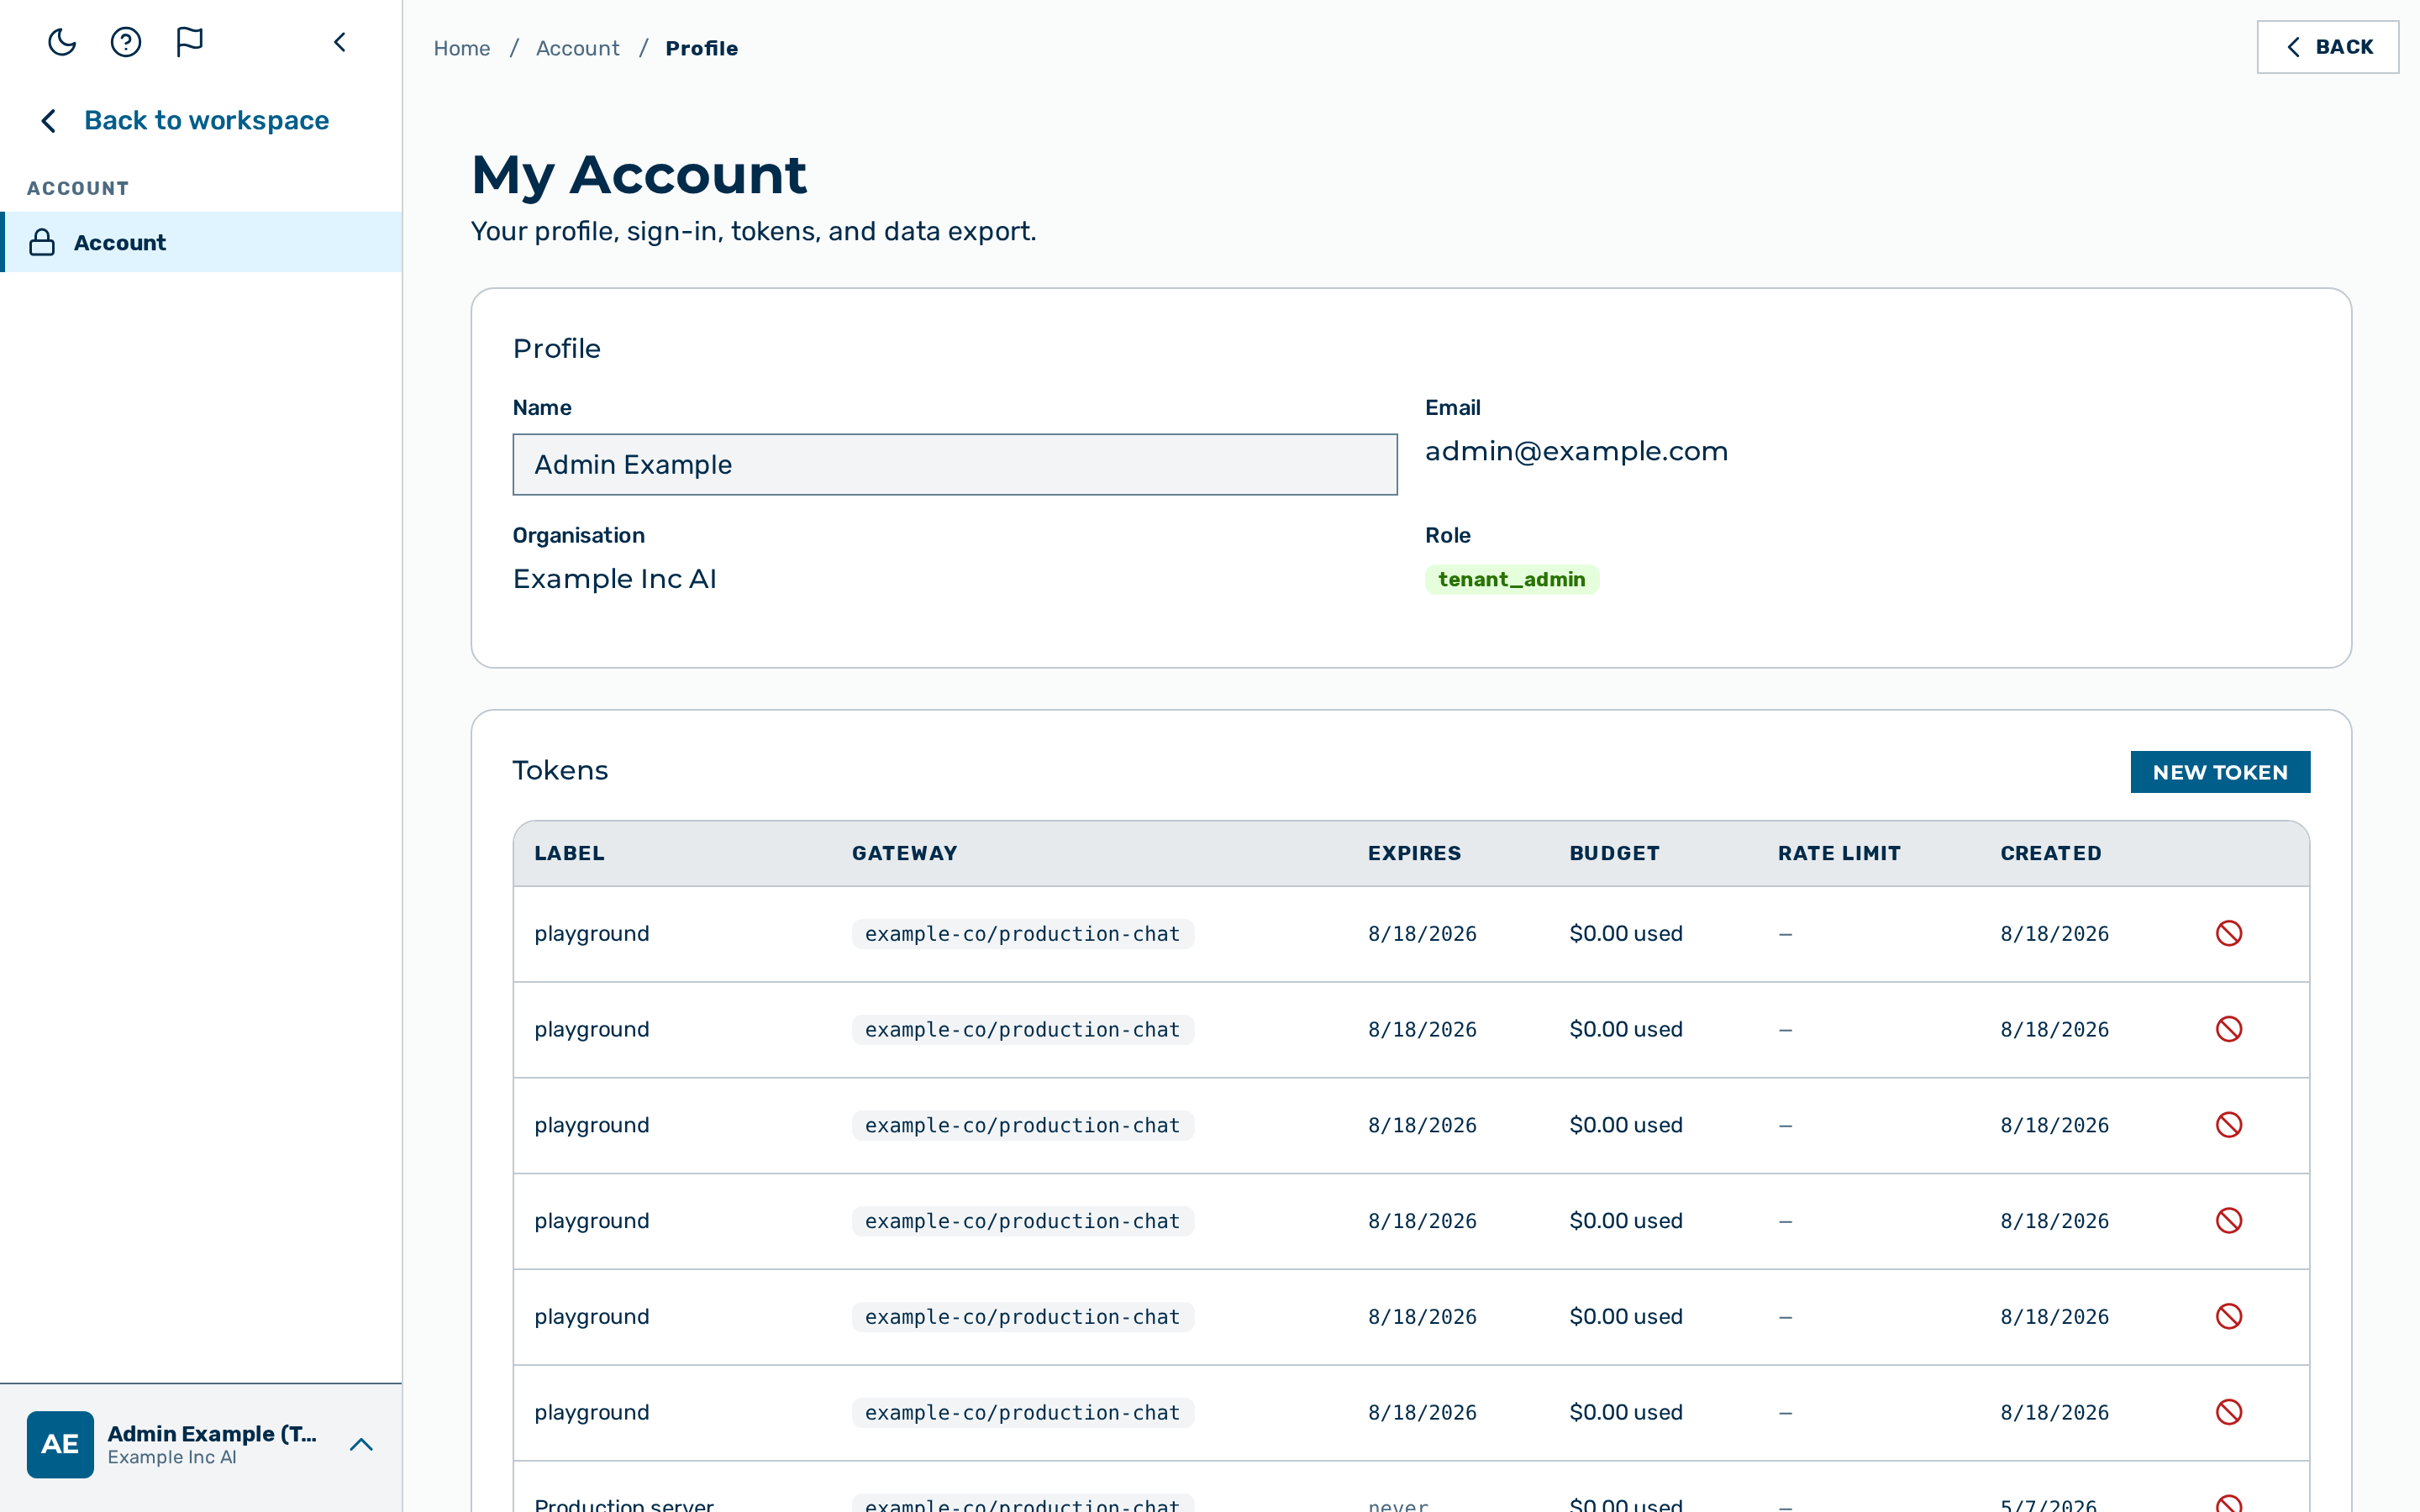
The My Account page lets any signed-in user manage their own personal authentication tokens without administrator assistance. It is reached from the account menu at the bottom of the left sidebar → Account (route /profile); the page heading reads My Account. The Tokens card on the page holds the token table.
Personal preferences (the Language switcher, the Enter-key behaviour toggle, the Display currency selector, personalisation, and your default model) moved to the separate Preferences view under Settings › Preferences. The My Account page contains four cards:
- Profile — shows the account Name, Email, Organisation, and Role of the signed-in user. The Name is self-editable (see Editing your account name); Email, Organisation, and Role are read-only.
- Tokens — the table of personal authentication tokens. Each row shows Label, Gateway (formatted as
<TENANT_SLUG>/<GATEWAY_SLUG>), Expires, Budget, Rate Limit, Created, and a Revoke button. The Budget column shows your current-period consumption and remaining amount (for example$2.50 / $10.00 · $7.50 left), not just the cap — so you can see how much of the token's budget you have used. A token without a cap shows only the amount used. If the spend figure cannot be read momentarily, the column shows the cap with usage unknown rather than a misleading$0.00. - Your data — a self-service export of all your personal data (GDPR Art. 15).
- Danger Zone — a Delete Account button (a soft delete) and an Erase all my data button (an irreversible GDPR Art. 17 erasure that requires you to type your email address to confirm).
| Role | Can create tokens | Can revoke own tokens | Can delete account |
|---|---|---|---|
admin |
yes | yes | yes |
tenant_admin |
yes | yes | yes |
ki_manager |
yes | yes | yes |
member |
yes | yes | yes |
finance |
yes | yes | yes |
viewer |
no | — | yes |
A viewer cannot make inference requests; the New Token button is hidden and the table shows the message Viewer users cannot make inference requests.
💡 Budget alerts are owner-scoped. When one of your personal tokens reaches or exceeds its budget, an administrator or tenant-administrator who owns it sees a dashboard budget banner that links to this My tokens page to view the spend and manage the token. A personal token's budget only blocks that token's own requests, so its alert is shown only to you (the owner) — it never raises a global "New requests are blocked" banner for other members of your tenant. A shared service / scheduler token that no person owns still alerts administrators (it can silently hard-stop scheduled runs), but its banner is distinct: it names the token and says its scheduled runs are blocked (not the admin's own requests), it links to that token's gateway Auth Tokens card rather than here, and it renders as a softer warning notice — though, being an active block, it stays shown until resolved. See Budgets and cost control.
Creating a token
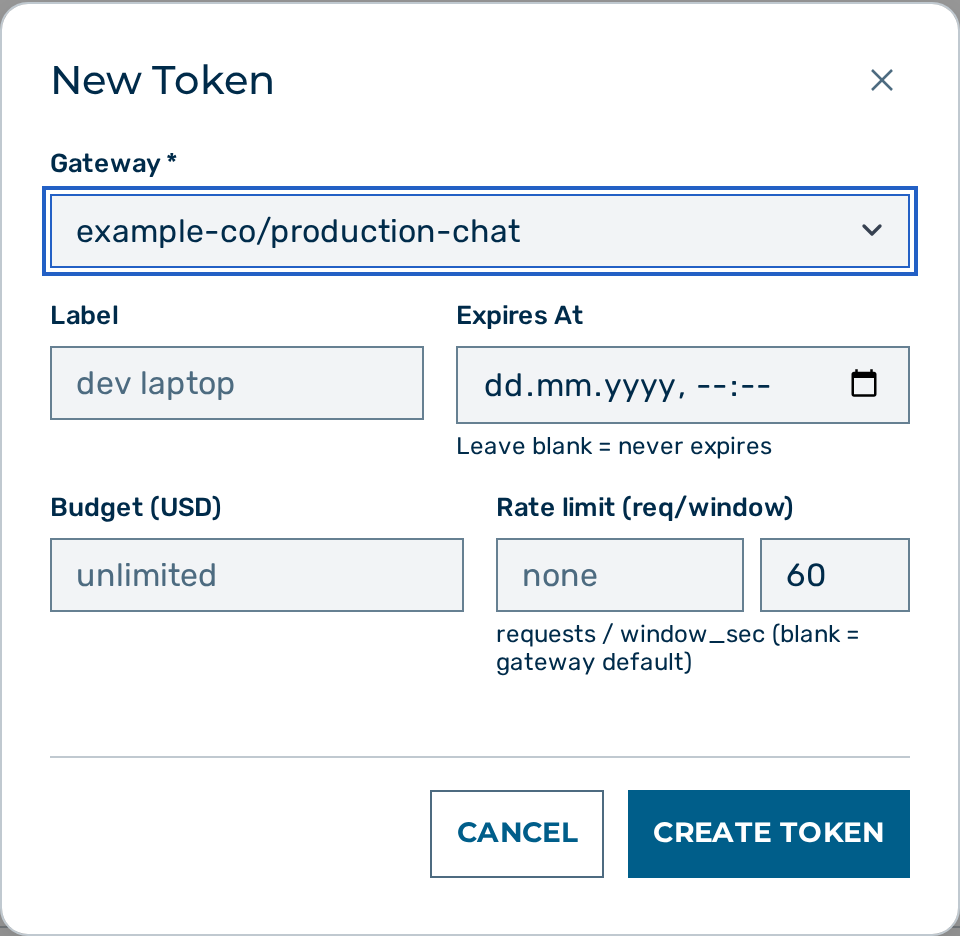
Proceed as follows to create a personal authentication token:
- Click on the + New Token button at the top of the Tokens section.
- The New Token dialog opens.
- Select the target gateway in the Gateway drop-down list. Gateways are listed as
<TENANT_SLUG>/<GATEWAY_SLUG>. - If required, enter a descriptive value in the Label text field.
- If required, set a date and time in the Expires At date field. Leave the field blank for a non-expiring token.
- If required, enter a maximum spend in USD in the Budget (USD) text field.
- If required, enter a request count and a window size in the Rate limit (req/window) fields.
- Click on the Create Token button.
- The dialog closes and the token value is shown once in the Token Created dialog.
- Click on the Copy button to copy the token value to the clipboard.
- Click on the Done button.
-> The new token appears in the list of personal tokens.
⚠️ Caution: The token value is shown only once. After the dialog closes, the value cannot be retrieved.
Revoking a token
Proceed as follows to revoke a personal token:
- Locate the token in the table.
- Click on the Revoke button in the row.
- An in-app confirmation dialog opens with the prompt Revoke this token?
- Click on Confirm in the dialog.
-> The revoked token disappears from the list. Requests authenticated with the revoked token are rejected immediately.
Editing your account name
The Name field on the Profile card is the account identity name shown across the app (the navigation, the account menu, and the My Account page). Every signed-in user can change their own name without administrator assistance.
Proceed as follows to change your account name:
- Locate the Name text field on the Profile card.
- Enter the new value in the Name text field.
- The Save button appears next to the field once the value differs from the stored name.
- Click on the Save button.
-> The new name is stored and appears immediately in the navigation and the account menu.
💡 Note: The name must not be empty. Clearing the field and clicking Save shows the message Name must not be empty and no change is stored. The Email, Organisation, and Role fields are read-only and cannot be changed here.
Editing a token's limits
The My tokens self-service view is create-and-revoke only. A token's three operational limits — Rate Limit, Budget (spend cap), and Expires — can, however, be changed in place on an existing token without revoking and re-issuing it (the deployed token keeps working), from the gateway's Auth Tokens card by a tenant administrator.
Proceed as follows to edit a token's limits:
- Open the gateway's detail view and locate the token in the Auth Tokens card.
- Click on the Edit button in the row.
- The Edit Token dialog opens, pre-filled with the token's current expiry, spend cap, and rate limit.
- Change the Expires At, Spend cap, and Rate limit fields as required. Clearing a field removes that limit (no expiry / no spend cap / no rate limit).
- Click on the Save Changes button.
-> The dialog closes and the new limits take effect on the very next request (a lowered spend cap or rate limit applies immediately). The token value itself is unchanged.
💡 Note: The token's label, scopes, and hash are fixed at creation and cannot be changed here — only the rate limit, spend cap, and expiry are editable. Editing requires the
tenant_admin(or platformadmin) role for the gateway's tenant; the same change is available over the API viaPATCH /admin/v1/gateways/{id}/tokens/{tid}(see Users and tokens — Editing a token).
Deleting your account
Account deletion is a soft delete. The account is signed out, locked out, and can be restored only by an administrator from the Users view.
Proceed as follows to delete your account:
- Scroll to the Danger Zone section at the bottom of the view.
- Click on the Delete Account button.
- The Delete Account confirmation dialog opens with the prose This deletes your account. You will be logged out immediately and will no longer be able to sign in.
- Click on the Delete Account button in the confirmation dialog.
-> Every session on every device ends immediately and permanently (and the account's /v1 API tokens are revoked), and the user is redirected to the sign-in page. Sign-in attempts with the deleted account are rejected until an administrator restores the account — and a restore does not revive the old sessions or tokens; the user signs in afresh.
⚠️ Caution: A self-deleted account cannot be reactivated by the user. Contact an administrator to restore access.
Using a token
Tokens created in the My tokens view are standard inference tokens. Use them with the Authorization: Bearer header on any provider endpoint:
curl -X POST https://<GATEWAY_HOST>/v1/<TENANT_SLUG>/<GATEWAY_SLUG>/compat/chat/completions \
  -H "Authorization: Bearer myra_xxxxxxxxxxxxxxxxxxxxxxxxxxxxxxxxxxxxxxxxxxxxxxxxxxxxxxxxxxxxxxxx" \
  -H "Content-Type: application/json" \
  -d '{
    "model": "gpt-4o-mini",
    "messages": [{"role": "user", "content": "Hello"}]
  }'
See Unified compat endpoint for provider-specific paths.
See also
- Authentication tokens — what the token types are and why
- Editors & IDEs — use a personal token to reach the local Qwen model from Continue, Cursor, Zed, and other OpenAI-compatible editor assistants
- Interface overview — the My access page that explains your own roles, permissions, and group membership