Chat
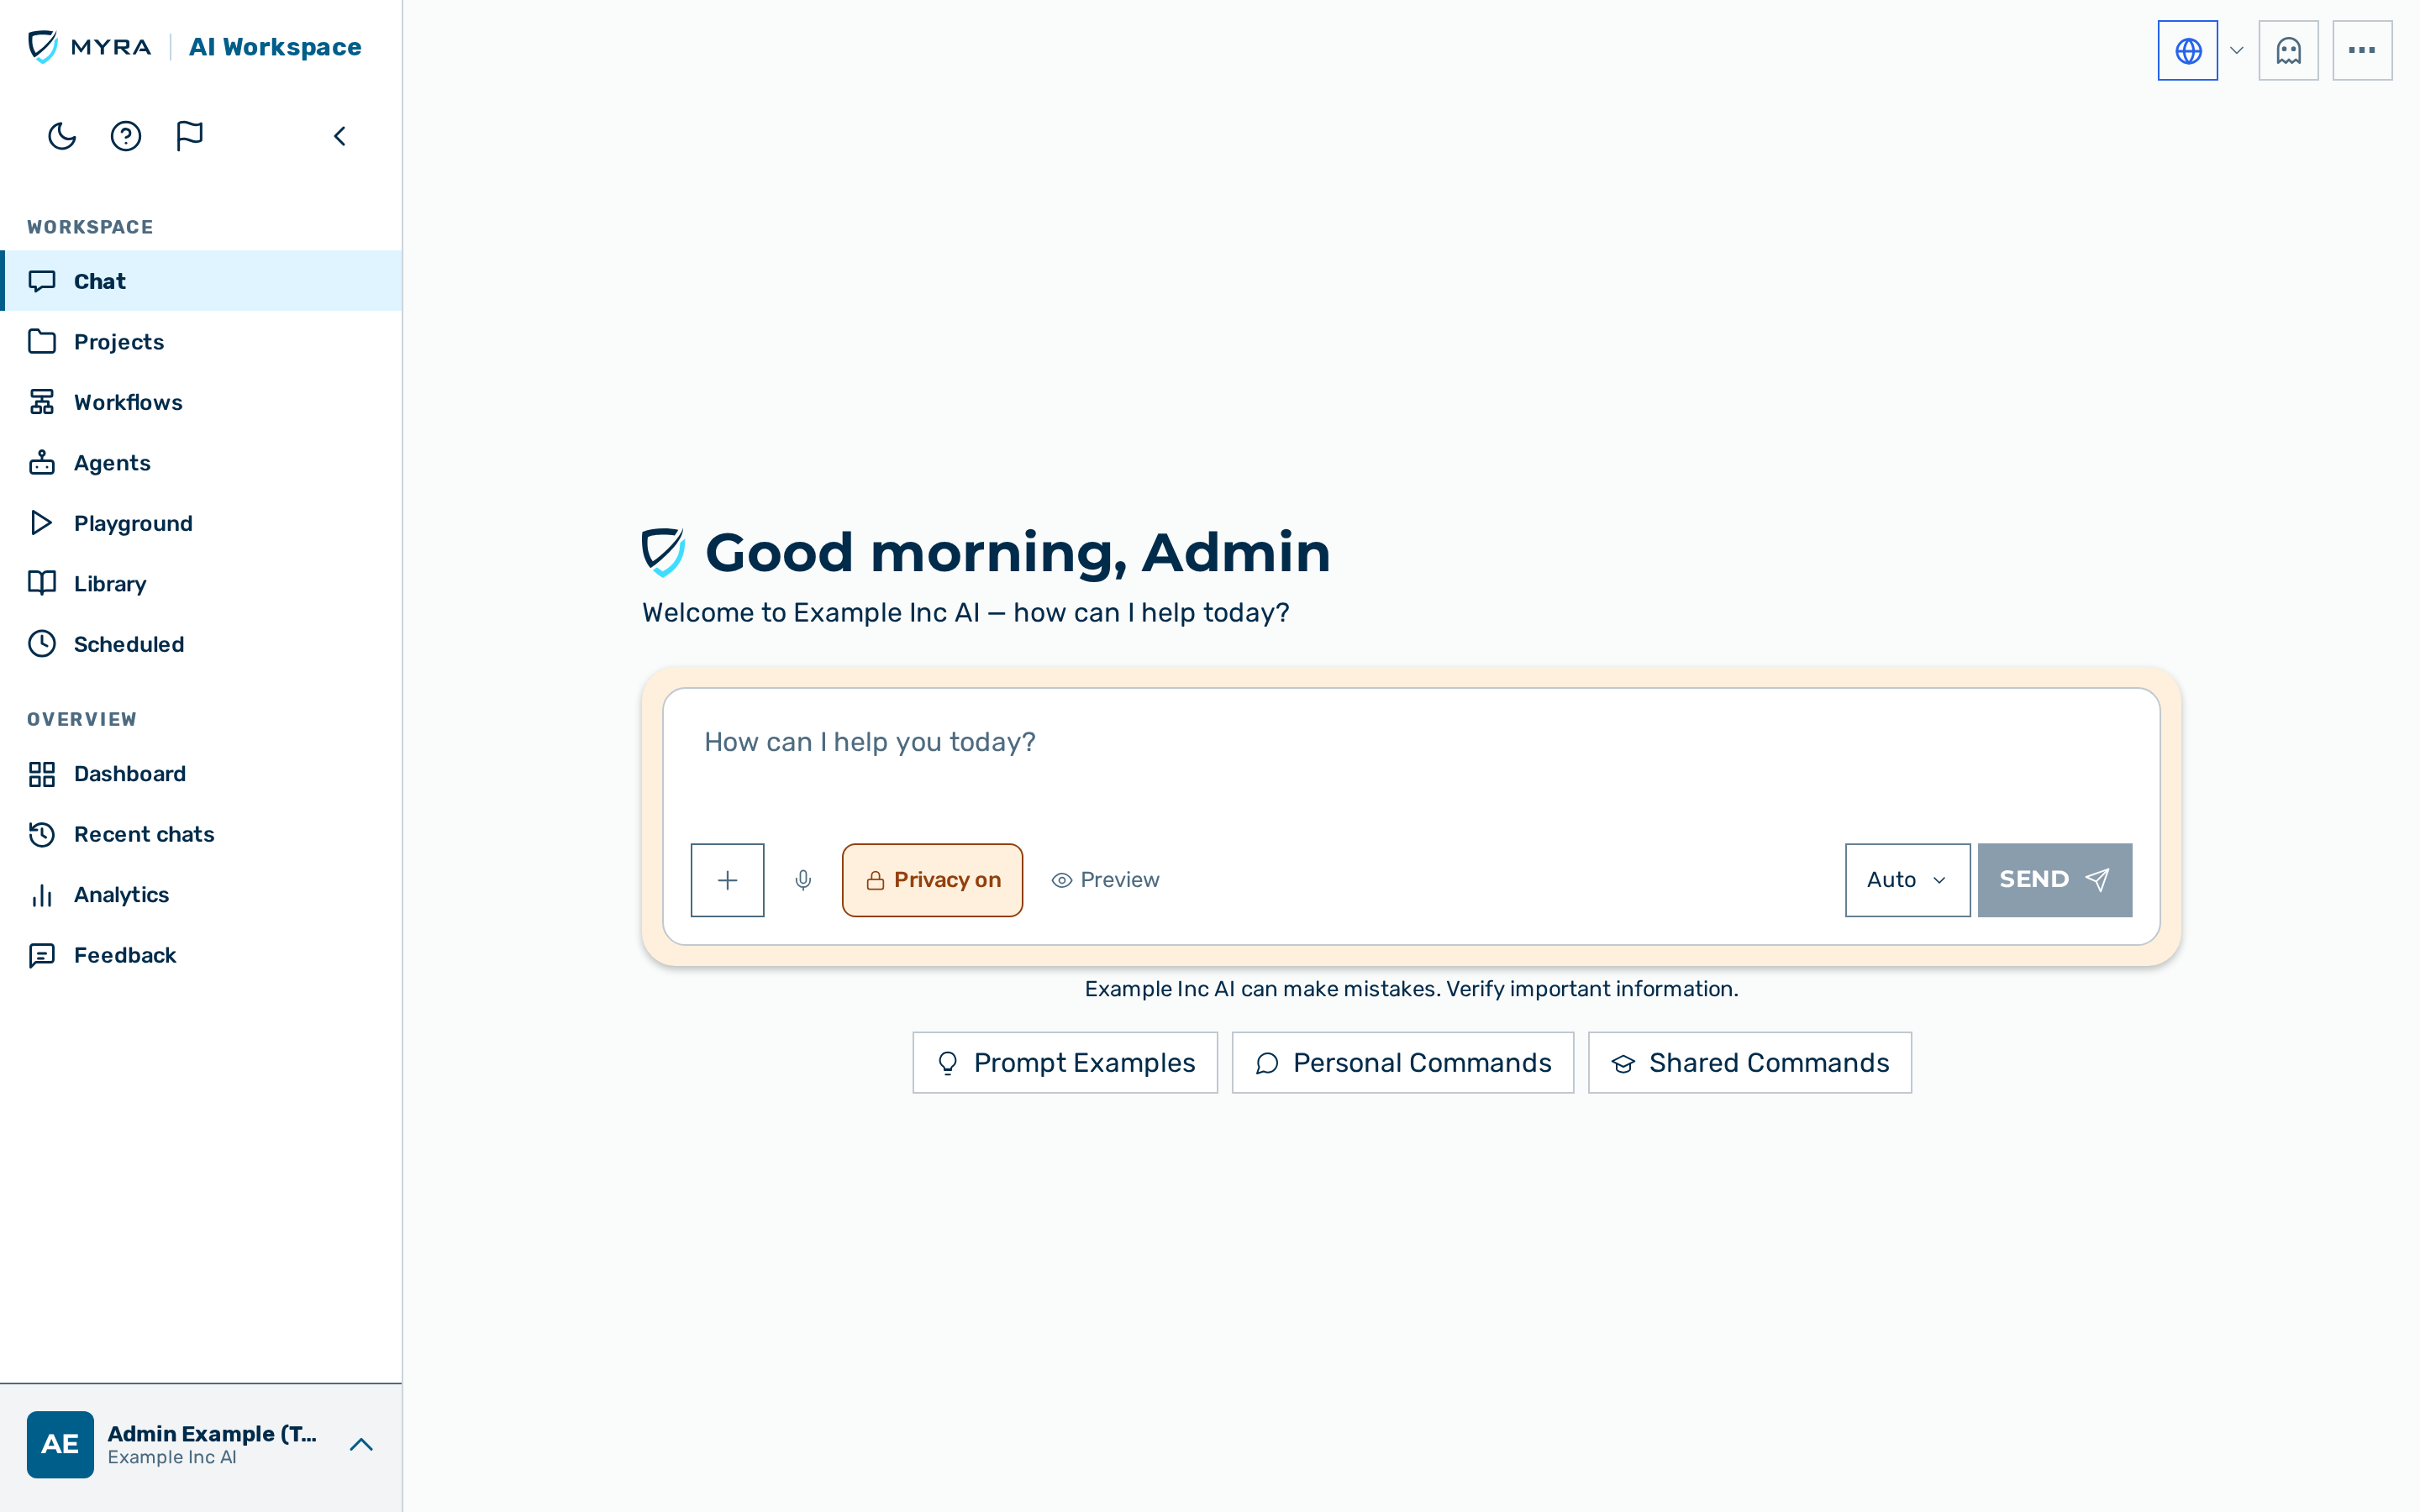 The Chat view with the start screen and the composer.
Description
Chat is the chat interface of Myra AI Workspace, reachable at /easy. Chat provides a persistent, multi-turn conversation that routes every message through the gateway. The interface is available to every authenticated user. Members and viewers are taken to Chat on sign-in; administrators and tenant admins are taken to the Dashboard and open Chat from the Chat entry in the sidebar. The legacy /chat URL redirects to /easy.
Chat resolves the gateway for the user. The interface has no tenant, gateway, or preset picker. The user selects a model with the model picker in the composer, or leaves the model on Auto to let the server choose.
Layout
The view has the regions below.
Top bar — the chat controls, grouped at the top-right. On desktop they sit in a slim bar along the top of the chat pane. On a phone or tablet they ride the global top bar instead — the same bar that carries the menu, notifications, and Send feedback — so the chat has no separate second row and reclaims that vertical space. The workspace navigation — the conversation list (Recents), Projects, Agents, Playground, and the Dashboard — lives in the app rail, and the account menu sits at its foot (see Interface overview), not in the chat pane. Wherever it sits, the top bar carries the same chat controls:
- The Web search globe — toggles web search for the conversation. See Composer and Searching the web.
- The Ghost mode icon — arms a private, unlogged conversation before the first message. The icon is shown on the start screen only and never for demo users. See Ghost mode.
- The ⋯ overflow menu — on the start screen it holds the Memories toggle for new chats; inside a conversation it holds New chat, export, share, feedback, and live-session actions. See Per-conversation options.
- Speaking-state indicator — while a reply is being read aloud (text-to-speech), the top bar reflects the speaking state.
Start screen — shown before the first message.
- A greeting with the name of the user, or How can I help today? when no name is set.
- The composer.
- Three tiles: Prompt Examples, Personal Commands, and Shared Commands.
Message thread — replaces the start screen once a conversation is active. The thread shows the message history and the generated-file artifact cards. In a project, the thread also shows the project banner.
Composer — the message input, present on both the start screen and the active conversation.
Composer
The composer holds the message input and the controls below. The placeholder reads How can I help you today?.
While the message is empty the composer shows no highlight — the input is ready to type into, but nothing is framed. As soon as the message contains text, a thin frame appears around the text area and disappears again when the message is cleared or sent. (Accessibility note: the composer is focused automatically on desktop; because the frame is tied to typed text rather than focus, keyboard users see no focus indicator on the empty composer — the blinking caret is the only cue. This is a deliberate design decision.) While dictation records, the frame stays off — the recording status carries the state.
- The SEND button — a labeled button that is greyed out while the message is empty and becomes active as soon as the message or an attachment is present. While a response streams it is replaced by a Stop generation button. Stopping keeps whatever was already generated: the partial response stays in the conversation and is saved. (If you stop before the model produced any text, there is nothing to keep and the turn is discarded.)
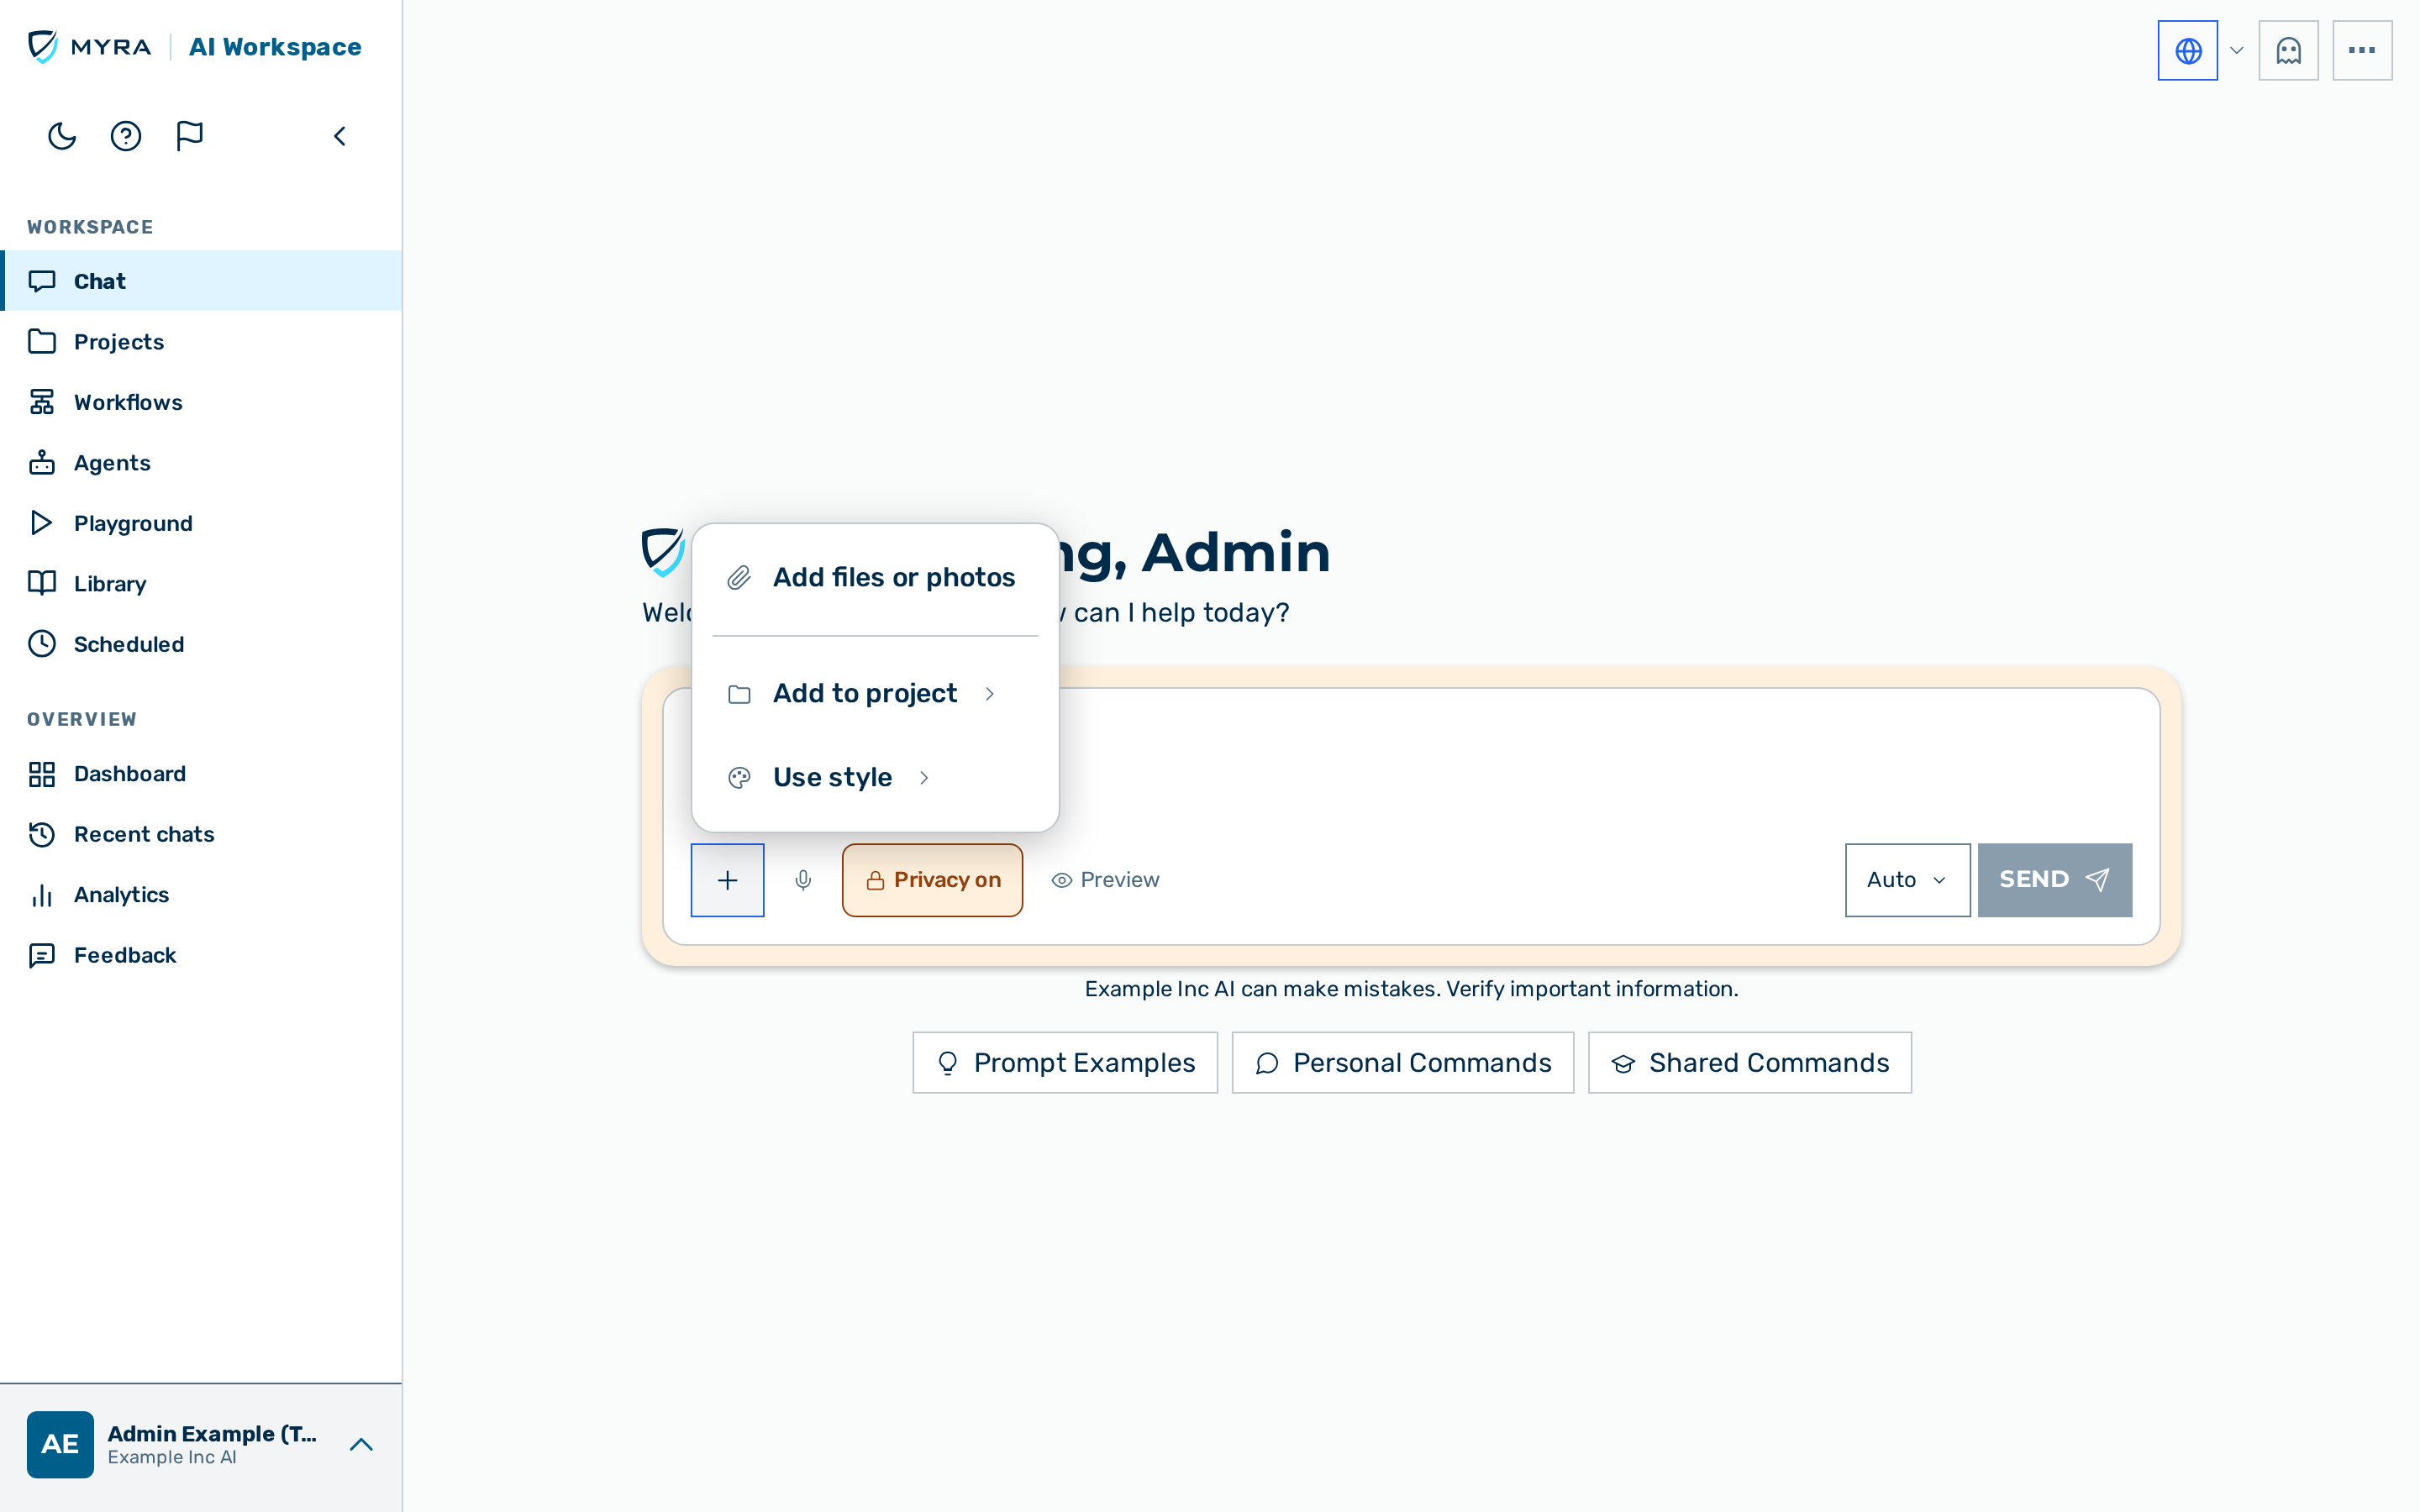
- The Add files, photos, or options menu (the + button) — attaches files (Add files or photos), holds an Add to project action that files the conversation into a project, and, under Use style, holds the Personal style option and the pre-configured writing styles. (Web search moved out of this menu to the top-bar globe — see below.)
- The model picker — see Choosing a model.
- A Dictate button (microphone icon) — records a voice message that the gateway transcribes to text.
- The Privacy pill and, on a gateway with PII protection, a Preview button — see Privacy pill.
At the top-right of the chat bar sit two icon buttons and an overflow menu (on a phone or tablet these ride the global top bar, as described under Top bar above):
- The Web search globe — toggles web search for the conversation; a small caret beside it opens a popover to set the Recency window. See Searching the web.
- The Ghost mode icon — arms a private, unlogged conversation before the first message (see Ghost mode).
- The ⋯ overflow menu — holds New chat, the Memories control, and (inside a conversation) export, share, feedback, and live-session actions.
Active options appear as chips above the message input, one chip per active project, personal style, and attachment.
An unsent draft is saved automatically on this device as you type and restored the next time /easy loads — reloading the page or briefly losing connection does not lose what you were writing. The draft is cleared once the message is sent. It belongs to the signed-in user: while an administrator is viewing the workspace as another user, nothing is saved or restored.
Prompt Examples, Personal Commands, and Shared Commands
Three tabs give quick access to ready-made prompts and saved commands:
- Prompt Examples — ready-made prompts. The list is the configured prompt examples of the tenant, or a built-in curated set when the tenant has configured none. See Tenants — Managing prompt examples.
- Personal Commands — the saved slash-commands of the user. See My commands.
- Shared Commands — the slash-commands shared with the tenant.
The tabs are available in both states: on the start screen they sit below the composer, and during an active conversation they stay reachable above the composer (where a selected tab opens over the thread), so you can insert a prompt or trigger a command at any point in the chat.
Selecting a prompt example fills the composer with the prompt. On the start screen, on Auto, the example also selects a suitable model; during an active conversation the model is fixed for the conversation, so a selected prompt example only fills the composer and does not change the model.
Starting a conversation
Proceed as follows to start a conversation:
- Enter the message in the composer text field.
- If required, choose a model with the model picker (see Choosing a model).
- Press Enter, or click on the Send message button.
- A status indicator appears while the request is processed.
-> The response of the model streams into the message thread.
💡 Note: Press Shift+Enter or Option/Alt+Enter to insert a line break instead of sending. Click on the Stop generation button to abort a response while it streams.
💡 Note: If the first message of a new conversation cannot be saved (a network error or a server fault), the conversation stays open with an error banner and the message restored in the composer — send it again to continue in the same conversation. A conversation that never received a message remains in Recent chats under the title taken from the first 60 characters of that message until you delete it; opening it shows No messages yet in this conversation. Write below to get started. and a working composer.
💡 Note: If you open a conversation that was pinned to a gateway you can no longer use — one that belongs to another workspace, or that was removed — the conversation falls back to your default gateway and a notice tells you the original gateway is unavailable. The composer stays usable on the fallback gateway, and you can pick a model on it. Because the fallback gateway may reach a different set of models, provider, or region, check the model picker before you continue.
Choosing a model
The model picker is the button in the composer. The default selection is Auto, which lets the server choose a suitable model. Auto prefers a local Myra-hosted model that is verified to support tools, so a default chat runs on European infrastructure and can still use web search and file tools. When the resolved model is an external (non-Myra) provider and the request asks for — or the project requires — personal-data protection, Auto picks a gateway that actually masks personal data, so nothing leaves Myra unmasked. A local Myra/EU model is served on the plain (non-masking) gateway by default — even when it uses web search — because the model keeps data at Myra and masking a first-party leg only corrupts your own data (PII Protector — Local model legs are not masked). When your organization enforces masking, the local route is masked too. See Conversations for the full rule.
Asking the assistant about itself. The assistant knows which model it is and how the current turn runs: its system prompt carries a one-line runtime reference — the provider and model id it is served as (for example myra/qwen3.8-27b), the gateway it runs through, whether the whole route is locally hosted (data stays on the platform — stated only when the primary model and every configured fallback are Myra-hosted), whether a fallback model may answer instead, and whether PII masking of the input is on or off for this turn (as the active policy — "any personal data detected is replaced by placeholders" — not as a claim that this particular message contained personal data). "Which model am I using?" or "Is masking active?" is therefore answered from that line rather than guessed. A white-labelled workspace (a custom assistant name) does not disclose the provider or model id; the assistant states only whether it is a locally hosted or an external model. The system prompt also carries a short product reference (what the workspace is: chat, projects with a knowledge base, web search, file generation, MCP connectors, agents, workflows; that administrators configure providers, models, gateways, guardrails and PII masking) and a list of where the main pages live, and instructs the assistant to point to the documentation rather than guess for anything beyond it. The runtime line is the last composed block of the system prompt (per-turn notices such as the reply-language pin may follow it) and does not change while the model and gateway stay the same, so it does not disturb prompt caching. It is derived only from the resolved request (provider, model, gateway, masking state) — never from client-supplied text; a model id that is not a plain identifier causes the line to be omitted.
Destructive-command safety. The system prompt also carries an always-present safety instruction for commands that irreversibly destroy data (for example diskpart clean, mkfs, dd, rm -rf, SQL DROP/TRUNCATE, partition-table writes, or format). Before suggesting such a command the assistant is instructed to say plainly that it is destructive and cannot be undone, name the exact target it acts on, remind you to back up first, and give the narrowest command scoped to the one partition, table, row, or path you mean — rather than wiping a whole disk, filesystem, or database and rather than slipping the command in as a routine step. It does not refuse the command (you may genuinely need it); it gives it with the warning. This guidance is present for every workspace and brand; it steers the model but, like any instruction, does not guarantee the model always follows it.
Proceed as follows to choose a model:
- Click on the model picker button in the composer.
- The model picker opens.
- If required, enter a model name in the Search models… field to filter the list.
- The typed part of the model name is highlighted in each suggestion. If the typed text matches no model, the list shows No matches for "…".
- Select Auto to let the server choose, or select a specific model from a provider group. Each model shows its own task labels — see Task labels on each model.
-> The selected model handles the next message. A privacy indicator on each model shows whether the model keeps data at Myra, masks sensitive details before sending, or sends data to a third-party model.
Task labels on each model
Each model in the list carries its own task labels under its description, so you can see at a glance what it can do. The labels are derived from what the model can actually do, so they never promise more than the model offers:
| Task label | A model carries it when |
|---|---|
| Long documents | Its context window takes at least 200,000 tokens — roughly a 500-page document in one go. |
| Web research | It can use tools, so it can search the web where the gateway offers web search. |
| Step-by-step reasoning | It has an extended thinking mode. |
| Images | It can look at attached images — screenshots, photos, diagrams. |
| PDFs | It reads a PDF directly, keeping its layout. |
| Fast and cheap | It is among the cheapest models available to you. |
On a very short or zoomed-in viewport — less than about 400 px high, as on a phone held in landscape or a narrow window zoomed far in — the per-model task labels step aside so the model list itself stays readable; the search field is always there.
The model picker offers an Adaptive thinking toggle that lets the model think harder for complex tasks. When the selected model does not support adaptive thinking, the toggle is disabled and a tooltip explains why. After typing to filter, the Arrow Up and Arrow Down keys move through the filtered list and Enter selects the highlighted model.
💡 Note: On an Auto conversation, the model picker button stays on Auto but, once the server has chosen a model for the conversation, shows which model it resolved to — for example Auto · Sonnet 5. The privacy indicator on the button then reflects the resolved route. On the start screen, before the first message is sent, the button shows a plain Auto with no indicator.
💡 Note: The model picker is locked when a project pins a model, and after the first reply when the model is fixed for the conversation.
💡 Note: On an Auto conversation, a message that attaches a spreadsheet or CSV may be answered by a more capable model for that turn. The reply discloses the model that produced it, for example Answered by
— Auto picked a more capable model for this file. 💡 Note: In a Local only project the model picker lists only local Myra models; cloud and external models are hidden. A cloud model pinned before entering the project resets to Auto.
💡 Note: Some models cannot use the gateway's tools. When a reply would have used a tool — for example web search or a connector — but the chosen model does not support tools, the reply carries a short notice such as Skipped web search — not available for this turn. The answer is still produced without the skipped tool. Choose a tool-capable model to use the tool.
Privacy pill
The Privacy pill next to the model picker shows how the personal data in the next message is handled. The pill has four states.
The pill is the primary privacy-state indicator in both themes: its fill and label colour follow the state (green for a local route, amber for a masked route, red for an unmasked third-party route). In the light theme the soft surface around the composer additionally tints with the same state colour; in the dark theme that surround is a uniform neutral slate by design — read the privacy state from the pill.
| State | Meaning |
|---|---|
| Local model | The resolved model runs on Myra infrastructure. Your message is processed by the local model as-is — a local model leg is never masked. If you use web search or external tools, personal data in those calls is sent as-is. When a masking alternative is available for this account, tapping the pill masks personal data sent to those tools (Local + masking); when none exists it is a read-only indicator. The pill shows a closed-lock icon. |
| Local + masking | A Myra model is selected on a gateway that also masks outbound data. Your message still runs on the local model unchanged; personal data you send to web search or external tools is protected before it leaves Myra. The pill shows a closed-lock icon. Tapping it turns that masking off (back to Local model); tapping again turns it on. |
| Privacy on | A non-Myra model is selected on a gateway with a PII-protective guardrail. Sensitive data is scrubbed before it reaches the model. The pill shows a closed-lock icon. |
| Privacy off | A non-Myra model is selected on a gateway without a PII guardrail. Data is sent to the third-party model unmasked. The pill shows an open-lock icon. |
When a protected alternative gateway is available, the pill is a button: tapping it switches the next message between the masked and the unmasked route. This applies to Local + masking ⇄ Local model as well as Privacy on ⇄ Privacy off, so masking on a local route can always be turned back on. When no alternative is available, the pill stays a read-only indicator.
The alternative gateway must also be able to run the conversation's current model — it needs a key or a Platform-model grant for that provider, and must not have the model disabled. When an alternative exists but cannot run the model, tapping the pill keeps your preference for new conversations but does not move this conversation; a banner explains — A protected alternative exists, but it can't run this conversation's model — switching would fail. Pick another model to change the privacy route. Choose a different model from the model picker to change the privacy route of this conversation. When the model catalog does not list the conversation's model (so the alternative cannot be checked), the pill likewise does not move the conversation and a banner says so; the banner disappears once you pick a model.
Picking a different local model from the model picker returns the route to the default Local model (unmasked): a first-party model prefers the non-masking gateway, so switching models on a Local + masking conversation drops the optional tool-egress masking. Tap the Privacy pill to turn masking back on. When your organization enforces masking, the route stays Local + masking across a model switch (masking cannot be turned off).
Proceed as follows to switch privacy protection for the next message:
- Locate the Privacy pill next to the model picker.
- Click on the pill.
-> The pill switches between Privacy on and Privacy off, and the routing of the next message follows the new state.
⚠️ Caution: In the Privacy off state, sensitive content (names, emails, IDs) leaves Myra unmasked. A banner above the composer — Data goes to a third-party provider without PII protection. — states this before you send. When a protected route is available that can run the conversation's model, the banner offers a Protect automatically button that switches to it; a protected gateway that cannot run the model is not offered. The banner can also be dismissed with the ×.
Privacy hint for new accounts
During the first seven days after an account is created, the composer shows a one-line hint directly under the input while the Privacy pill reads Privacy on and the conversation has no messages yet: If "Privacy on" is selected, we replace names, numbers, and addresses with placeholders before the AI processes your input. The hint is plain text with a lock icon; it is not a button and does not change the composer. It is shown once per page session and disappears after the first message is sent. It is never shown on a Local model, Local + masking or Privacy off route, on a gateway without a PII detector, or to the demo user.
Enforced masking
A tenant can enforce masking for every user in the tenant. When masking is enforced, the Privacy pill is read-only, always shows the closed lock, and cannot be switched off. The tooltip reads Privacy is enforced by your organization. Sensitive data is always scrubbed before it's sent to an external model or tool, and this cannot be turned off. Sensitive data is always scrubbed, and manual unmasking is not available. See My PII configuration for how personal keywords combine with the tenant policy.
Previewing masking
On a gateway with PII protection, the composer shows a Preview button. The preview shows how a draft message is masked before it reaches the model, and lets the user unmask individual items or mask more text by hand.
The Preview button is not shown for a local (Myra) model: a local model leg is never masked on the message input, so there is nothing to preview. On a local route the Privacy pill (above) is where you control and read the privacy posture.
Proceed as follows to preview masking:
- Enter the draft message in the composer text field.
- Click on the Preview button.
- The Preview masking dialog opens and runs the detectors on the draft.
- Review the masked items. Each masked item shows its type and the token it is replaced with.
- If required, click on a masked item to send it unmasked.
- If required, select sensitive text the detectors missed, then click on Mask selected text to mask it by hand.
- Click on Looks good — send to send the draft.
-> The message is sent with the masking shown in the preview.
💡 Note: When the tenant enforces masking, the Preview masking dialog does not offer the unmask action — every detected item is always masked.
⚠️ Caution: On a PII-active gateway, previewing masking is required before the first send. If the draft would be rejected by a guardrail, the dialog shows ⛔ This message will be rejected and names the guardrail.
⚠️ Caution: If a PII detection service cannot be reached, the dialog shows PII detection incomplete and warns that the preview may not show all personal data in the draft. Detection did not run completely — review the text before sending.
Importing a file
Proceed as follows to attach a file to a message:
- Click on the Add files, photos, or options button (the + button) in the composer.
- The composer menu opens.
- Click on Add files or photos.
- The file picker opens.
- Select the file.
- The attached file appears as a chip above the composer text field. Drag a file onto the view, or copy a file (for example in the file manager) and paste it into the composer with Ctrl+V (macOS: Cmd+V), to attach it the same way.
- If required, enter a message to accompany the file.
- Press Enter, or click on the Send message button.
 An attached file shown as a chip above the composer
💡 Note: When a PDF is read as extracted text, the figures, charts, and other images embedded in it are also attached to the message as images. When some cannot be attached, a notice reports how many of the images in the document are shown to the model, and the rest are left out because of an unsupported format, a size limit, or the per-message image limit.
-> The file is sent with the message. The model processes the file content and responds.
The following file types are supported:
| Format | Extensions |
|---|---|
| Images | .jpg, .jpeg, .png, .gif, .webp, .tiff, .bmp, .heic, .heif, .avif, .dng (Apple ProRAW and other camera raws — decoded from the embedded preview) |
.pdf |
|
| Plain text | .txt, .md, .html, .htm |
| Source code / text | .py, .js, .ts, .tsx, .jsx, .rb, .php, .c, .h, .cpp, .go, .rs, .sh, .sql, .java, .cs, .swift, .kt, .lua, .toml, .ini, .cfg, .conf, .log, .env, and other common code/config text files (read as plain text) |
| Word document | .docx, .doc (legacy binary Word 97–2003) |
| Spreadsheet | .csv, .tsv, .xlsx, .xlsm, .ods |
| Data | .json (analysed as an extracted-text data file — computed over by the code interpreter when enabled) |
| Presentation | .pptx |
💡 Note: A message accepts up to 10 attachments, each up to about 110 MB (large Office documents included). Attaching an unsupported file type shows an error message that lists the supported formats. On a model that reads PDFs natively (page images), a PDF larger than the native-inline limit (~7.4 MB) is automatically read as extracted text instead of being rejected — a notice under the attachment says the model reads its text but not its visual layout or images.
💡 Note: The composer knows your workspace's upload size limit (read live from your account) and, if a file exceeds it, shows a payload too large notice and does not send it, rather than uploading and failing. See the
payload_too_large/attachment_too_largeentries in Error codes.💡 Note: A PDF is read up to a 200-page bound. When a PDF is longer, or when some pages cannot be fully transcribed, a notice under the attachment reports how much of the document reached the model — for example Only the first 200 of 640 pages of report.pdf could be read — content on the remaining pages is not available to the model. The model receives the same limit, so it never treats unread pages as absent content. See Conversations — PDF extraction.
💡 Note: When a message carries several attachments and one of them cannot be processed (for example, file processing is momentarily busy), the message is not sent and all attachments stay in the composer. The chip of the file that failed is shown in red with the tooltip "
— failed on the last send" ; the other files keep their finished processing. Press Send again to retry only the failed file, or remove its chip to send the message without it — the other files are not uploaded a second time as long as the message text, the model and the gateway are unchanged (an image that is read through text extraction is read again when the message text changes, because that extraction is guided by the text).💡 Note: On some mobile app builds, tapping Add files or photos can fail to open the native picker at all (a photo/file-chooser permission or wiring issue in that build). If the picker does not open within about 1.5 seconds, the composer shows a "The file picker didn't open" message instead of doing nothing — retry, or check that the app has permission to access photos/files.
Spreadsheets and CSV files are analyzed from a size-bounded text preview that leads with exact row/column/sheet counts computed over the complete file, so structure questions are answered correctly even when the preview is truncated — a notice under the reply reports when values may be estimates. When the resolved gateway has the code interpreter enabled, the model can additionally run code over the full file for exact computed results.
💡 Note: After sending, a spreadsheet or CSV attachment appears in the conversation as a collapsible chip that shows the file name. Click on the chip (Show content / Hide content) to expand or hide the extracted text. The full extracted content is always sent to the model, whether the chip is expanded or collapsed.
Searching the web
Web search augments a reply with live search results.
Web search is on by default for a new chat. Proceed as follows to control it:
- Use the Web search globe at the top-right of the chat bar to turn web search on or off for the conversation. The globe shows its current state and, while on, a small caret appears beside it.
- To restrict results by age, click the caret next to the globe and set the Recency window in the popover.
-> The setting applies per conversation and persists. See Web search for the supported models.
The Recency window offers the values below.
| Value | Effect |
|---|---|
| Any time | No age restriction. |
| Past 24 hours | Results from the last 24 hours only. |
| Past week | Results from the last week only. |
| Past month | Results from the last month only. |
| Past year | Results from the last year only. |
Web-search timeline
When a reply uses web search, the message shows a Searched the web disclosure. Click on the disclosure to expand a vertical timeline with one node per search the model ran. Each node shows the search query, the result count, and a card that lists the source rows (a per-domain icon, the title, and the domain). The disclosure is collapsed by default — while the search runs and after the reply is finished — and only expands or collapses when you click it; it reappears on conversation reload.
Citations
A web-search reply ends with a numbered Sources list. When the model wrote inline markers such as [1] and [2] after the claims a source supports, each marker renders as a clickable superscript link to the matching source.
A reply grounded in project knowledge files shows a separate Sources panel below the answer. The panel groups citations by document and lists each with its page locator and section, so an answer can be traced to a document, a page, and a section. A grounded citation can also carry a verified excerpt, shown under Verified excerpt:.
Recording a voice message
The composer can transcribe a spoken message to text.
Proceed as follows to record a voice message:
- Click on the Dictate button (microphone icon) in the composer.
- The composer shows Words you speak will appear here… with a Recording — tap to stop status, and the microphone button turns into a filled waveform tile.
- Speak the message.
- Click on the button again to stop the recording, or click on STOP & SEND to stop the recording and send the message in one step.
- The button shows Transcribing… while the gateway transcribes the audio.
-> After the Dictate button: the transcribed text appears in the composer text field. Edit the text if required, then send the message.
-> After STOP & SEND: the button stays busy until the transcription arrives, then the message is sent including the words spoken last. If the transcription fails or is cancelled, nothing is sent and the message stays in the composer.
💡 Note: Pressing Enter while the recording runs does the same as STOP & SEND. And if the recording was stopped with the microphone button, pressing SEND while Transcribing… is shown also waits for the transcription — so the spoken words are never left out of the sent message.
💡 Note: While the send button is busy, the message is not sent yet. Clicking the microphone button cancels the transcription, and editing the text or switching to another conversation cancels the automatic send — in each case the message stays in the composer and can be sent with SEND. The same applies if the composer becomes unavailable while transcribing (for example when another user takes over a shared chat): nothing is sent and the text stays put.
💡 Note: Long recordings are supported. To keep them reliable, dictation stops automatically after about eight minutes and transcribes what was captured so far; continue in a new recording if you need to dictate more. A recording that is still too large to transcribe shows a short "recording too long" message.
💡 Note: On browsers that support the Screen Wake Lock API the screen stays awake while a recording or transcription runs — and likewise while a reply is streaming in any of your conversations, including one you have switched away from — and is released when that finishes.
💡 Note: Transcription runs on a European speech-to-text service. The gateway always re-encodes the recording before transcription (the browser's native audio formats cannot be transcribed directly), and it automatically retries the occasional empty result. If the service is momentarily busy, dictation shows a short "service is busy — try again in a moment" message; if the service is briefly unreachable, it shows a "temporarily unavailable — try again shortly" message instead. Both are transient — simply record again. If nothing was recognised in the audio, it shows a "didn't catch that" message.
Applying a personal style
The personal style applies the writing style from the profile of the user to the replies of the model. The toggle appears only when the profile contains writing-style notes.
Proceed as follows to turn the personal style on for a conversation:
- Click on the Add files, photos, or options button (the + button) in the composer.
- Click on Use style.
- Select the Personal style checkbox.
-> The Personal style chip appears above the composer. Click on the × on the chip to turn off the personal style for the current conversation only.
Using commands
A command is a personal prompt shortcut that inserts a saved prompt into the composer. Manage commands in the My commands view.
Proceed as follows to use a command:
- Type
/in the composer text field. - A list of the commands of the user appears. The typed part of the command name is highlighted in each suggestion.
- If the typed text matches no command, the list shows No matches for "/…". Pressing Enter then sends the typed text as a normal message.
- Select the command, or continue typing the command name to filter the list.
- The prompt of the command is inserted into the composer.
- If required, edit the inserted text.
- Press Enter, or click on the Send message button.
-> The message is sent with the prompt of the command as its content.
Reply actions
Every assistant reply carries the label AI-generated to mark the content as produced by the AI system, as required by the EU AI Act. The hover action row on a reply offers Copy, Read aloud, Regenerate, Report, Comment, Edit this answer, New chat from here, and the Download menu.
💡 Note: A code block inside a reply carries its own Copy button in the top-right corner that copies only that block. On a long code block the button stays visible while you scroll through the code.
Editing an answer
The Edit this answer action lets you fix a settled reply in place — for example correcting a typo or a wrong figure before you share or export the conversation. The correction is saved for display only and is not sent to the model: it changes what the conversation shows, not what the model was told, so a later turn still sees the model's original words.
Proceed as follows to edit an answer:
- Hover the reply and click on Edit this answer.
- The reply text becomes editable in place.
- Make your changes and save.
-> The reply shows an edited marker; choose Revert to original at any time to restore the model's original text. The action is offered only on a finished, plain-text assistant reply (not while streaming, and not on replies that carry a generated card, image, or error), and an edited answer is not shown as editable to viewers of a shared conversation.
Regenerating a reply
Proceed as follows to regenerate a reply with a reason:
- Click on the Regenerate button on the reply.
- A menu of reasons opens: Try again, Too long, Too short, Too formal, Too casual, Off topic, and Inaccurate.
- Select a reason.
-> The model produces a new reply. The new reply carries a provenance chip Adjusted ·
While the new reply is being written, the previous reply stays on screen above it; the moment the new one is complete it takes the previous reply's place (there is never a moment with no reply). If the regeneration fails (for example, the model provider is unavailable), the previous reply is kept and the error appears beneath it — nothing is lost. When the failure was a provider outage or an expired access token, the error bubble offers its own Try again action to anyone who may regenerate (after a reload too, for a provider outage), which regenerates the reply exactly like Regenerate does; other failures keep their specific notice. A regenerate of a reply that used a tool (a connector, web search) runs the tool again, so the new reply carries current data. If you have scrolled up to re-read while regenerating, the view stays where you left it.
Commenting on a reply
Message comments let members of a project discuss a single reply.
Proceed as follows to comment on a reply:
- Click on the Comment button on the reply.
- The Comments dialog opens and lists the comment thread for the reply.
- Enter the comment in the Write a comment… field.
- If required, click on Mention to notify a project member.
- Click on the Comment button in the dialog.
-> The comment appears in the thread. Click on Resolve to mark a comment resolved, or Reopen to reopen it. A resolved comment shows Resolved by
Reading a reply aloud
The Read aloud action plays a completed reply as speech through an EU-hosted text-to-speech voice. The voice matches the language of the answer — German, English, French, Dutch, or Spanish — and a mixed-language answer is read in its dominant language. The control appears on an assistant reply once the reply has finished streaming.
Proceed as follows to hear a reply:
- Click on the Read aloud button on the reply.
- The button shows a busy state while the audio is prepared, then plays.
- If required, click on the Stop button to end playback.
-> The reply is played as audio. A reply that exceeds the length limit cannot be read aloud, and a message states this.
💡 Note: Before playback, numbers, dates, currency amounts, ranges, percentages, and abbreviations in the reply are rewritten into fully spoken form in the answer's own language, so read-aloud sounds natural. This runs entirely inside the EU boundary. See Text-to-speech (read aloud) for details.
Masked-input warning
When the gateway masked personal data in the corresponding user message, the reply shows a PII masked:
Follow-up suggestions
After a completed answer, the chat can show a row of Suggestions — up to a few short, clickable prompts below the last reply. They are next PROMPTS, phrased the way you would type them, so they are often instructions ("Summarise that more briefly") rather than questions. The suggestions are a best-effort aid: when none are available, no row is shown.
The suggestions are produced by a separate model call that carries the last question and answer. That call runs under the same project policy as the conversation itself: in a project with PII protection required it is masked, or refused when the gateway has no PII filter, and in a Local only project it is confined to local models. When the policy cannot be satisfied — or when the chat cannot determine which project the conversation belongs to — no suggestions appear. The automatically generated conversation title carries the same project binding. It prefers a local Myra model that may run on the conversation's gateway for your workspace, so it normally never leaves Myra. When no local model may run there — every local model disabled (a frontier-only gateway), none offered under the gateway's provider restriction, or none within your plan — the title runs on the model that answered the conversation, and is masked or refused under the project policy exactly like a turn. When no model answered (the turn itself was refused), no title is generated and the first message stays as the title.
- Click on a suggestion to send it as the next message.
- Click on Dismiss suggestions to hide the row for the current answer.
A new answer replaces the row with fresh suggestions. Suggestions are not shown on a private (ghost) turn, on an error, or on a blocked reply.
Generated files
When the model generates a file, the file appears as a card in the message thread. The card shows the file name and a format badge.
| Action | Control |
|---|---|
| View the file | Click on the card. The file opens in the artifact panel. |
| Download the original | Open the Download menu on the card and select Download original. |
| Export to another format | Open the Download menu on the card and select a format. |
The Download menu offers Download as PDF, Download as Word, Download as PowerPoint, Download as Excel, the three OpenDocument formats, Download as plain text, and Download as CSV. The gateway reports inline when a format does not fit the content — for example a CSV or Excel export of a reply that contains no table returns a No table found notice on that menu item.
💡 Note: Downloading a CSV or plain-text file writes a UTF-8 byte-order mark at the start of the file, so Microsoft Excel and Windows Notepad open German umlauts (ä, ö, ü, ß) correctly. JSON and code downloads are written byte-for-byte without a marker, as their parsers require.
Office-named files download as real documents. A generated file whose name is an
Office or PDF format (report.docx, folien.pptx, tabelle.xlsx, .odt/.odp/.ods,
.pdf) is stored as text but is rendered into the real document when you download it —
the card's and the artifact panel's download button run the same server-side conversion as
the Download menu, so the file opens correctly in Word, PowerPoint, Excel, or the
OpenDocument applications. If the conversion is not possible (for example an Excel name on
a text with no table), the error appears at the card instead of a broken file. The
assistant cannot produce other binary formats (images, archives, legacy .doc/.xls/
.ppt) — a file-write under such a name is refused and the assistant is asked to pick a
document or plain-text name instead.
Generated-image actions
A generated image shows a Copy image button and a Download original button. The Copy image button is shown only where the browser can place an image on the clipboard.
Proceed as follows to copy a generated image:
- Locate the generated image in the reply, or open it in the lightbox.
- Click on the Copy image button.
-> The image is placed on the clipboard. If the copy fails, the button shows Copy failed.
Artifact preview
Selecting a generated-file artifact card opens the artifact panel beside the thread, with Code, Split, and Preview views. HTML and SVG artifacts render as a static preview. A Markdown artifact's preview renders formatted — GitHub-flavored tables, lists, and links appear exactly as they do in a chat message, and the panel's open-in-new-tab action opens the same rendered document.
💡 Note: An artifact preview has no network access. External stylesheets, web fonts, CDN scripts, remote images and API calls are all blocked, so an artifact must be self-contained — its CSS and JavaScript inline, its images and fonts embedded as
data:URIs. The assistant is instructed to produce artifacts that way; if one still references something external, that part of the page simply does not load (typically an unstyled or blank preview). The file itself is unaffected — downloading it and opening it locally works normally.
The Open in new tab button (the pop-out icon in the panel header) opens the artifact full-size in a new browser tab. The tab shows a short note that the content is AI-generated and is displayed in an isolated preview: the artifact runs with no access to the workspace, its data, or the session — exactly as in the panel preview. If the tab cannot be opened — a pop-up blocker, an app wrapper without multi-window support, or an artifact too large to hand over — the panel says which, and the artifact stays available in the panel preview and as a download. Reloading the opened tab re-fetches the artifact from the chat tab, so it keeps working as long as the artifact panel is still open there; once the panel is closed, a reload shows a note pointing back to the chat.
When an artifact has more than one version (for example after asking for a revision), the panel's version navigator offers a Diff toggle that shows a line-level comparison of the current version against the previous one — added lines in green, removed lines in red, with old and new line numbers. Long runs of unchanged lines are collapsed to keep the comparison readable. React/JSX/TSX artifacts (a component with a default export) render as a live, interactive preview — buttons, inputs, and state work as they would in a running app.
The interactive preview runs the model-generated component in a sandboxed frame that is isolated from the application: it cannot read your session cookie, browser storage, or the page around it, and it cannot make any network request. A component that fails to compile, throws while rendering, is too large, or reports nothing to display shows an inline notice with a Run again action and leaves the code view fully usable.
Known limitation: because the preview runs in the page for the highest fidelity, a component with an unintentional infinite loop can make the browser tab unresponsive on some browsers (Firefox, Safari, and mobile Chrome) until the page is reloaded. Desktop Chrome contains such a component automatically. The code of the artifact is always available in the Code view.
Editing an artifact
In the Code or Split view you can edit the artifact text directly, then Update Artifact to save it or Revert to discard your changes. Ask Claude to Revise hands the whole artifact plus your instruction back to the model.
Highlighting a span of text in the editor reveals a selection toolbar with writing shortcuts — Shorter, Longer, Simplify, Polish, Translate — and Edit selection… for a free-text instruction. Any of these asks the model to rewrite only the highlighted span and return the updated document as a new version, leaving the rest unchanged. The request is prepared in the composer, so you can review or adjust it before sending. The selection toolbar is available in the raw-source editor; switch a document artifact to Source to use it.
Rich-text editing
Markdown/document artifacts open in a Rich text WYSIWYG editor by default: headings, lists, emphasis, inline code, and links render formatted and are edited in place, like a word processor. A Rich text / Source toggle at the top of the editor switches to the raw markdown at any time; both edit the same document, so switching never loses your changes.
The markdown source stays the single source of truth — the rich editor serializes your edits straight back to markdown on every change, and a saved document round-trips to the same source. Constructs the rich editor does not yet edit inline (fenced code blocks, tables, blockquotes, and raw HTML) are shown as read-only blocks with their exact source preserved; switch to Source to edit them. The artifact body is treated as untrusted: any embedded HTML or script is shown as inert text and never executed, and links with unsafe schemes are dropped. Code, React/JSX, HTML, and SVG artifacts keep the raw-source editor only.
Guardrail block
When a guardrail on the workspace rejects a request, the reply is replaced by a block bubble that names the reason. When the reason is a temporarily unavailable safety check, the bubble on the latest message also offers a Try again action (not to a read-only viewer of a shared conversation); a policy block offers none — rephrase instead. The block bubble is the same whether the block happens live or the conversation is reloaded later.
| Reason | Bubble |
|---|---|
| Content policy | Blocked by the content policy — the request violates the usage policy for the workspace. |
| Privacy required | Privacy protection required — the project requires personal data to be protected, but the selected gateway has no privacy filter. Switch to a privacy-enabled gateway to continue. |
| Attachment not scannable | Attachment couldn't be checked for personal data — a PDF, image, or audio attachment could not be scanned for personal data. |
| Guardrail unavailable | Safety check temporarily unavailable — a safety guardrail is temporarily unavailable, so the request was rejected. Try again in a few moments. An attachment sent with the blocked request stays in that blocked turn — Try again re-sends it, no re-upload needed. |
| Document too large | Document too large to check right now — this document is too large to scan for personal data right now. Please try again in a few moments. This is retryable, so the bubble offers Try again. |
| Model not available for your role | Model not available for your role — the selected model isn't available for your role on this workspace. Choose a model included in your role's allowance, or contact your admin if you think this is a mistake. |
Proceed as follows to retry after a guardrail block:
- Read the reason in the block bubble.
- If the reason is content policy, rephrase the request in the composer.
- After a temporarily unavailable safety check, click on the Try again action (an attachment on the blocked request is re-sent with it); after a content-policy block, send the rephrased request.
-> The request is sent again. Contact the admin if you think the block is a mistake.
A blocked message does not stay in the conversation's history: the rejected request and its block bubble remain visible so the record is honest, but neither is sent to the model again on the following messages. The conversation therefore keeps working normally afterwards — the next message is judged on its own content, not on the one that was rejected.
Recent chats
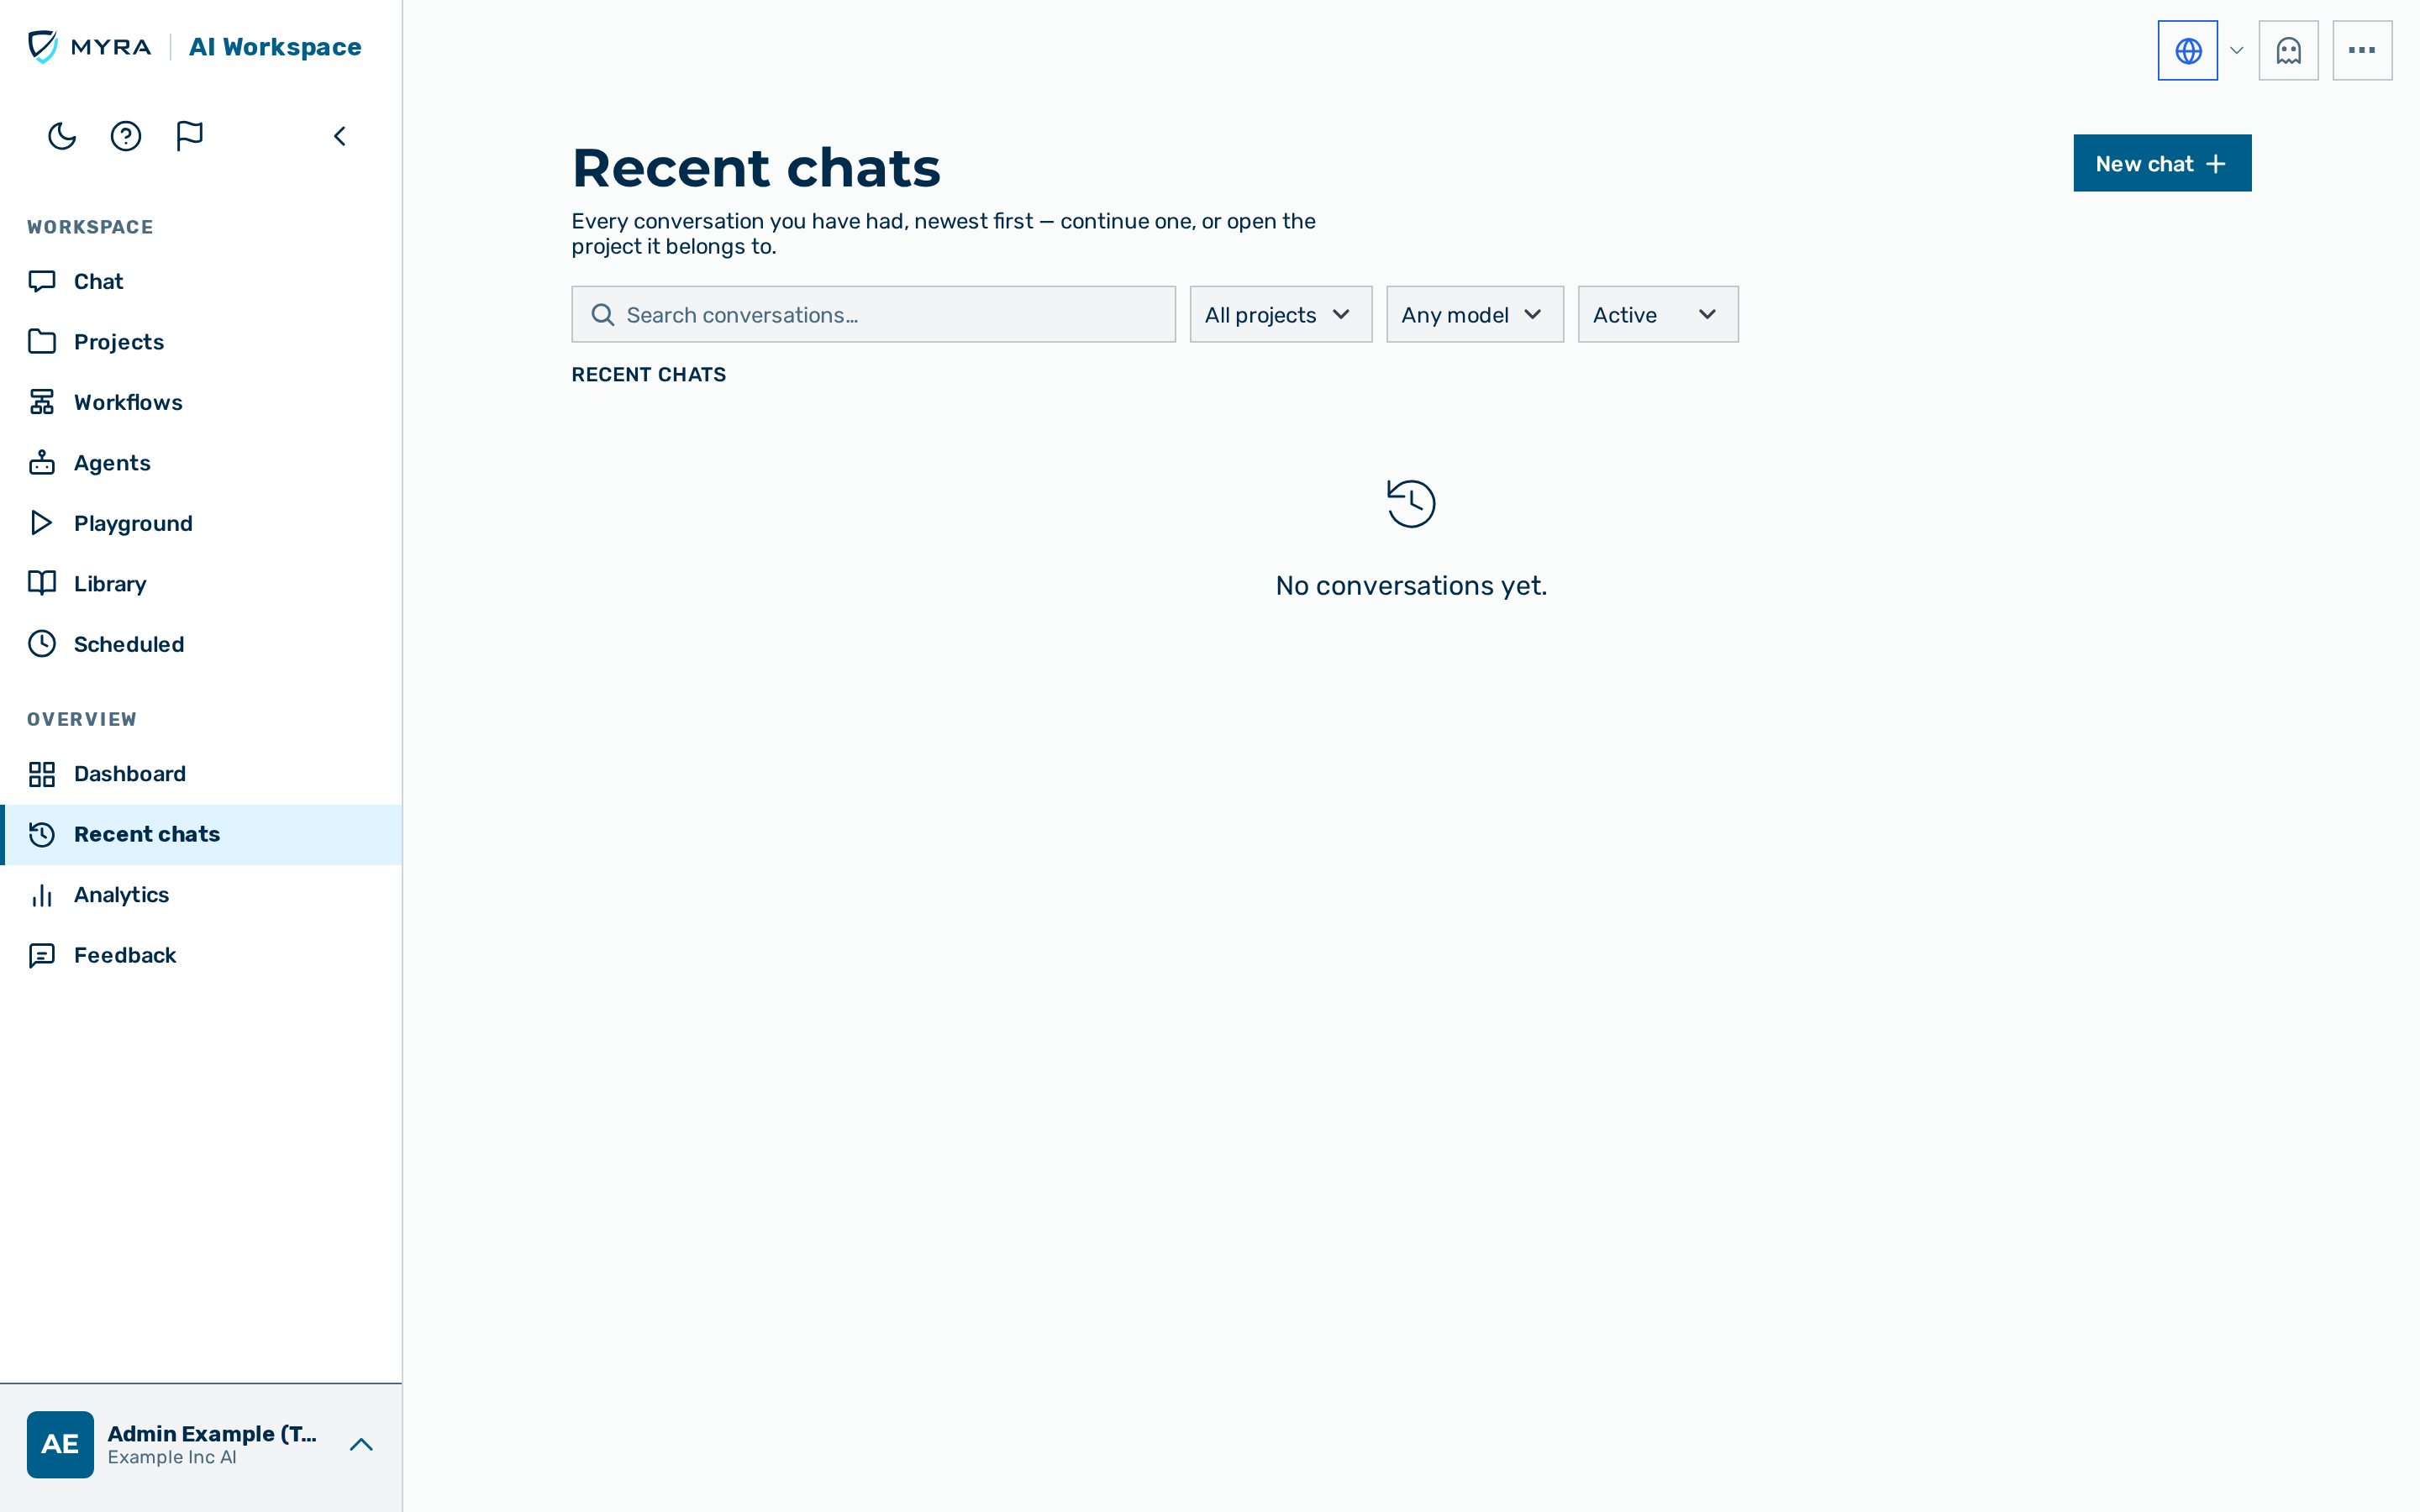
Every conversation is listed on the Recent chats page at /easy/recents, reached from the Recents entry in the app rail (see Interface overview). The page replaces the former docked conversation drawer. It shows a header with a primary New chat button, a filter row, and a table of conversations, newest first.
Filter row — always visible above the table. The filter row holds the controls below.
- A Search conversations… field. In the Active view the search runs on the server; in the Archived view it filters the loaded rows.
- An All projects drop-down list that limits the table to one project.
- An Any model drop-down list that limits the table to one model.
- A Status drop-down list that switches between Active and Archived conversations.
Table — one row per conversation, with the columns Conversation, When, Model, Project, Turns, and Actions. A conversation opens from its title link in the Conversation column. The Load more button pages older conversations into the table.
Conversations are private. Only the user who created a conversation can see it. The active conversation is reflected in the browser URL as /easy/c/<id>, which links directly to that conversation.
A conversation whose first message could not be saved (see Starting a conversation) is listed under the title taken from that message until you delete it; opening it shows the empty state and a working composer.
Conversation history actions
The Actions column on each row holds an icon cluster. The table below lists the row and page actions.
| Action | Control |
|---|---|
| Open a conversation | Click on the conversation title, or click on the Continue icon in the row. |
| Start a new conversation | Click on the New chat button in the page header. |
| Find a conversation | Enter a term in the Search conversations… field. |
| Filter by project | Select a project in the All projects drop-down list. |
| Filter by model | Select a model in the Any model drop-down list. |
| Rename a conversation | Click on the Rename icon in the row, edit the title in place, then press the Enter key. |
| Share a project conversation | For a conversation in a project, click on the Share icon in the row. |
| Archive a conversation | Click on the Archive icon in the row. |
| Show archived conversations | Select Archived in the Status drop-down list. |
| Restore an archived conversation | Select Archived in the Status drop-down list, then click on the Restore icon in the row. |
| Delete a conversation | Click on the Delete icon in the row, then confirm in the dialog. |
💡 Note: The conversation rows support keyboard navigation. The Arrow Up and Arrow Down keys move between rows, the Home and End keys jump to the first and last row, and the Enter key opens the highlighted conversation.
Per-conversation options
The More options menu (⋯) on the active conversation offers Download PDF, Download Markdown, Share conversation, Memories, and Session feedback. In a project, the menu also shares the conversation to the project feed and starts a live session (see Shared conversations).
Exporting a conversation
Proceed as follows to export the whole conversation:
- Open the More options menu (⋯) on the active conversation.
- Select Download PDF or Download Markdown.
-> The conversation downloads in the selected format.
💡 Note: A single reply carries its own Download menu for a per-reply export in more formats (see Generated files).
Sharing a conversation
A share link lets anyone view a conversation in a read-only page without signing in.
Proceed as follows to share a conversation:
- Open the More options menu (⋯) on the active conversation.
- Select Share conversation.
- The Share conversation dialog opens and generates a link.
- Click on the Copy button.
-> The recipients open the link to view the conversation. A recipient who clicks on Continue this conversation receives their own copy; a signed-out recipient is asked to sign in first and lands on the copy afterwards (see Returning to the requested page). Click on the Revoke link button in the dialog to stop the link from working. See Shared conversations.
Rating a conversation
Session feedback records a rating (5 = best, 1 = worst) and an optional comment for a conversation.
Proceed as follows to rate a conversation:
- Open the More options menu (⋯) on the active conversation.
- Select Session feedback.
- The session-feedback dialog opens.
- Select a rating and, if required, enter a comment.
- Submit the feedback.
-> The rating is saved for the conversation.
Memory
The memory system lets the model remember facts, preferences, and instructions about the user across conversations. The gateway injects the memories into the system prompt automatically.
Saved memory content is encrypted at rest in the database (AES-256, the same cryptographic facade that protects BYOK provider keys and OAuth secrets).
Open the More options menu (⋯) on the active conversation and select Memories to review or manage the memories of a conversation. Each memory has a type — Fact, Preference, or Instruction — and a memory the model suggested carries an auto badge.
Proceed as follows to add a memory:
- Enter the memory in the Add a memory… field.
- Click on the Add button.
-> The memory appears in the list.
💡 Note: Each memory scope holds at most 50 memories — your personal scope, and a separate pool per project. When a scope is full, adding another is refused with a memory limit reached for this scope message rather than silently dropping the oldest; delete one to make room. Memories are injected in their listed order, so a higher-ranked memory takes precedence.
Proceed as follows to reorder memories:
- Locate the drag handle on a memory row.
- Drag the row to its new position.
-> The new order is saved.
Reviewing suggested memories
When the assistant infers a durable fact, preference, or instruction during a conversation, it proposes it in a Save these memories? dialog. Each proposal is decided on its own.
Proceed as follows to decide a suggested memory:
- Read the proposed memory in the dialog.
- If required, edit the text in the Memory text field.
- If the proposal is wrong, click on the Reject button.
- To restore a rejected proposal, click on the Undo button.
- Click on the Save button.
-> Each accepted or edited memory is added to the list. A rejected proposal is not saved.
💡 Note: Closing the dialog without saving records no decision — a dismiss is not a rejection, and the proposals are offered again later.
To start a conversation without the memories, click on the Memories toggle in the top bar of the start screen before sending the first message. The conversation then proceeds without any memory context.
Ghost mode
Ghost mode keeps a conversation in memory only. No messages are saved to the database, and no request logs are created. Files the assistant generates are not stored either — including when the conversation is opened inside a project, where they are not added to the project's knowledge base. They are still delivered: a download card appears in the reply, but the file lives only in your browser, so download it before you leave the conversation. The assistant also does not propose new memories to save in a ghost conversation, so nothing the model infers there becomes durable — but your existing memories are still injected, so the conversation keeps the context it already has. Your account preferences (preferred name, work role, and custom instructions) are also applied, exactly as in a normal conversation: ghost mode only stops data from being saved, never from being loaded.
Proceed as follows to start a conversation in ghost mode:
- Click on the Ghost mode toggle in the top bar of the start screen.
- The toggle shows that ghost mode is on.
- Enter the message and send it.
-> The conversation is kept in memory only and is lost when you leave the page.
💡 Note: Ghost mode is chosen on the start screen, before the first message. A saved conversation cannot be switched to ghost mode after it starts.
Extended thinking display
When extended thinking is enabled, the reasoning of the model appears in a collapsible Thinking block above the response. The block shows the duration of the thinking phase. Click on the block header to expand or collapse it.
Automatic context management
When a conversation approaches the context limit of the model, earlier messages are summarised automatically. The summary replaces the original messages in the context sent to the model. The conversation continues without interruption.
Long or stuck tool-using answers
Some answers use tools (web search, file reads, the code interpreter) over several steps. Two limits protect you from a run that never finishes, and neither one leaves you without an answer:
- The per-turn step limit. A single answer runs at most a fixed number of tool steps. When a long multi-step task reaches that limit, the assistant delivers its best answer so far and shows a Continue button on that message. Clicking Continue resumes the same task in a new turn, picking up where it left off. The button appears on the latest message only, and not for a read-only viewer of a shared conversation.
- A stuck tool. If a tool keeps returning the same (or an empty) result, the assistant stops repeating it and answers from its own knowledge instead, with a short note saying it did so — double-check anything time-sensitive. You are never asked to simply "rephrase" without getting an answer.
Both behaviours are the same whether the answer streams live or the conversation is reloaded later; the explanatory note is part of the saved message. (The Continue button itself is offered during the live session.)
Jump to latest message
When the message thread is scrolled up — away from the newest message — a Jump to latest message button appears in the bottom-right corner of the thread, above the composer.
Proceed as follows to return to the latest message:
- Click on the Jump to latest message button.
-> The thread snaps to the newest message and the button disappears. The button reappears whenever the thread is scrolled away from the bottom.
While a reply streams in, your question stays at the top of the thread and the reply grows below it, so you keep your question and the start of the answer in view. As soon as the reply extends past the bottom of the thread, the Jump to latest message button appears; click it — or scroll down to the bottom yourself — to follow the reply as it grows. Scroll up at any time to stop following; the thread then stays where you left it, also when the reply finishes.
Empty and error states
- When no model is available, the model picker shows No models available. When the model catalogue fails to load, the picker shows Couldn't load models.
- When the conversation list fails to load, the drawer shows Couldn't load your chats. with a retry control.
- When a new conversation cannot be started for an unexpected reason, the composer shows Something went wrong starting the chat. Please try again in a moment. — a raw error code is never shown to the user.
- When the workspace prepaid balance is exhausted and you can manage the wallet, a message that a request could not be sent offers an Add budget action that opens the wallet, rather than the upgrade or contact path. See Billing & plans.
Permissions
Chat is available to every authenticated user. The models a user can pick depend on the gateways available to the tenant of the user.
See also
- Projects — workspaces with shared instructions and files
- Shared conversations — public share links and live rooms
- My PII configuration — personal masking keywords
- My commands — personal slash-commands
- My MCP Connectors — connecting personal tool servers
- Web search — live search augmentation
- Playground — side-by-side multi-model comparison