MCP Connectors
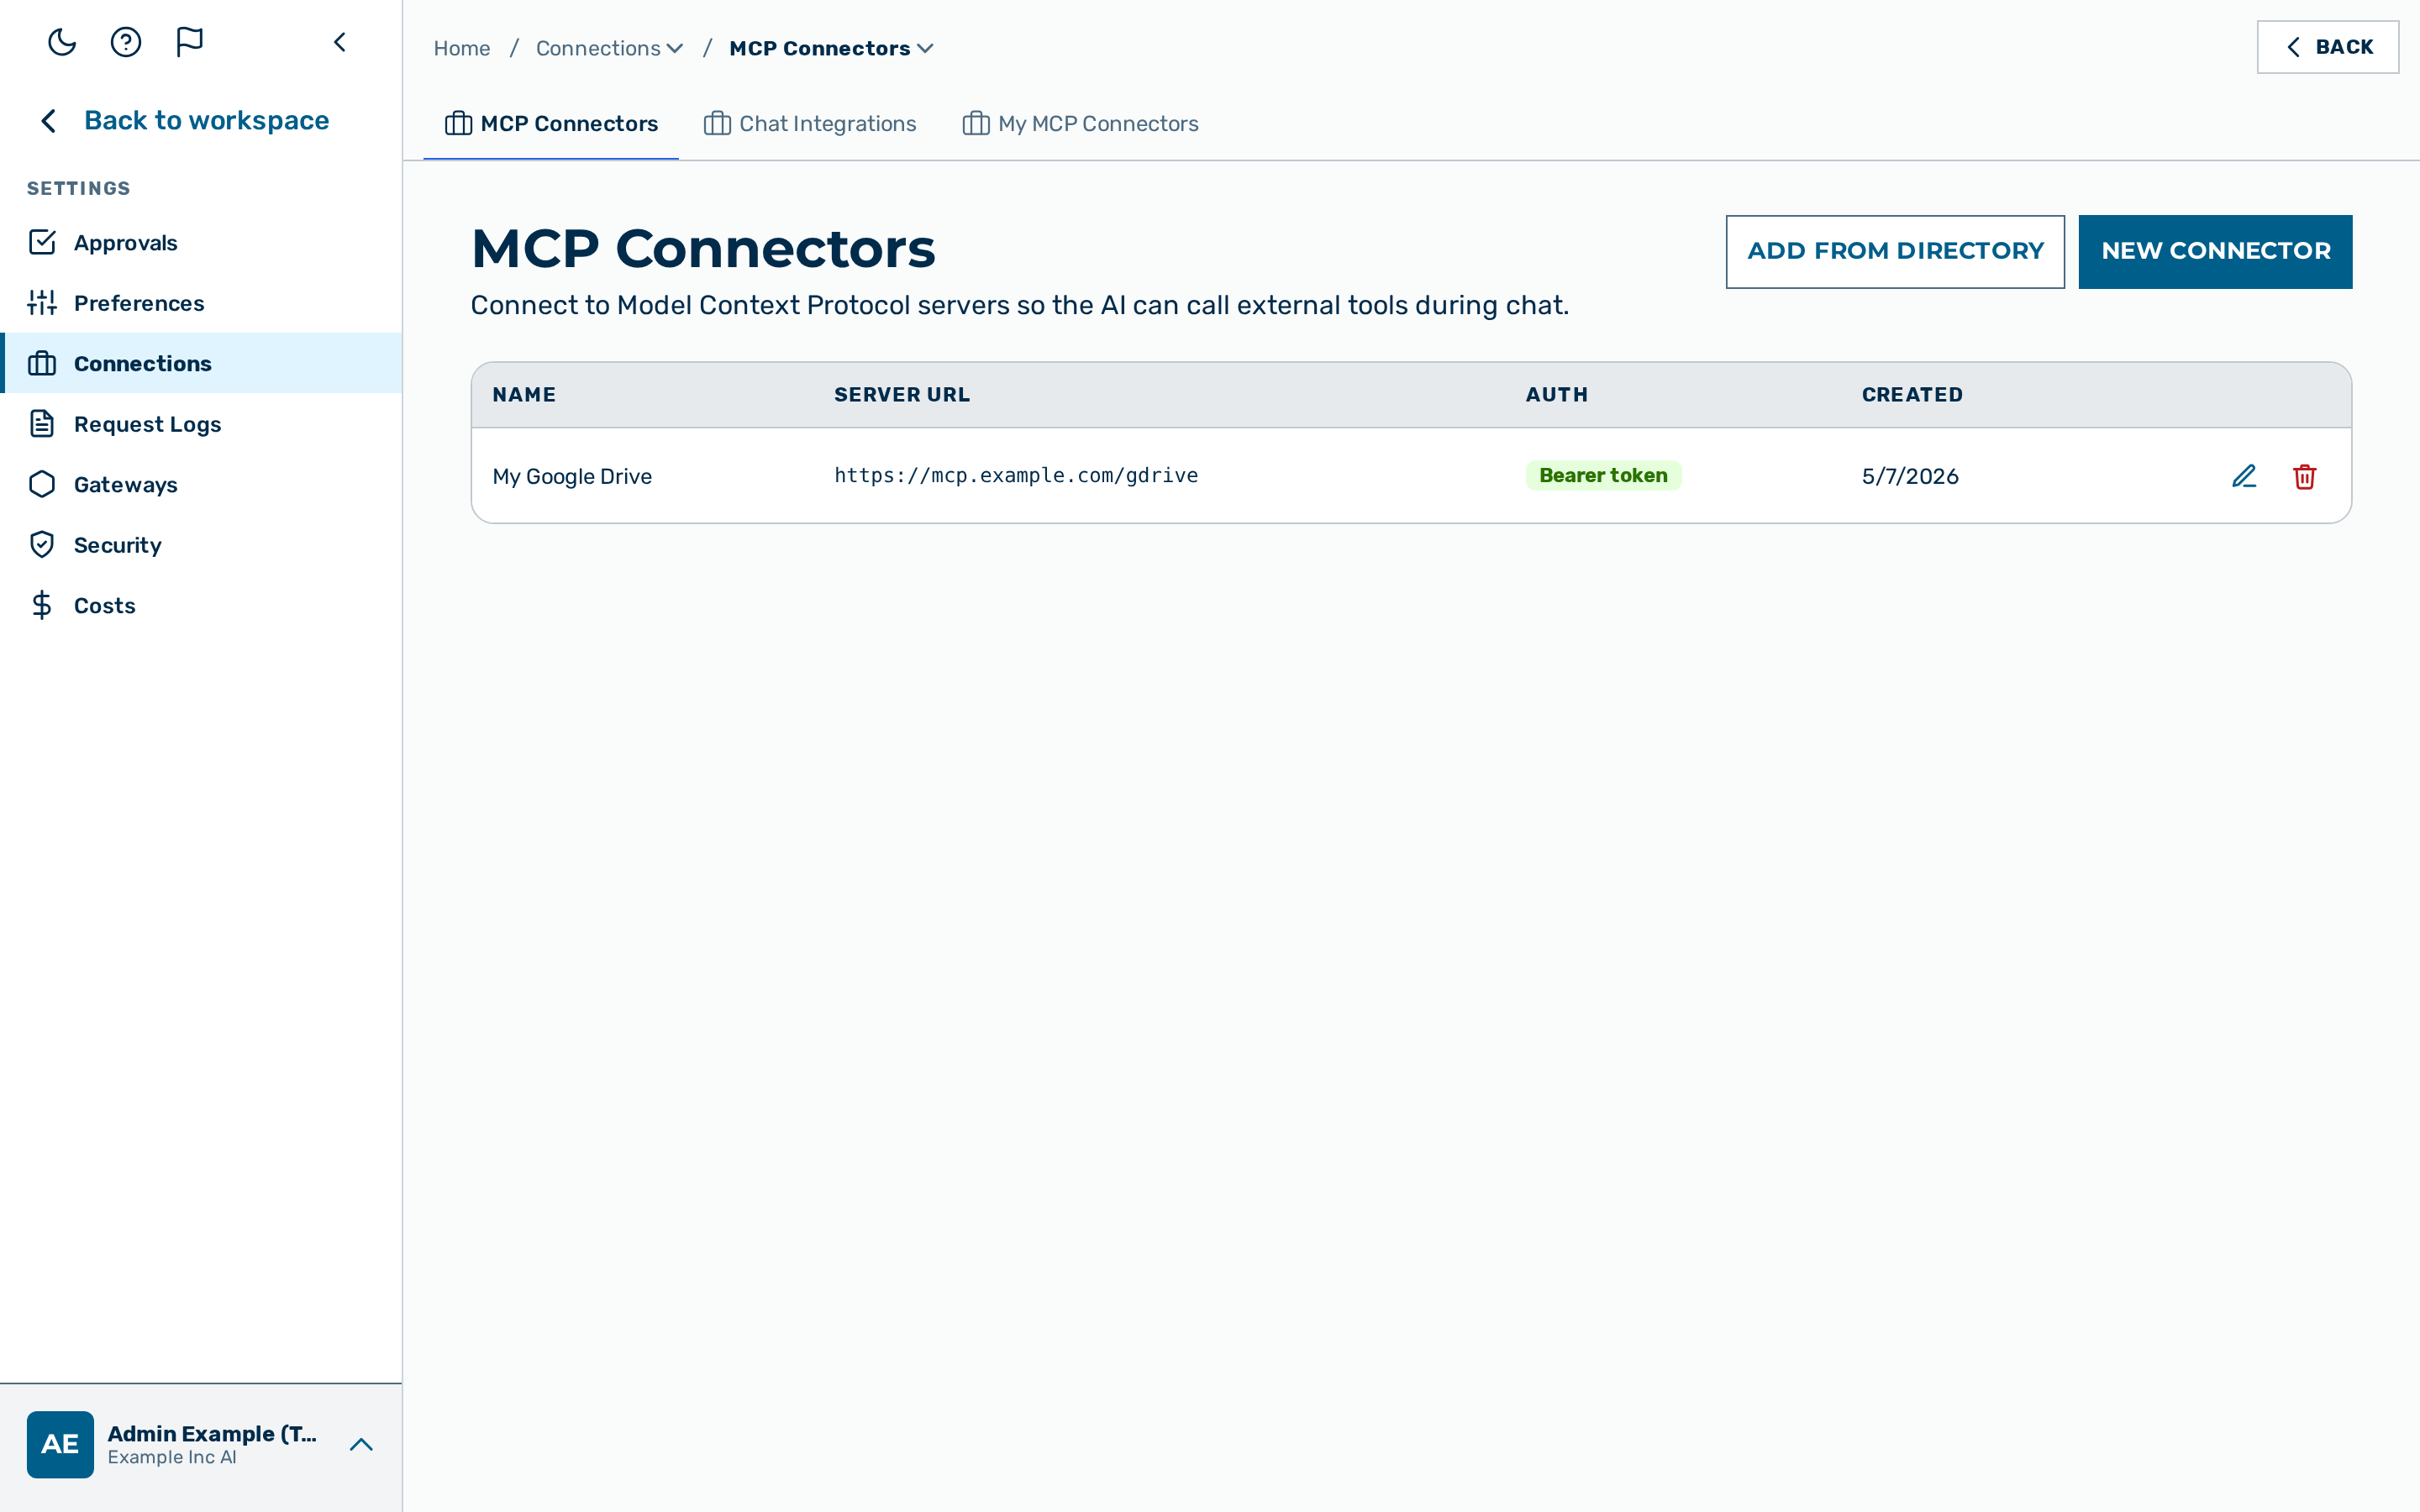 The MCP Connectors view.
The MCP Connectors view lets you register external tool servers that implement the Model Context Protocol (MCP). Once a connector is registered, the AI can discover and call the tools exposed by the MCP server during chat conversations.
The view is the MCP Connectors tab of Settings › Connections, reached from the user-block menu at the bottom of the left sidebar → Settings → Connections (route /mcp unchanged), and is available to users with the admin or tenant_admin role.
How MCP connectors work
When you open a chat conversation, the gateway queries each registered MCP connector via a tools/list call. The tools returned are added to the model's available functions. If the model decides to use a tool, the gateway forwards the call to the appropriate MCP server, receives the result, and feeds it back into the conversation automatically.
This loop runs entirely server-side: the gateway resolves the connector (referenced as tools: [{ type: "mcp", connector_id }]), calls the tool, and injects the tool_result back into the conversation itself — the client never sees the MCP server or handles the tool round-trip. See MCP API — using connectors from the inference API.
Adding a connector
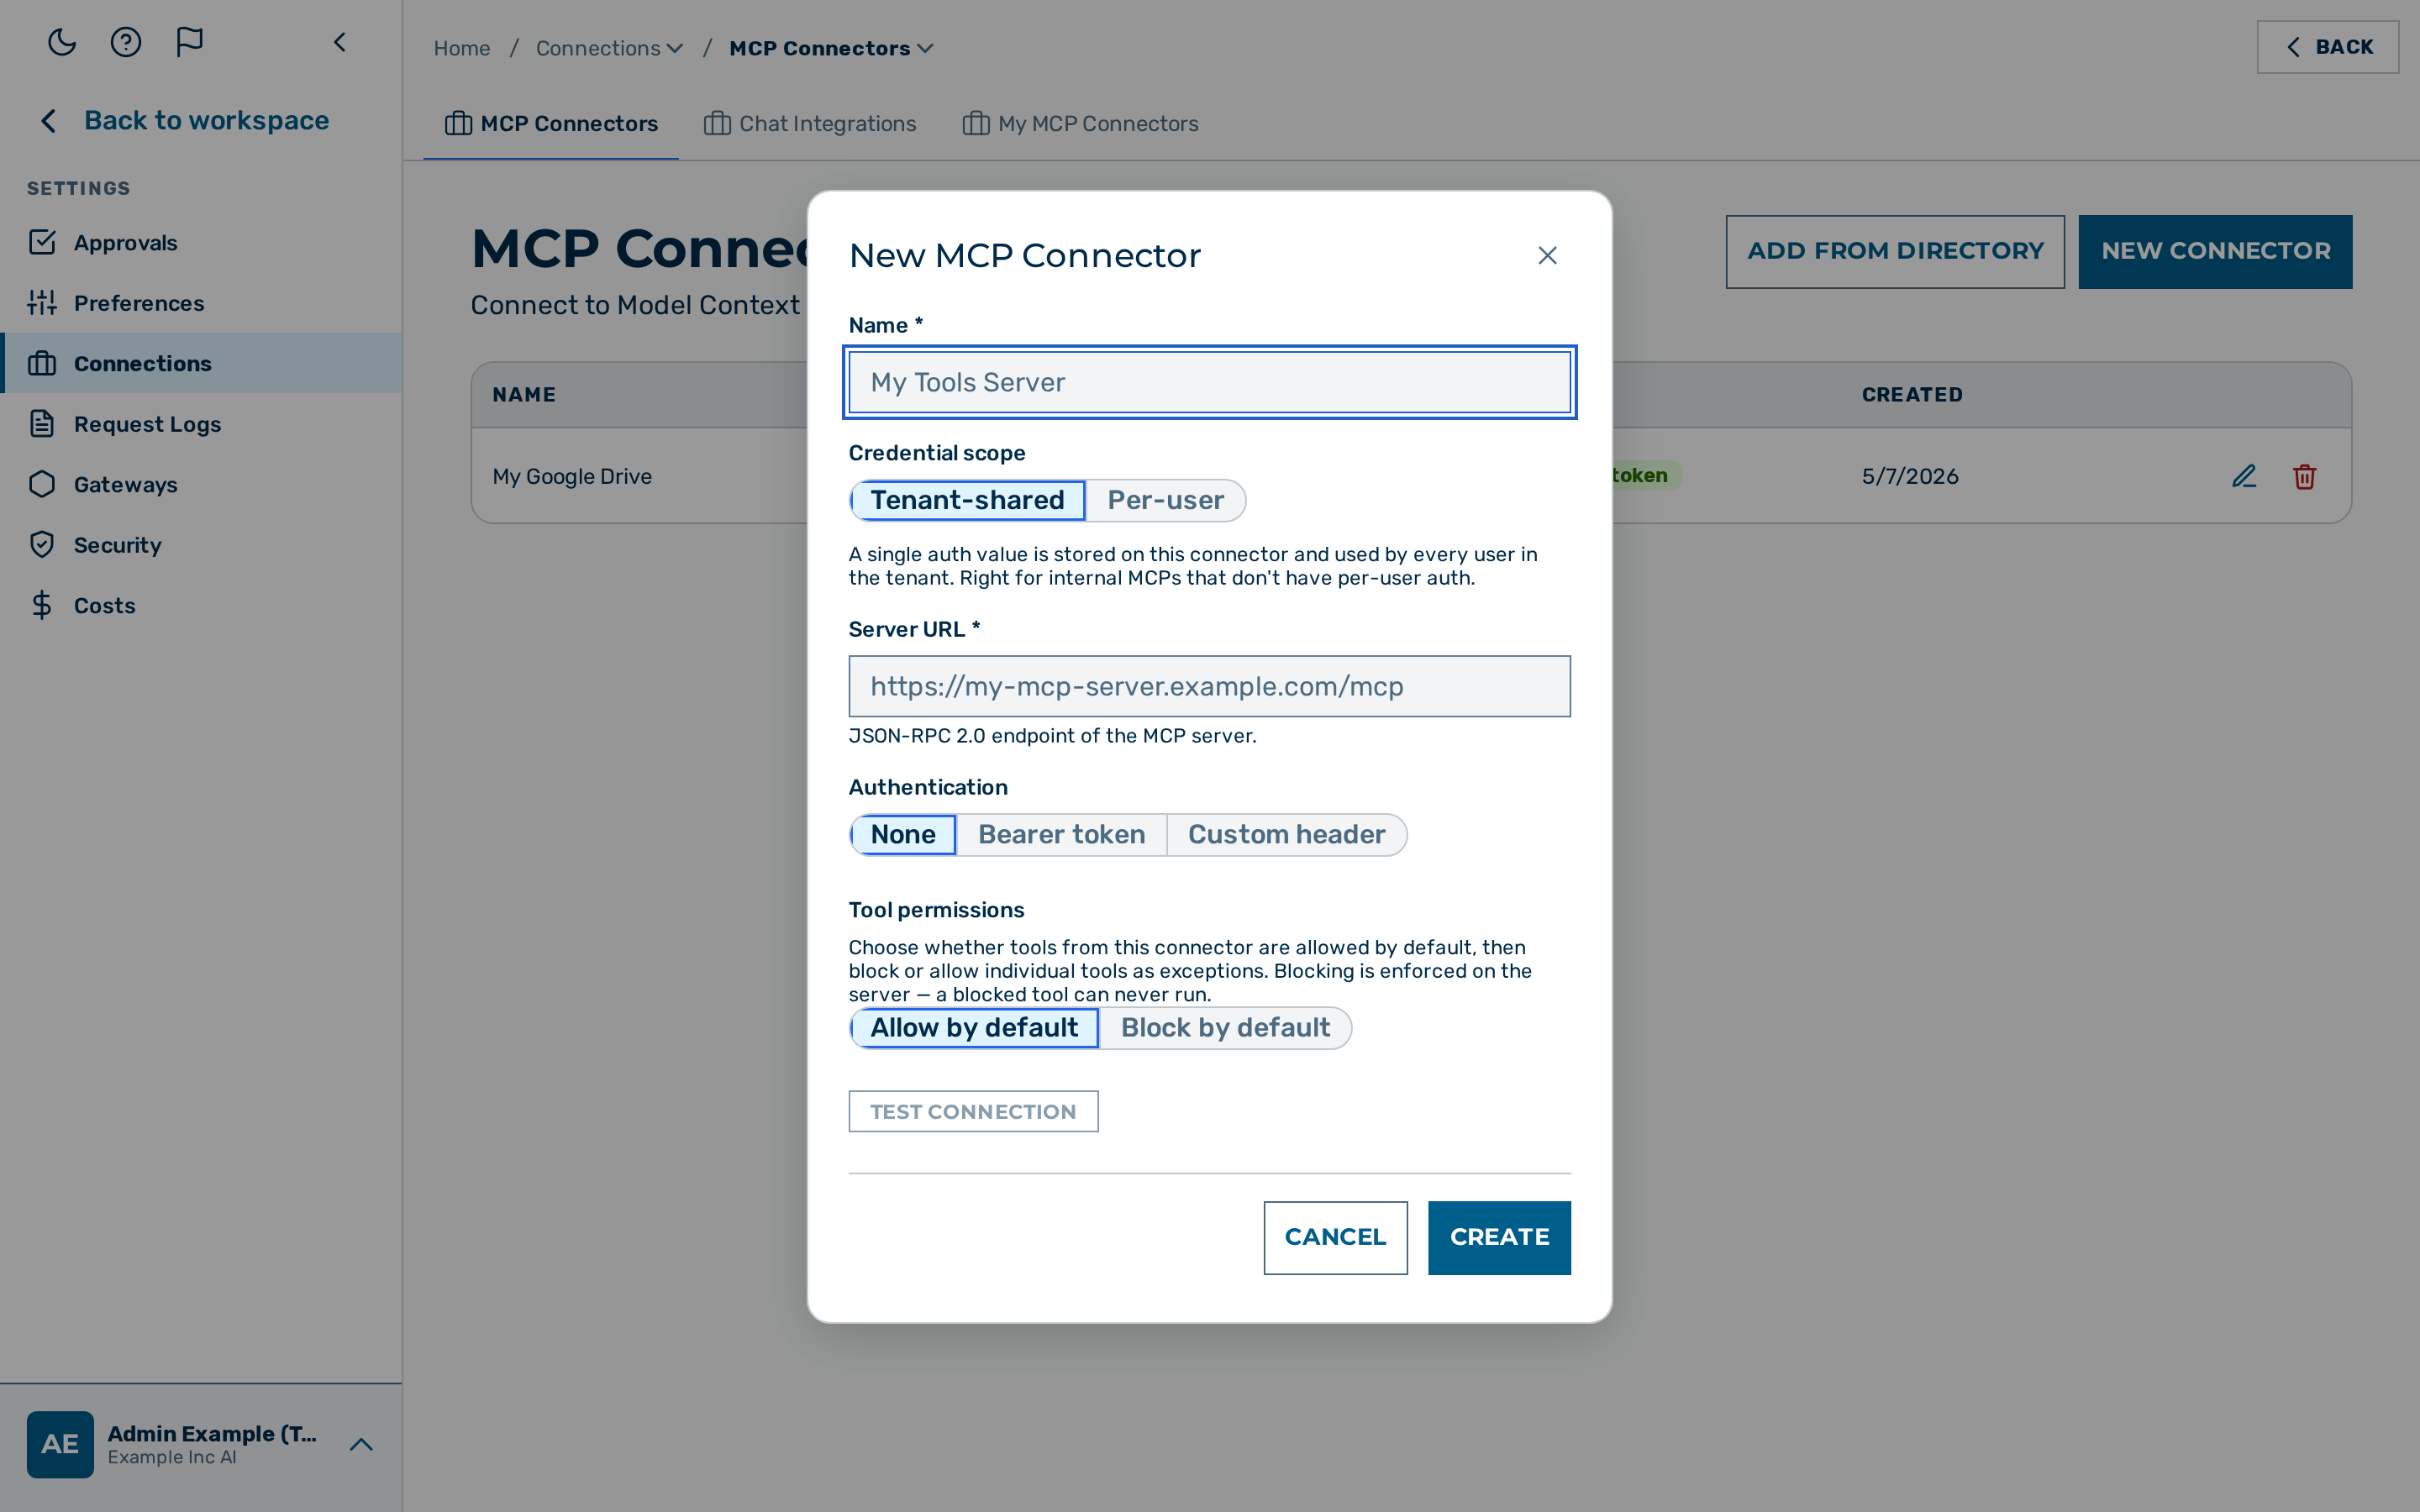
Proceed as follows to add an MCP connector:
- Click on MCP Connectors in the left sidebar.
- The MCP Connectors list opens.
- Click on the New connector button.
- The New MCP Connector dialog opens.
- Enter a name for the connector in the Name text field.
- Enter the URL of the MCP server endpoint in the Server URL text field.
- The URL must point to the JSON-RPC 2.0 endpoint of the MCP server (for example,
https://my-tools-server.example.com/mcp). - The URL must start with
http://orhttps://. OAuth sign-in and token URLs (in the advanced OAuth section of a user-scoped connector) must start withhttps://. A URL that breaks one of these rules is rejected when you save: the dialog stays open, shows the reason (for exampleserver_url must be an http(s):// URL (max 500 bytes)), and keeps what you typed so you can correct it. Nothing is saved until the URL is accepted. - Select the authentication method:
- None — no authentication header is sent.
- Bearer token — sends an
Authorization: Bearer <token>header. Enter the token in the field that appears. - Custom header — sends a custom HTTP header. Enter the header name and value in the format
Header-Name: header-value. - Click Create to save the connector.
- Optionally, reopen the saved connector and click Test connection to verify that the server responds correctly (the test runs through the gateway proxy and requires a saved connector).
-> The connector appears in the connectors table. The AI will discover its tools in the next chat session.
Microsoft 365 (SharePoint / OneDrive)
The directory includes the official Microsoft 365 connectors Microsoft SharePoint and Microsoft OneDrive. These reach a per-tenant Microsoft endpoint, so when you add one the dialog asks for your Microsoft Entra tenant ID (the Directory GUID from the Entra admin center, e.g. 00000000-0000-0000-0000-000000000000).
- Enter the tenant ID once. The gateway completes both the server URL and the Microsoft Entra sign-in URLs from it automatically — those fields are managed and cannot be edited later.
- Sign-in uses Microsoft Entra OAuth per user. Register an enterprise application in your Entra admin center and enter its client ID, client secret and scopes in the OAuth section. Include
offline_accessin the scopes plus the Work IQ resource scope (for example<app-id>/.default) so access can be refreshed without re-signing in. - Each user connects with their own Entra identity, so the connector only reaches content that user is already permitted to see.
For the full list of supported data sources, residency posture, and the self-hosted (fully sovereign) alternative, see Supported data-source types.
Salesforce
The directory includes the Salesforce connector, which reaches the Salesforce Hosted MCP server. Like the Microsoft 365 connectors, it is a per-organisation connector, so some fields are supplied at setup and cannot be substituted by the gateway.
- The server URL is templated from an environment (default
prod) and a server API name (defaultsobject-reads); the gateway completes the URL from those values. - Sign-in uses OAuth per user. Salesforce OAuth URLs are per-organisation, so an administrator registers an External Client App in the Salesforce org and enters the app's client ID, client secret, and the organisation's authorize and token URLs in the OAuth section. The required scopes are set by the gateway.
- Each user connects with their own Salesforce identity, so the connector only reaches records that user is already permitted to see.
Editing a connector
Proceed as follows to edit an existing connector:
- Click on MCP Connectors in the left sidebar.
- Click on the Edit button in the row of the connector you want to change.
- The Edit MCP Connector dialog opens with the current values pre-filled.
- Change the required fields.
- Click Save.
-> The changes take effect for new chat sessions.
Trusted subprocessor (structured-PII egress exemption)
On a PII-active gateway (or a tenant with PII masking enforced), the gateway blocks any outbound tool-call whose arguments carry protected structured personal data — a national ID, IBAN, card number, or a configured keyword — before it leaves for the connector's server. This applies to both the chat AI's tool calls and the workflow connector node. The data cannot be tokenised and still be usable by the tool, so the policy is to refuse the call, not scrub it. (Free-text names and places are always allowed.)
Marking a connector a trusted subprocessor exempts that one connector from this block: its tool arguments may then carry structured personal data. Turn it on only for a vetted EU/DPA subprocessor you have a data-processing agreement with — it widens what personal data can leave your tenant. The setting is off by default and cannot be changed through an ordinary connector edit (an ordinary Save never touches it); it has its own control, visible only to administrators with the governance-management permission, and it is never shown on the member My connectors page.
Because this is a governance-sensitive change, it goes through four-eyes approval:
- When a tenant administrator (or another governance-management role) flips the toggle, the change is submitted for approval rather than applied — it appears in the config-approvals inbox and takes effect only after a second administrator approves it. This holds even if your tenant's general four-eyes toggle is off (the trusted-subprocessor change is always two-person).
- A Myra platform administrator may set it single-handed (no second approver needed).
- A requester can never approve their own change (self-approval is refused).
Single-admin tenants: because a request cannot be self-approved, a tenant that has only one governance-management administrator cannot complete a trusted-subprocessor change on its own — the request will sit pending. In that case a Myra platform administrator applies it (the single-handed path above). Add a second governance administrator if you want to keep the change within your tenant.
Deleting a connector
Proceed as follows to delete a connector:
- Click on MCP Connectors in the left sidebar.
- Click on the Delete button in the row of the connector you want to remove.
- A confirmation dialog opens.
- Confirm the deletion.
-> The connector is removed. The AI will no longer have access to the tools it provided.
Authentication
Three authentication methods are available:
| Method | Description |
|---|---|
| None | No authentication header is sent. Use for publicly accessible MCP servers. |
| Bearer token | Sends Authorization: Bearer <token> with every request. The token is stored encrypted and is not returned in list responses. |
| Custom header | Sends a single custom HTTP header. Use for servers that require a proprietary API key header such as X-Api-Key. Enter the header in the format Header-Name: header-value. |
The authentication value is visible only when you open the edit dialog for an individual connector. It is never included in list responses.
Testing the connection
The Test connection button in the connector form sends a JSON-RPC tools/list call to the configured server URL using the provided authentication. The result is displayed next to the button:
- Connected ✓ — \<N> tool(s) found — the server responded and its tools were listed.
- Connect required — add your credential first. — the connector needs a credential you have not yet supplied.
- Error: \<message> — a network, timeout, or server error occurred.
The test runs server-side, through the gateway proxy (never a direct browser fetch) — so an internal-network MCP server the browser cannot reach is still testable, and the same egress path the live tool loop uses is exercised. The connector must be saved first: for a new connector, save it, then use Test connection. (The per-user connectors form under My connectors has no test button.)