Projects
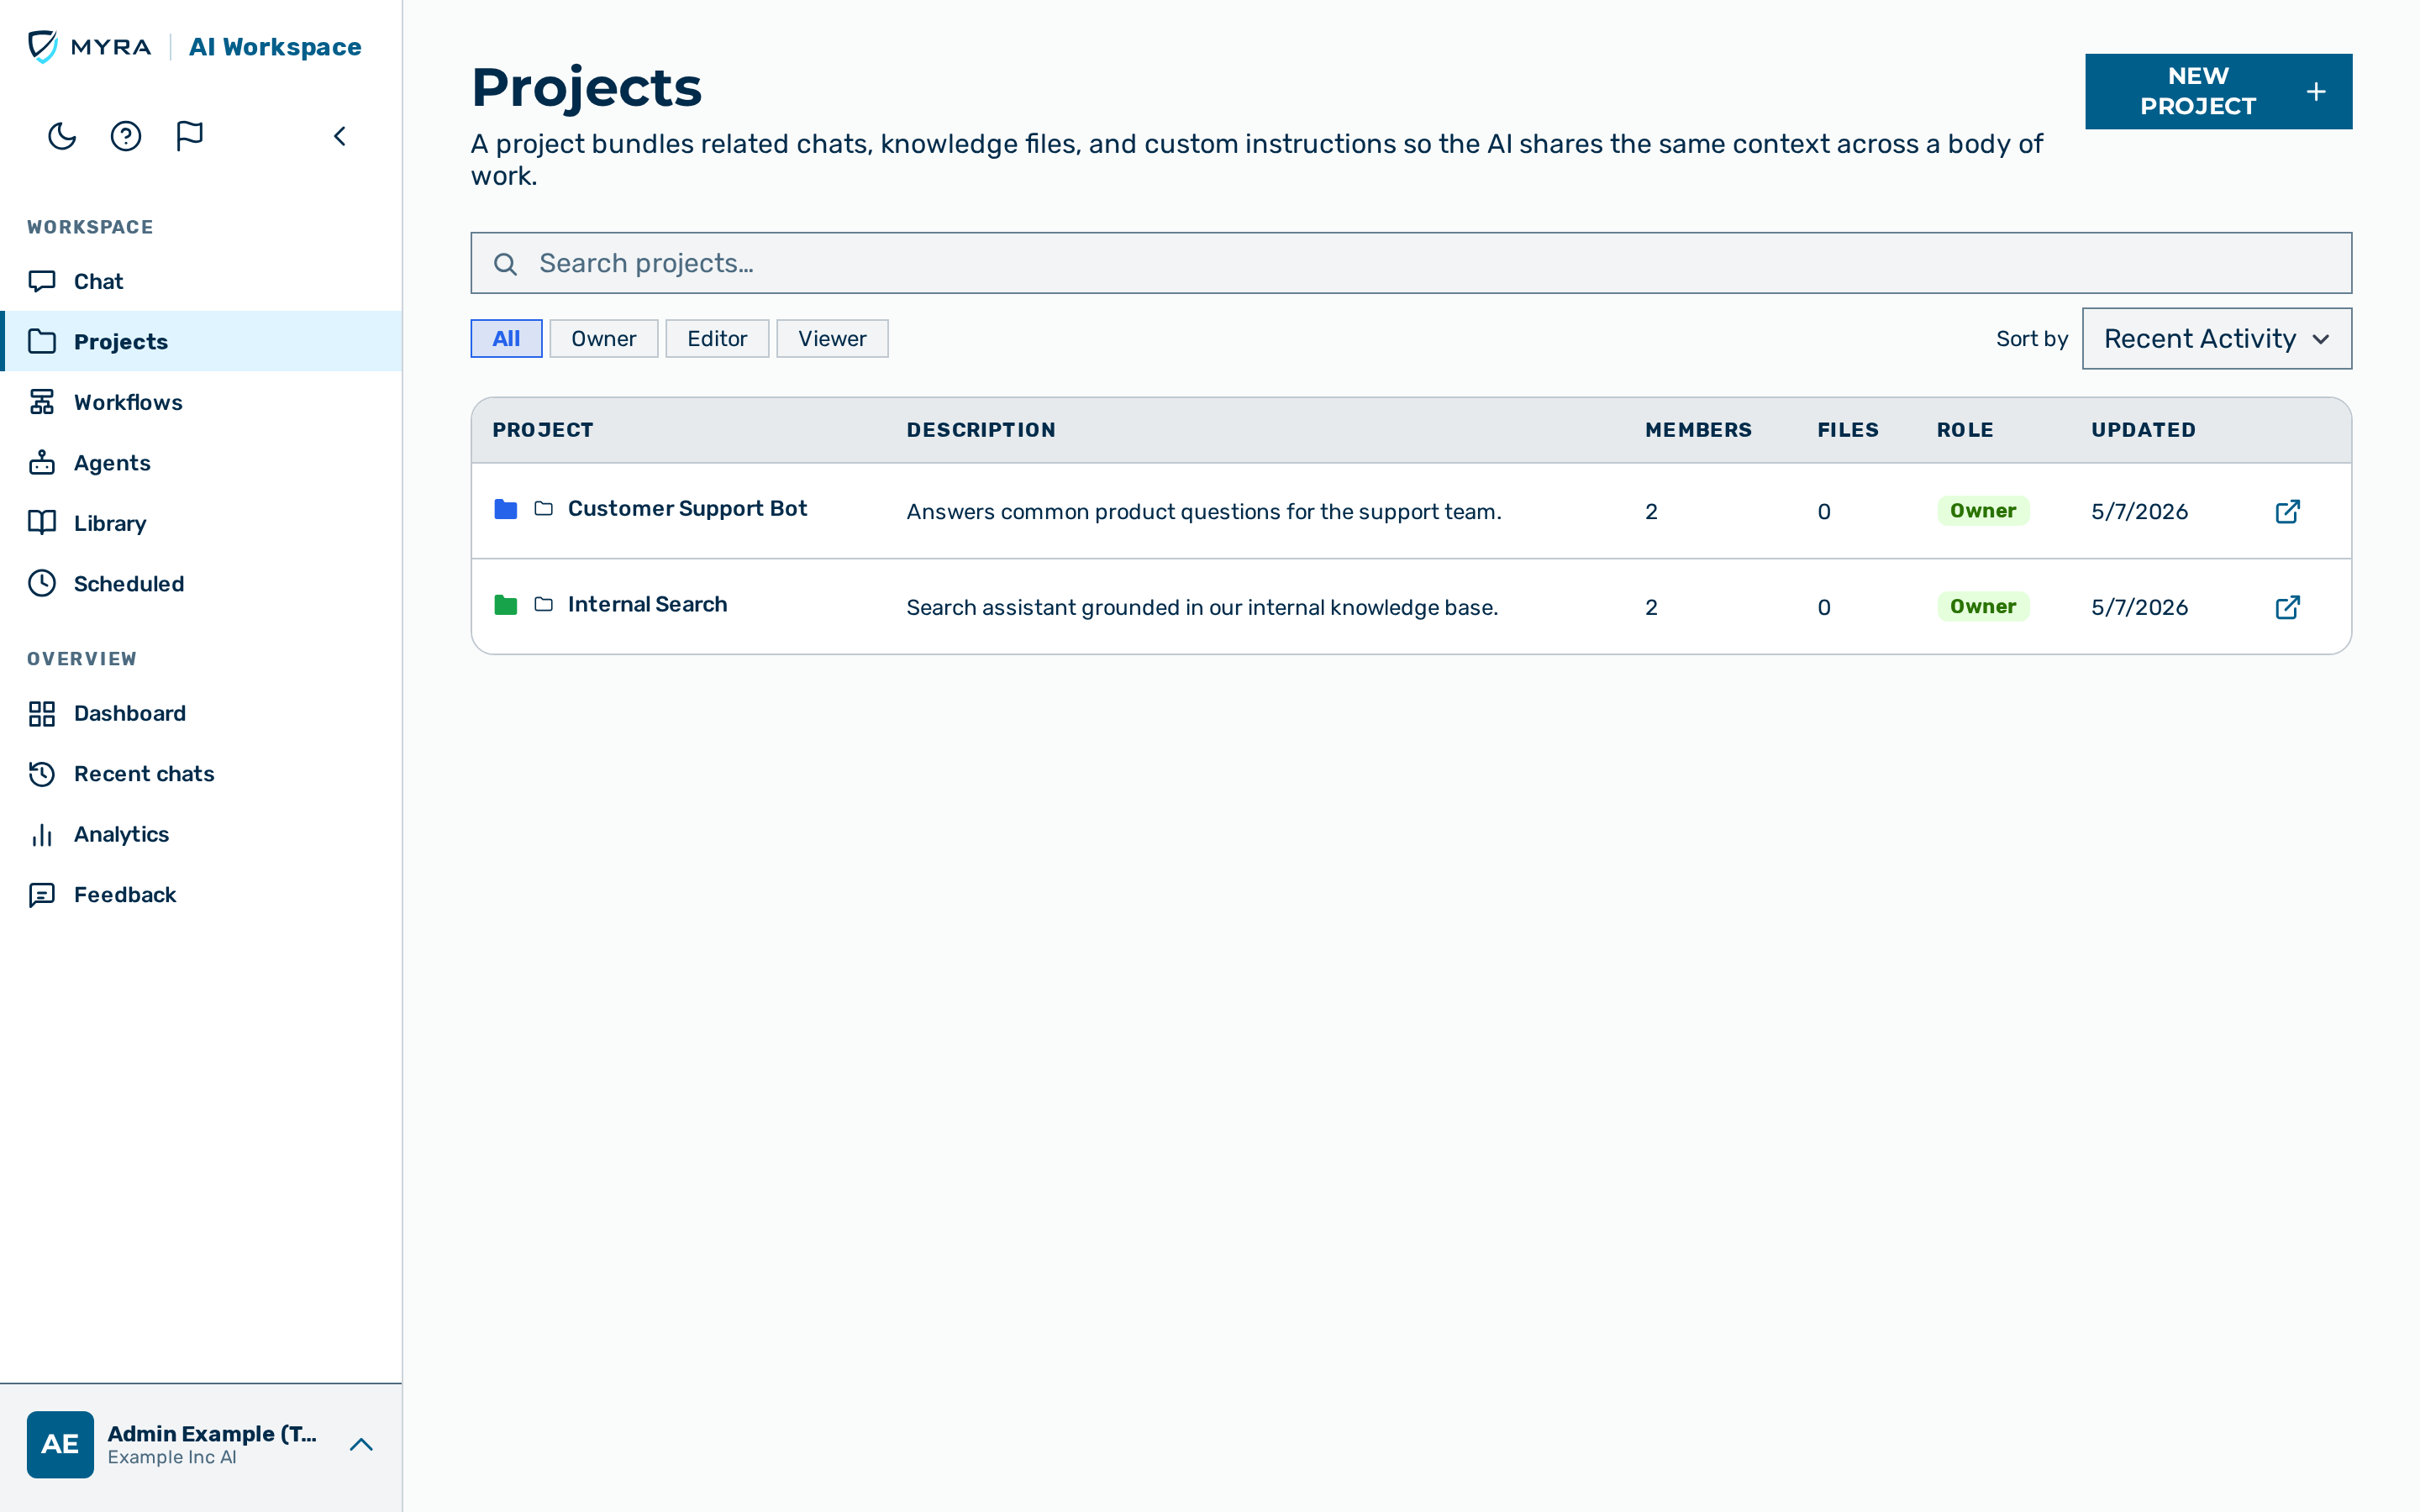 The Projects list.
A project is a workspace that groups conversations under a common context. Each project can have a set of instructions that are automatically prepended to every conversation as a system prompt, an Access tier that controls which models the project may use and whether PII protection is forced, and a library of knowledge files whose contents are injected into every conversation. Projects also have members, so access can be shared with other users.
Access tier
Every project has an Access tier that governs which models its conversations may use and how personal data is handled:
| Tier | Effect |
|---|---|
| User configurable (default) | All models are available. People choose PII protection per chat (today's behaviour). |
| PII protection required | All models are available, but PII protection is always on and cannot be turned off in this project. |
| Local only | Only local Myra models are available. Data never leaves Myra infrastructure; cloud models, web search, and external tools are disabled. |
In a Local only project the model picker lists only local Myra models, and a conversation cannot be sent to a cloud provider.
If you change an existing project to Local only after conversations have already been started in it on a cloud model, those conversations are reconciled automatically the next time they are opened: each one is re-pointed to a local Myra model (the same model the project would pick automatically), so it stays usable rather than being blocked. The conversation then stays on that local model — switching the project back to a cloud tier later does not restore the original cloud model.
The Projects view is accessible from the Projects entry in the left sidebar and is available to all users.
Search, filter, and sort
The projects list includes a toolbar with the following controls:
| Control | Description |
|---|---|
| Search field | Filters projects by name or description. The search term is remembered, so it still applies when you leave the list and come back. |
| Role filter | Filters to All projects or to the ones where you are Owner, Editor, or Viewer — by your own role on each project. |
| Sort drop-down list | Orders projects by recent activity, last edited, or date created. |
The list shows up to 10 projects per page. When there are more, use the Previous and Next buttons below the table to page through them; the page controls stay in a fixed position as you move between pages.
Creating a project
Before you begin, ensure the following conditions are met:
- ☑ You are logged in with the
admin,tenant_admin, ormemberrole. (vieweraccounts cannot create projects.)
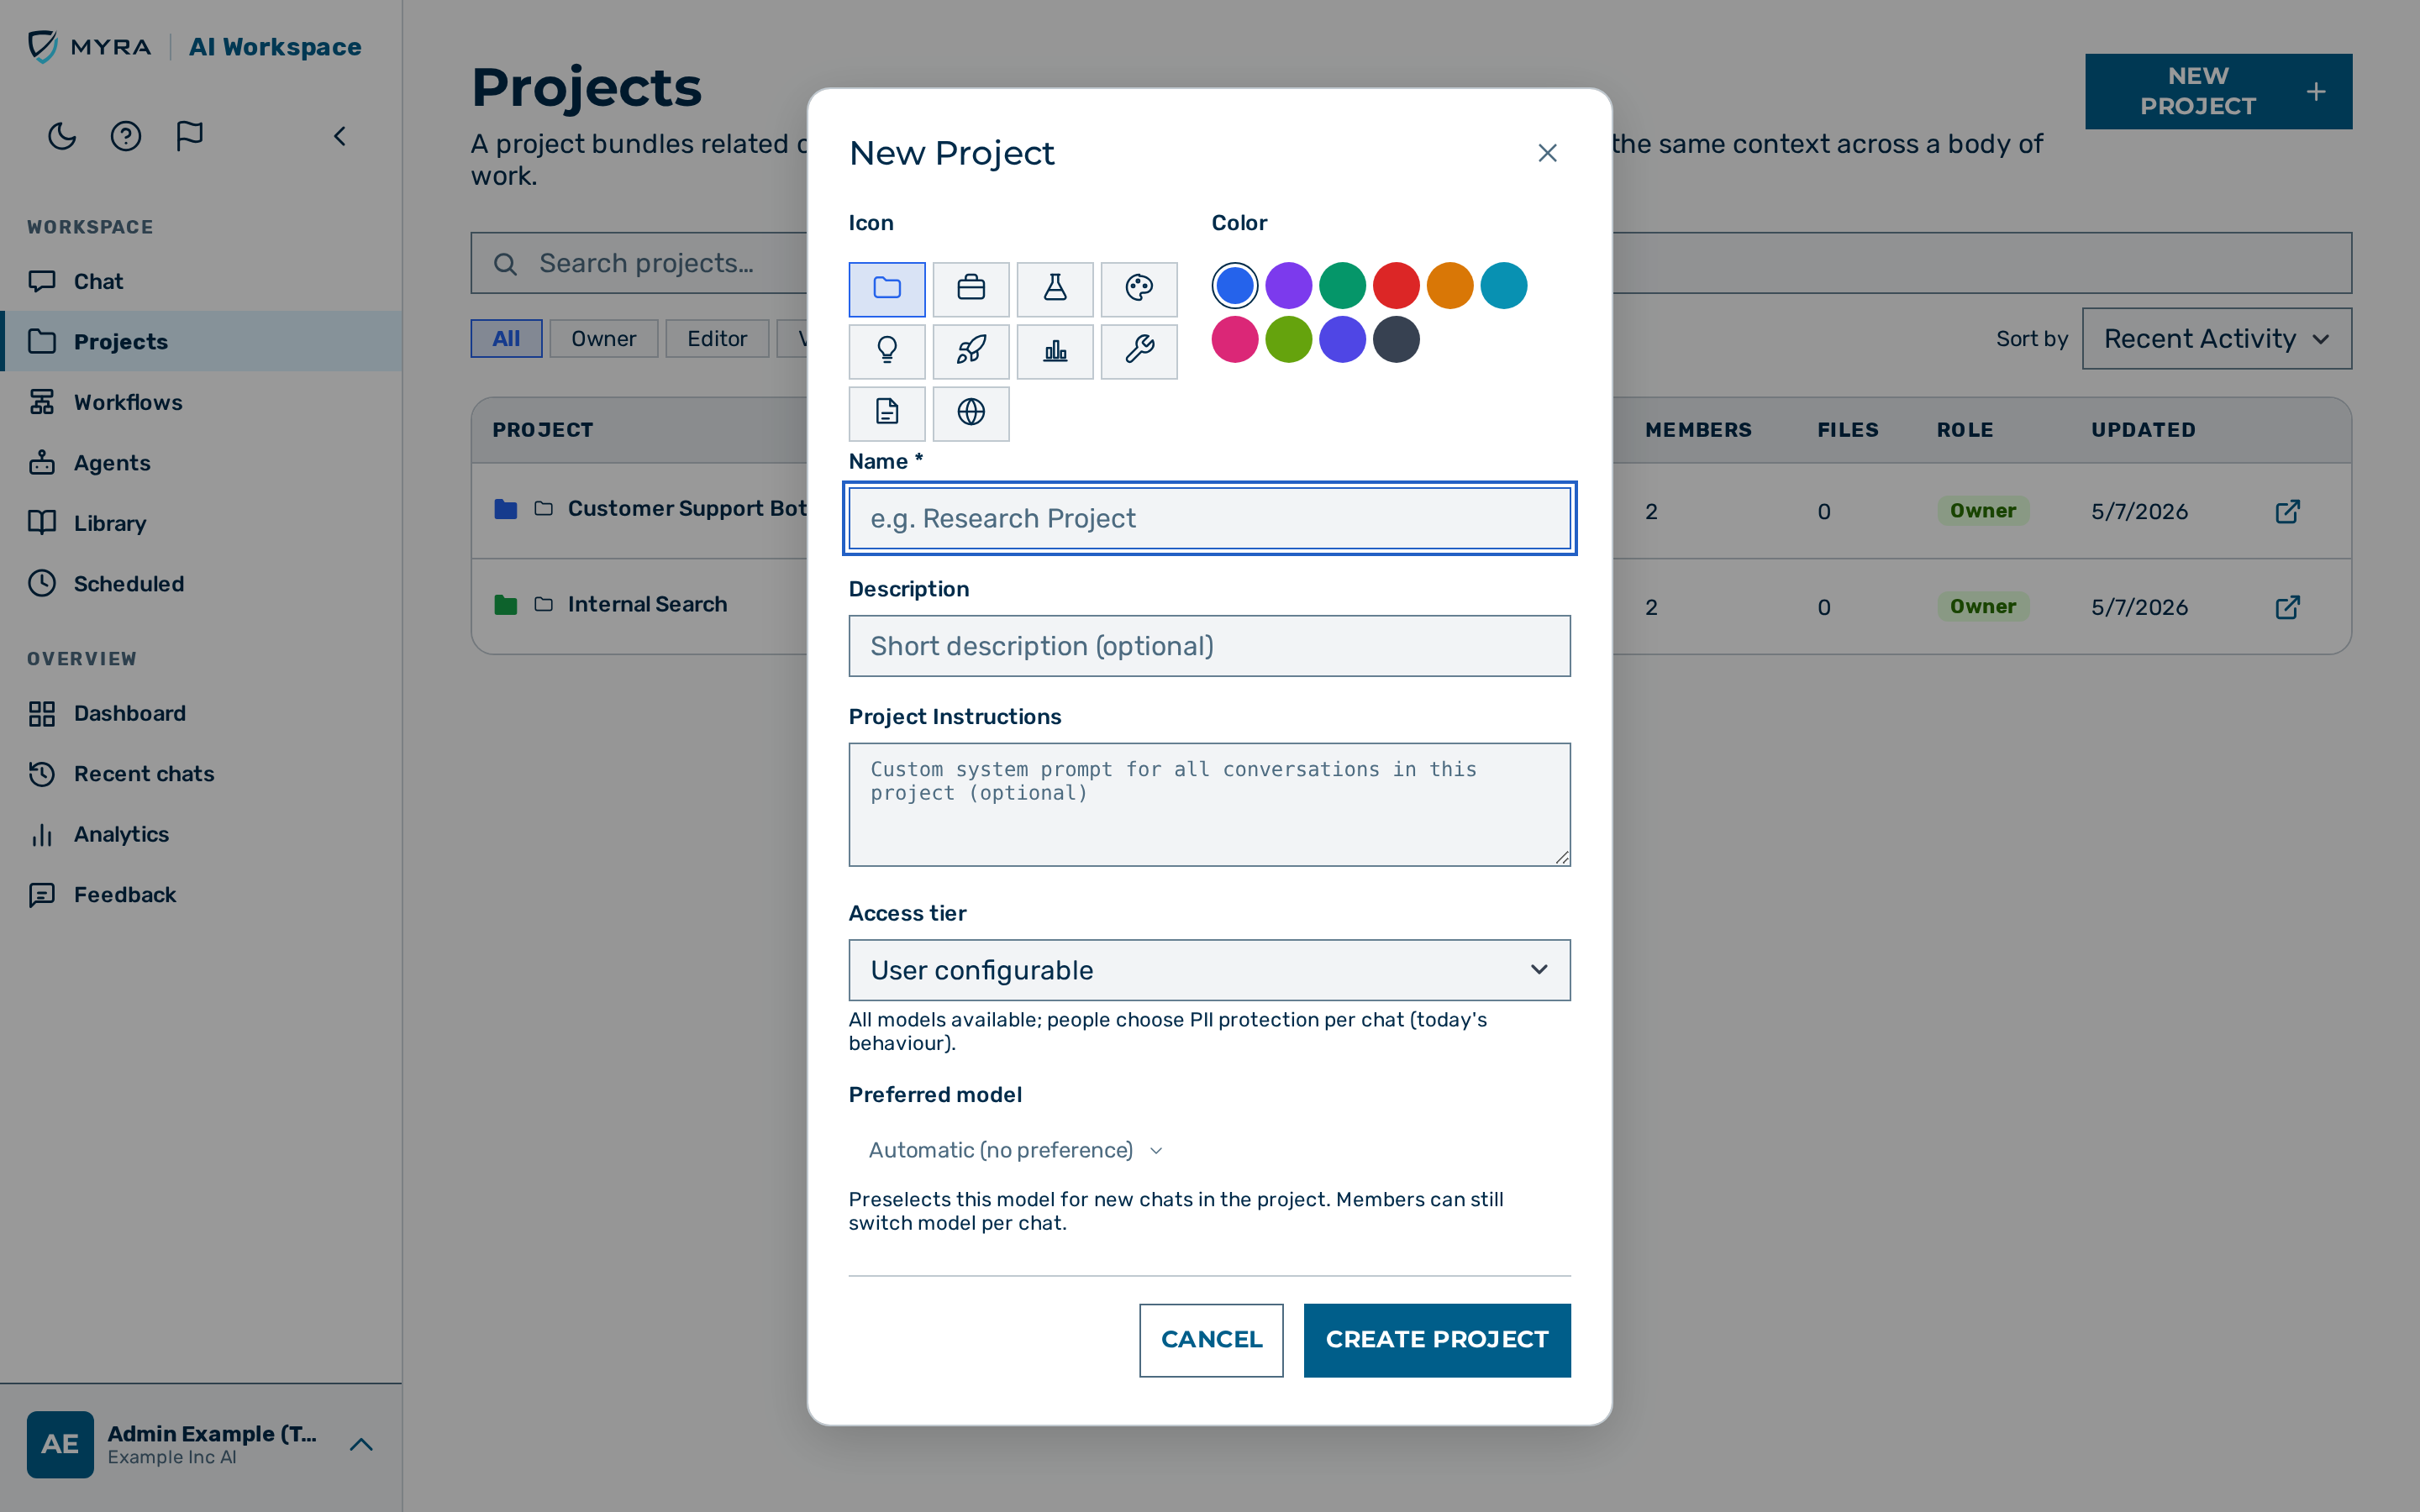 The New Project dialog.
Proceed as follows to create a project:
- Click on Projects in the left sidebar.
- The Projects list opens.
- Click on the + New Project button.
- The New Project dialog opens.
- Select an icon for the project by clicking on one of the icon buttons in the Icon row.
- Select a colour for the project by clicking on one of the colour swatches in the Colour row.
- Enter a name for the project in the Name text field.
- If required, enter a short description in the Description text field.
- If required, enter project instructions in the Project Instructions text field. The instructions are sent as a system prompt at the start of every conversation in this project.
- Select an Access tier from the drop-down list. The default is User configurable. A hint below the list explains the selected tier:
- User configurable — all models are available; people choose PII protection per chat.
- PII protection required — all models are available, but PII protection is always on and cannot be turned off in this project.
- Local only — only local Myra models are available; cloud models, web search, and external tools are disabled, and data never leaves Myra infrastructure.
- Click on the Create Project button.
-> The new project appears in the projects list and its detail view opens automatically.
Editing a project
Before you begin, ensure the following conditions are met:
- ☑ You have the
adminrole, or you are a member of the project with theowneroreditorrole.
Proceed as follows to edit a project:
- Click on Projects in the left sidebar.
- The Projects list opens.
- Click on the row of the project you want to edit, or click the open action icon in that row.
- The project detail view opens.
- Click on the pencil button in the project header.
- The edit form opens in the Overview tab.
- Update the Name, Icon, Colour, Description, Project Instructions, or Access tier fields as required.
- Click on the Save Changes button.
-> The updated details are applied immediately to all new conversations in this project.
Deleting a project
Before you begin, ensure the following conditions are met:
- ☑ You have the
adminrole, or you are a member of the project with theownerrole.
⚠️ Caution: Deleting a project removes all members and knowledge files permanently. Conversations that were linked to the project are detached but not deleted — they remain accessible in the Chat view.
If the project's access tier was Local only or PII mandatory, deleting it also lifts that restriction from those conversations — including conversations belonging to other members. They can then use cloud models like any other conversation. The deletion dialog states this, and the action is written to the audit log.
Proceed as follows to delete a project:
- Click on Projects in the left sidebar.
- The Projects list opens.
- Click on the row of the project you want to delete, or click the open action icon in that row.
- The project detail view opens.
- Click on the trash button in the project header.
- A confirmation dialog opens.
- Click on the Delete Project button to confirm.
-> The project is permanently deleted. Linked conversations are detached and remain in the Chat view without a project context — and without the project's access-tier restriction, if it had one.
Managing knowledge files
Knowledge files are documents injected into the system prompt of every conversation in the project. Use them to provide background information, reference data, or instructions that all conversations should have access to.
Both text files and binary documents are supported. Binary files are processed server-side and their extracted text is injected into the conversation context.
| Category | Supported formats | Maximum size |
|---|---|---|
| Text | .txt, .md, .markdown, .csv, .yaml, .yml, .rst, .log |
5 MB |
| Structured | .xml, .json, .html, .htm |
64 MB |
| Documents | .pdf, .docx, .odt |
100 MB |
| Spreadsheets | .xlsx, .xlsm, .ods |
100 MB |
| Presentations | .pptx |
100 MB |
| Images | .png, .jpg, .jpeg, .webp (OCR-extracted) |
20 MB |
.xml and .json are extracted server-side: an .xml is reduced to its text content (a file
that declares a DOCTYPE or any entity is refused for safety), and a .json is validated and
pretty-printed for retrieval (a file that is not valid UTF-8 JSON, or contains NaN/Infinity,
is refused). A file the pipeline cannot extract is rejected with a clear message, never ingested. Acceptance is decided by the file's content, not its extension: the formats in the table above get their dedicated extractors (and the subtype — csv/json/xml/html/md — is still chosen by the extension), while any other file whose bytes are plain text is accepted and ingested as text — source code (.py, .go, .ts, …), a Dockerfile, a config file, or an extension-less script all work. A genuine binary that matches none of the supported document types fails closed and is rejected server-side (422). The browser therefore no longer blocks a file by type before upload — its pre-upload check is advisory (size), and the server is the authority, so every file reaches it and the text-vs-binary decision is made there. Legacy .xls (Excel 97–2003) is not supported — save it as .xlsx.
Maximum file size, as enforced by the upload form: text files up to 5 MB, structured files (.xml, .json, .html, .htm) up to 64 MB, Office and PDF documents (.pdf, .docx, .pptx, .xlsx, .xlsm, .ods, .odt) up to 100 MB, and images up to 20 MB. (The API accepts a text file up to 7.5 MiB — the form's 5 MB is the tighter of the two, so a file that the form accepts is always accepted by the server.)
💡 Note: A long PDF can exceed the current page limit for extraction. When it does, the file preview shows a banner of the form Showing the first N of M pages — this document exceeds the current page limit, so later pages are not searchable or citable yet. Only the extracted pages are searchable and citable.
💡 Note: For a PDF, each page's embedded text layer is used when it is present and readable. A page whose text layer is missing (a scanned page) or is garbage — for example a PDF built with a broken font mapping, which yields high-volume but unreadable glyph noise — automatically falls back to OCR, so the document is stored as real text rather than mojibake. Stray control/NUL bytes in a text layer are stripped, so such PDFs ingest cleanly instead of failing. A page that falls back to OCR is used to answer — its transcribed text is retrieved and searched like any other page — but it is not listed under Sources: an OCR page can be mis-located, and the gateway only names a page it can stand behind. The same holds for an OCR'd image. So an answer drawn from a scanned page or a photo shows either no source or only the other, text-layer documents that were retrieved alongside it.
Before you begin, ensure the following conditions are met:
- ☑ You have the
adminrole, or you are a member of the project with theowneroreditorrole.
Files created in a chat
When the assistant generates a file inside a project conversation (for example a document the code interpreter produced), it appears in the Files tab. Until you share the conversation that created it, the file is marked Only you — only you can see this file until you share its chat into the project. Use the Share this chat action on the file to make its source conversation visible to project members, which un-hides the generated file for everyone in the project.
A member who cannot yet see another person's chat-generated files reads a hint above the file list instead of a shorter list: N files are only visible to their creator until their chats are shared into the project. The Files count on the Overview tab is counted per viewer, so a member sees a lower count than the file creator until the relevant chats are shared.
Uploading a knowledge file
Proceed as follows to upload a knowledge file:
- Open the project detail view.
- Click on the Files tab.
- The Files panel opens.
- Click on the Upload File button, or drag a file onto the drop zone.
- If you click on the button, a file browser opens. Select the file you want to upload.
- If you drag a file, drop it onto the drop zone area.
- Wait for the upload to complete.
-> The file appears in the knowledge files list. Its contents will be injected into all new conversations in this project.
Deleting a knowledge file
Proceed as follows to delete a knowledge file:
- Open the project detail view.
- Click on the Files tab.
- The Files panel opens.
- Click on the trash button in the row of the file you want to remove.
- A confirmation dialog opens.
- Confirm the deletion.
-> The file is removed from the project. Existing conversations are not affected; only new conversations will no longer receive the file's contents.
Organizing knowledge in folders
Knowledge files can be organized into folders inside the Files panel. A folder is derived from the leading path of a file name, so there is no separate button to create an empty folder — a folder comes into existence as soon as a file is moved into it. Use a / in the folder path to nest folders.
Before you begin, ensure the following conditions are met:
- ☑ You have the
adminrole, or you are a member of the project with theowneroreditorrole.
Proceed as follows to move a knowledge file into a folder:
- Open the Files panel of the project.
- Click on the Move to folder button in the row of the file.
- The Move "
" dialog opens. - Enter the target folder in the Folder text field. Leave the field blank to move the file to the top level. Use
/to nest folders. - The field suggests the folders already in use.
- Click on the Move button.
-> The file appears under the target folder in the knowledge list. Repeat this process for all files you want to organize.
💡 Note: A move is rejected when a file of the same name already exists in the target folder (A file with that name already exists in the target folder.) or when the folder path is not allowed (That folder path is not allowed.).
Choosing knowledge sources for a chat
When a project has knowledge files, the chat Project Files panel lists each file with a check box. Every file is included by default. Clear a file's check box to exclude it from the current chat only — the hint reads Uncheck a file to exclude it from this chat. The choice scopes retrieval for that conversation and does not change the project or the file. See Chat.
What "included by default" means precisely:
- Unchecking a file excludes that file. It never excludes anything else.
- A file added after you opened the chat — by a colleague, from another tab, or produced by a program run in another chat of the same project — stays included, and the panel shows it checked. (Before, the browser sent the list of files it knew about when the page loaded, so once you unchecked anything, a file added since was silently left out of retrieval even though it appeared checked.)
- A file the assistant creates during the current answer can always be read back in that same answer, whatever the check boxes say. The selection describes the project's existing knowledge, not what the assistant just produced.
- A file you delete and upload again comes back as a new file, so it is included again and shows checked.
- Above 200 unchecked files in one project the browser cannot express the selection as an exclusion list, and falls back to sending the list of files it knew about when the page loaded. In that case only — a project where you have individually unchecked more than 200 files — the two points above do not hold, and a file added since the page loaded may be left out until you reload.
- The selection governs what the assistant may retrieve, search, list and open by name. It does not restrict loading a project file into the code interpreter's sandbox, which is a deliberate by-name action gated only by your access to the file — see Code interpreter.
💡 Note: A document whose extracted text has no page or section index carries a No page-level citations badge in the knowledge list. Answers over it cannot cite specific pages, and because there is no index to search within it, a LARGE such document is returned only up to the per-read size limit when the assistant reads it — an indexed document of the same size has the passages relevant to the question selected instead. A small document is still returned in full.
Connecting a website source
A project can index a public web page as a connected source. The page text is fetched, indexed into the knowledge base, and kept in sync on a schedule. Connected sources appear in the Connected sources list with their sync status.
Before you begin, ensure the following conditions are met:
- ☑ You have the
adminrole, or you are a member of the project with theowneroreditorrole.
Proceed as follows to add a website source:
- Open the Files panel of the project.
- Click on the Add website button.
- The Add a website dialog opens.
- Enter the page address in the Website URL field. For example:
https://example.com/page. - If required, enter a name in the Label (optional) field.
- Click on the Add website button in the dialog.
-> The website appears in the Connected sources list, and its text is fetched and indexed. Click on Sync now to re-fetch it, or Remove to delete the source and every document it synced.
💡 Note: Only a public
http(s)web page is accepted. An internal or non-web address is rejected, and a page already added to the project is rejected as a duplicate.
Sharing a connected source org-wide
Required role: tenant admin or admin.
A project can attach a synced knowledge source from a connector (for example Confluence). In the Connected sources area of the Files panel, a Share org-wide toggle publishes a Confluence source to the whole organization, so every user who can open the project can read and cite the synced pages. A source that is shared shows a Shared org-wide badge.
⚠️ Caution: Org-wide sharing is admin curation, not permission mirroring. When you publish a source org-wide, every user who can open the project can read and cite all pages the source synced — including pages that are restricted in the source system. You take responsibility for exposing these pages tenant-wide.
Proceed as follows to share a connected source org-wide:
- Open the Files panel of the project.
- Locate the connected source in the Connected sources area.
- Tick the Share org-wide toggle.
- A confirmation dialog explains that all synced pages become readable and citable tenant-wide.
- Click on the Publish org-wide button to confirm.
-> The source shows the Shared org-wide badge, and its synced pages become visible to every project member.
Proceed as follows to stop sharing a connected source:
- Clear the Share org-wide toggle.
- Confirm the change.
-> The synced pages revert to being visible only to the person who created the sync.
💡 Note: Org-wide sharing depends on the tenant setting Allow sharing with the whole organization. When that setting is off, no source can be shared org-wide and existing org-shares stop granting access. See Tenants.
Keeping a connected source up to date automatically
Required role: project editor or owner.
A connected source can re-crawl itself on a schedule, so connector-sourced knowledge stays current without anyone clicking Sync now. In the Connected sources area of the Files panel, each source has an Auto-sync selector.
- New sources default to every 24 hours. A source you connect from now on re-syncs daily out of the box.
- Sources connected before this feature start off. They keep their content until you either click Sync now or pick an auto-sync cadence — nothing begins re-crawling silently.
- You choose the cadence per source: Off (manual Sync now only), or every 6 hours, 12 hours, 24 hours, or week.
Proceed as follows to set a source's automatic re-sync:
- Open the Files panel of the project.
- Locate the connected source in the Connected sources area.
- Choose a cadence from the Auto-sync selector (or Off to disable it).
-> The source re-syncs on the chosen cadence, anchored to its last successful sync. A manual Sync now counts as a sync, so it also pushes the next automatic run out by a full interval.
💡 Note: Automatic re-sync runs under the same credentials and per-item permissions as Sync now — nothing new is exposed. A source whose creator has lost access to the project, or whose connector was removed, is skipped rather than synced.
Managing members
Each project has its own member list that controls who can access and interact with the project. Members can have one of three roles:
| Role | Permissions |
|---|---|
owner |
Full control: can edit, delete, manage members, and manage knowledge files |
editor |
Can edit project settings and manage knowledge files |
viewer |
Can read the project and open conversations; cannot edit |
The user who creates the project is automatically added as owner. At least one owner must remain at all times.
Below the member list, a Groups with access table lists the groups that have been granted access to the project. Each row shows the Group name, its Members count, and the granted Role. Every user in a granted group inherits that role on the project without an individual invitation. Manage group grants from the Groups view; remove access for a whole group by removing its grant there.
When the whole organisation has been granted access (an org-wide grant, available when org-sharing is enabled for the tenant), the Members tab shows this explicitly as an organisation-wide access entry with its role (editor or viewer) — it does not list every user individually. The member count reflects named (direct) members only and deliberately excludes an org-wide grant, since the organisation's size is not a fact about the project. See org_access in the Projects API for the underlying field.
Inviting a member
Before you begin, ensure the following conditions are met:
- ☑ You have the
adminrole, or you are a member of the project with theownerrole. - ☑ The user you want to invite already has an account. See Users to create an account.
Proceed as follows to invite a member:
- Open the project detail view.
- Click on the Members tab.
- The members list opens.
- Click on the + Invite Member button.
- The Invite Member dialog opens.
- Enter the email address of the user in the Email address text field.
- Select a role from the Role drop-down list.
- Click on the Invite button.
-> The user appears in the members list with the selected role.
Removing a member
Before you begin, ensure the following conditions are met:
- ☑ You have the
adminrole, or you are a member of the project with theownerrole. - ☑ The member you want to remove is not the last
ownerof the project.
Proceed as follows to remove a member:
- Open the project detail view.
- Click on the Members tab.
- The members list opens.
- Click on the Remove button in the row of the member you want to remove.
-> The member no longer has access to the project.
💡 Note: You cannot remove the last
ownerof a project. Assign another member asownerfirst.
Leaving a project
Any member can remove themselves from a project — regardless of their role. This is useful when organization-wide sharing has placed you in a project you no longer need.
Before you begin, ensure the following condition is met:
- ☑ If you are an
owner, you are not the lastownerof the project. The last owner cannot leave (that would strand the project without an owner); promote another member toownerfirst, or delete the project.
Proceed as follows to leave a project:
- Open the project detail view.
- Click on the Members tab.
- The members list opens.
- Click on the Leave project button in your own row.
- Confirm in the dialog that opens.
-> You are removed from the project. It disappears from your Projects list and you lose access; you must be re-invited to return.
💡 Note: If you are the only
owner, leaving is refused with a message asking you to assign another owner first — the project is never left without an owner.ℹ️ Not the same as the conversation-header link. Inside a project chat, the conversation header offers an Exit project view link. That link only leaves the project view and returns you to general chat — it does not remove you from the project. To actually leave, use the Leave project button on the Members tab as described above.
Sharing a project with the whole organization
Instead of inviting colleagues one by one, you can grant every user in your organization access to a project in a single step. This is the project-level org-share; it is not the same as sharing a connected source org-wide, which applies to a single synced knowledge source.
Before you begin, ensure the following conditions are met:
- ☑ You are a member of the project with the
ownerrole, or you have theadminrole. A plainmemberaccount is sufficient as long as you own the project. Atenant_adminmust also be a member of the project — only the platformadminrole can open a project it is not a member of. Accounts with the read-onlyviewerrole cannot share, even if they own the project. - ☑ Org-wide sharing is enabled for your organization. An administrator can switch it off, in which case the control is not shown. Switching it off later also withdraws access from every project that was already shared this way.
Proceed as follows to share a project with the organization:
- Open the project detail view.
- Click on the Members tab.
- The members list opens.
- Click on the Share with organization button.
-> The button changes to Shared with organization — unshare. Every user in your organization can now open the project and read and cite its knowledge files, without appearing in the member list.
Click the button again to stop sharing. Individually invited members keep their own roles, and users who only had access through the org-share lose it immediately.
💡 Note: Users who gain access this way receive the read-only
viewerrole: they can open the project and its conversations and cite its knowledge files, but cannot add, remove, or edit anything. Invite members individually if you want to grant theeditororownerrole instead.
Opening a project in Chat
Proceed as follows to start a conversation within a project:
- Open the project detail view.
- Click on the Start Chat button in the project header. If the project already has a recent conversation, the button is labelled Continue Last Chat and reopens that conversation instead.
-> The Chat view opens with the project pre-selected. All new conversations started from this view are linked to the project and use the project instructions and access tier.
💡 Note: The project detail Overview tab shows the project's Access tier as a stat card alongside the member, file, and conversation counts.
💡 Note: A project's preferred model (
default_model) is a soft default: a new conversation in the project opens on it whenever it can be routed — including a local model, which previously had no effect. A project that pins both a gateway and a model still routes to that pair verbatim. The Access tier governs model availability and PII handling and always applies on top.
Conversations
The Conversations tab in the project detail view lists your own conversations in this project, ordered by recent activity (other members' conversations are private to them; a member can share one into the project Feed deliberately). Use the New Conversation button to start a fresh conversation in the project context, click a row to open it in the Chat view, or delete one via the row's delete action — deletion asks for confirmation and cannot be undone.
Project feed
The Feed tab in the project detail view shows conversations that members have shared with the project. Sharing a conversation makes it visible to everyone with access to the project — whether they were invited by name, reached the project through a group grant, or through the organisation-wide share. All three can open a shared feed conversation (read-only) and can share their own chats to the feed, exactly as a name-invited member can.
Sharing a conversation to the feed
Before you begin, ensure the following conditions are met:
- ☑ The conversation was started in the context of this project (via Start Chat — or Continue Last Chat — from the project detail view).
Proceed as follows to share a conversation to the project feed:
- Open the conversation in Chat.
- Open the More options (⋯) menu on the active conversation and choose Share to project feed.
-> The conversation appears in the project Feed tab and is visible to all project members.
Removing a conversation from the feed
A conversation can be removed from the feed by the person who shared it (its author), by any project owner, and by platform administrators — so the person responsible for a project can take down another member's conversation (for example after a name-invited member leaves, or if a conversation holds content that should not be on the feed). A plain editor or viewer cannot remove someone else's conversation.
Proceed as follows to remove a conversation from the project feed:
- Open the conversation in Chat.
- Open the More options (⋯) menu again and choose Share to project feed to toggle it off.
-> The conversation is removed from the feed. The conversation itself is not deleted — it reverts to being private to its author, and any files it generated revert to Only you visibility.
Saving multiple conversations at once
You can save several conversations to a project in one step using the batch save feature in the Chat view. Select the conversations you want to save, then choose the target project from the batch action menu. All selected conversations are linked to the project and appear in its feed.
Viewing the feed
Proceed as follows to view the project feed:
- Open the project detail view.
- Click on the Feed tab.
-> All conversations shared to the project are listed, ordered by the time they were shared. The feed loads in pages; when more shared conversations exist than are shown, a Load more button appears below the list to fetch the next page.
Continuing a feed conversation
A conversation you open from the feed that you do not own is read-only — a banner at the top of the conversation says so. To keep working from it, choose Continue in your own chat: this copies the whole thread into a new, private conversation of your own in the same project, where you can send new messages. The original feed conversation is unchanged, and your copy is private to you (it is not added to the feed).
See also
- Projects and conversations — what a project and a conversation are, and why
- Chat
- Gateways
- Users