Organisations
Description
A tenant (organisation in the UI) is the top-level organisational unit. Each tenant has its own users, gateways, inference tokens, and usage data. Tenants are isolated: users and tokens of one tenant cannot reach the resources of another.
The Organisations view is the Organisations tab of User Management, reached from the
user-block menu at the bottom of the left sidebar → User Management (route /tenants unchanged). It
is visible to a platform admin — the cross-tenant company list — and, more recently, to a
tenant_admin for their own organisation only.
💡 a tenant admin's own organisation: the tab reads Organisation (singular) for a
tenant_adminand Organisations for a platform admin, off the same entry. Opening it as a tenant admin goes straight to their own organisation's detail view —GET /tenantsis server-scoped to exactly one row for them, so there is no cross-tenant list to browse and no back-to-list button. This replaces two older entry points, both retired: the Settings › Organisation rail leaf (its/organisationroute still redirects here, so old bookmarks keep working) and the account menu's Workspace settings popup.Their edit dialog shows a smaller field set than a platform admin's:
- Editable: Assistant name, Organization policy, org-sharing, the PII-preview switch, the whole Branding tab, the Identity & SSO tab, and — carried over from the retired Workspace settings popup — the organisation's budget and the four-eyes approval switch, in the Budget & governance section of the General tab. A budget change is always sent for a platform admin's approval and may not exceed the platform cap, which is shown read-only beside it.
- Read-only: Trial ends (when the tenant is on a trial), and the platform cap.
- Not shown: Plan, Budget Period, the egress-artifact cap, the request-logging kill switch, the default user type, the four feature toggles (Playground / Agents / Workflows / Scheduled Tasks — all platform-admin-only and server-enforced), and the whole Data & Retention and Routing tabs.
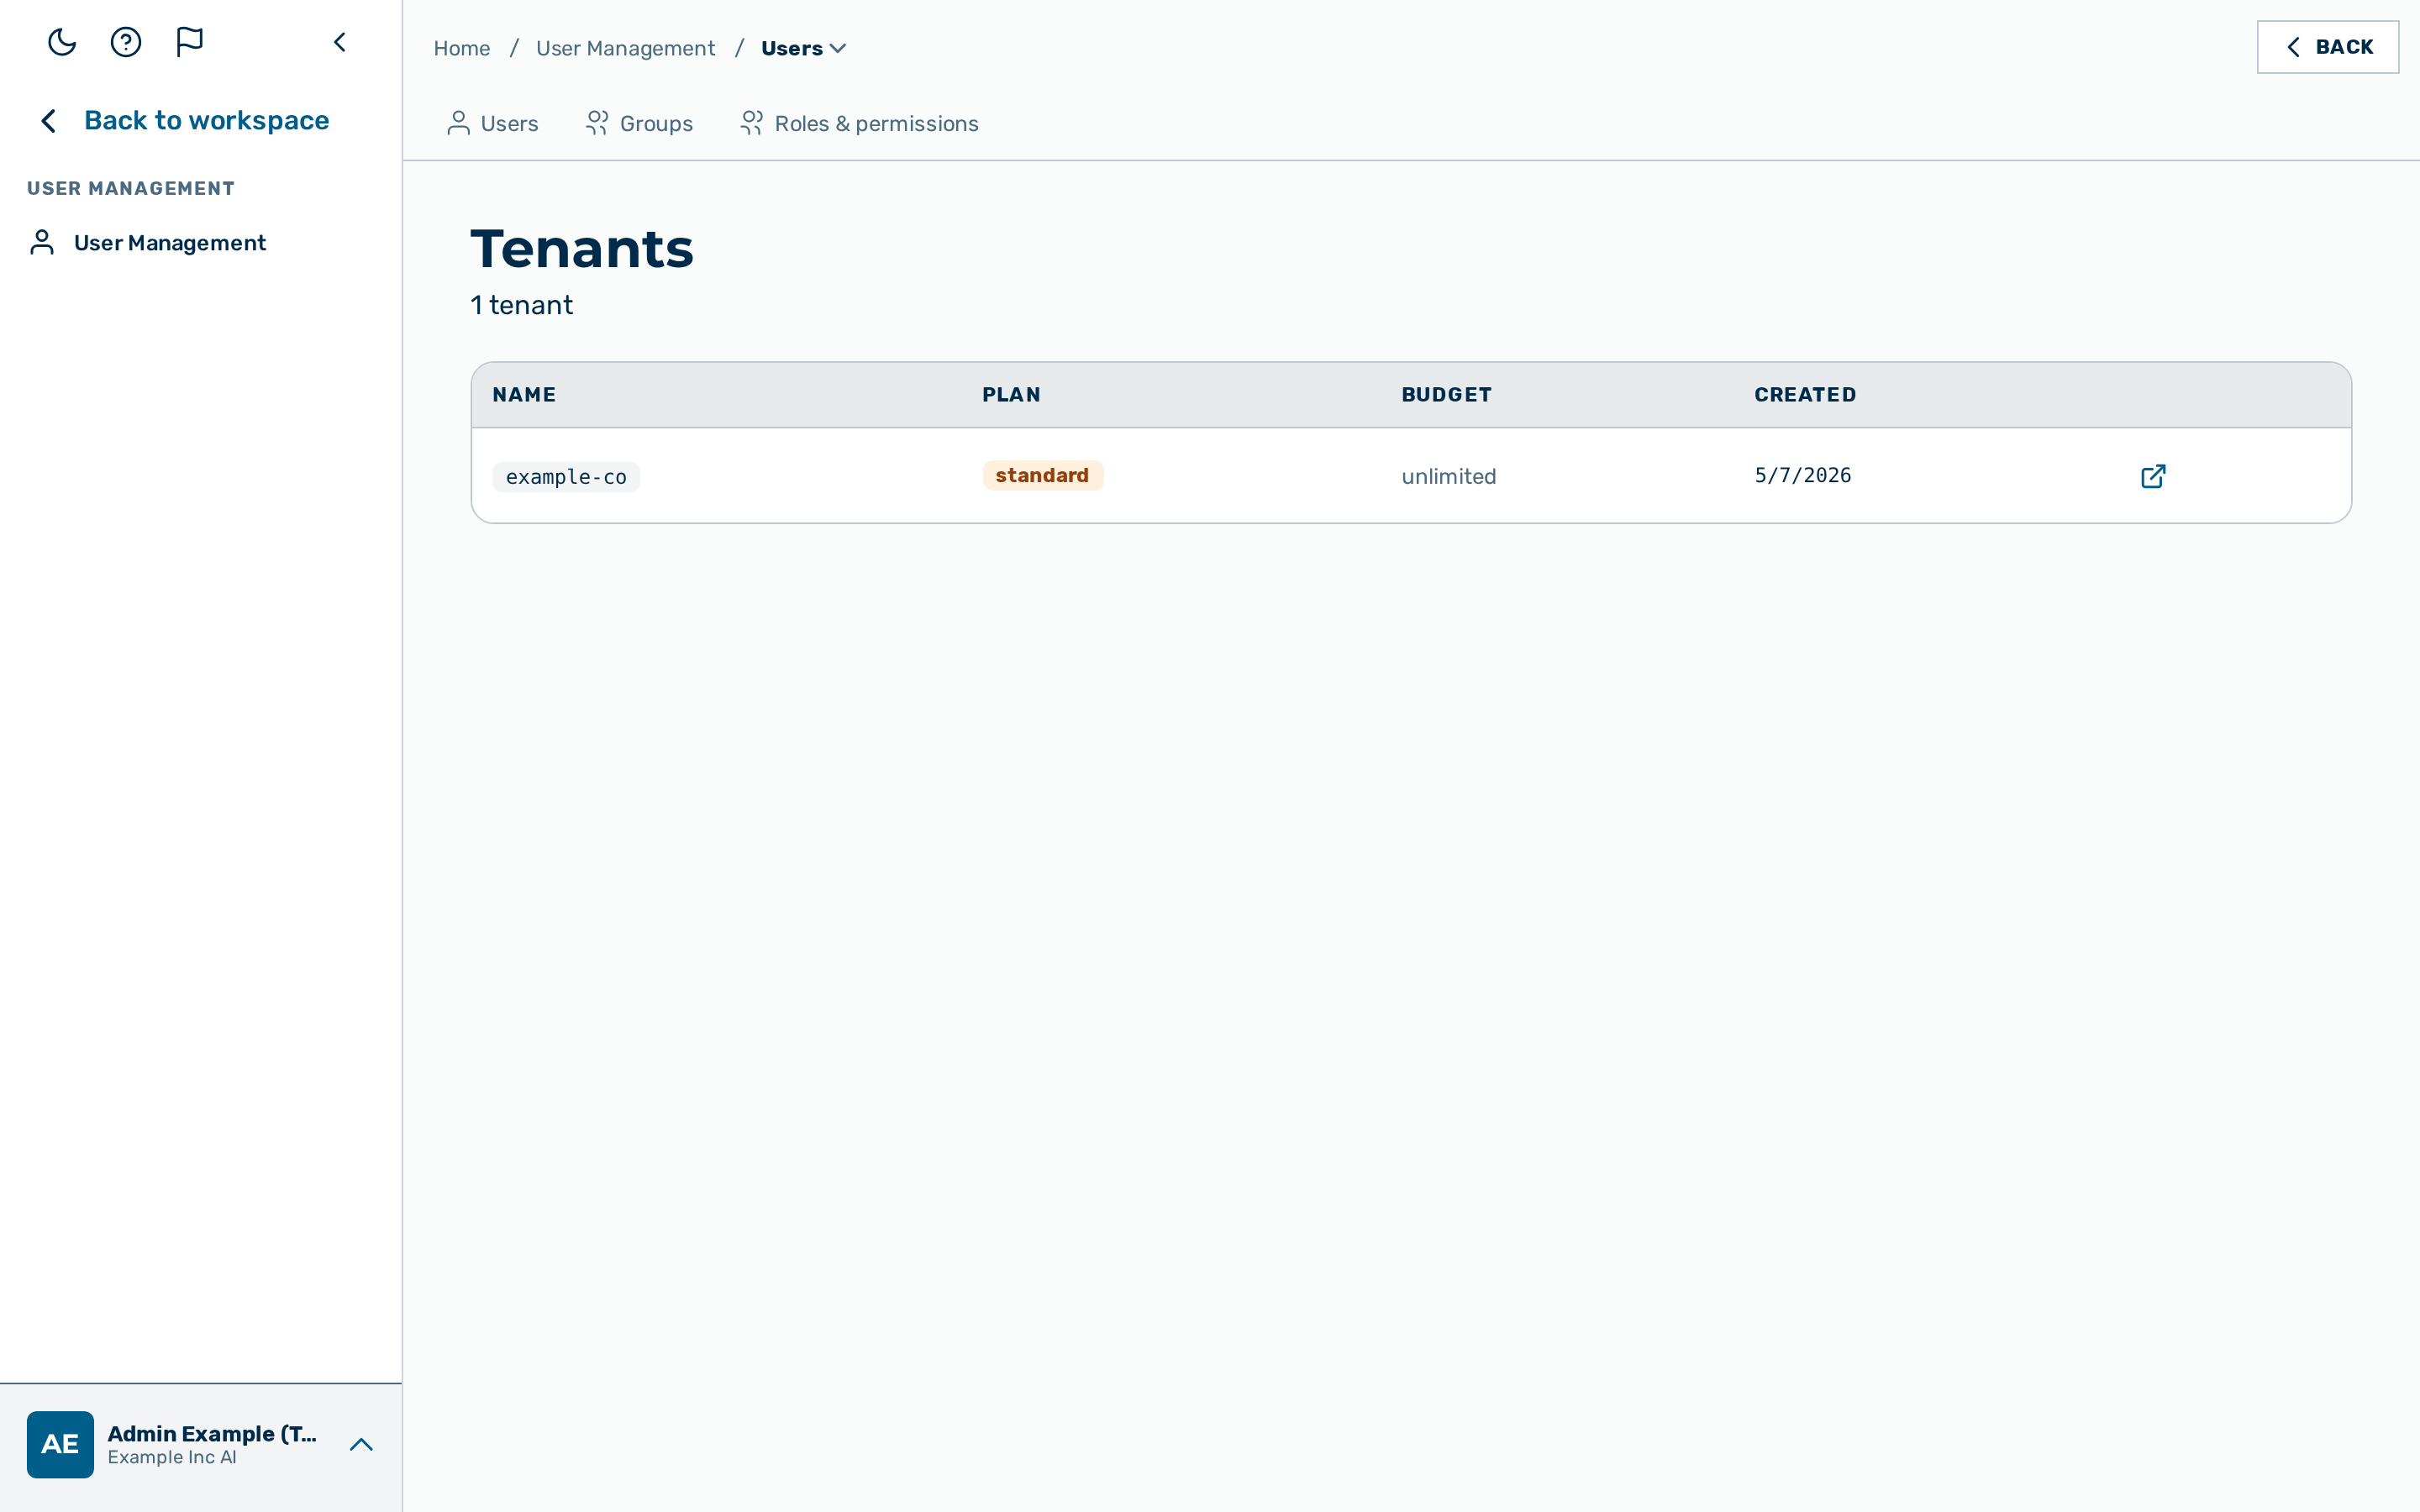
The list shows one row per tenant with the Name, Plan, Budget, Organisation admins, and Created columns, sorted by slug. Organisation admins counts the administrators (both admin and tenant_admin roles) whose home tenant is this organisation (see Platform admins for the full cross-tenant administrator view). Open a tenant via the open action icon on its row, or by clicking the row (it navigates to the tenant).
When more than one tenant exists, a filter box narrows the list by slug as you type, and the list is paginated with a Previous / Next control that shows the current page. The filter text is remembered across page reloads and navigation, so returning to the view keeps the same filter applied.
The detail view is organised as a row of tabs below the tenant title, so each aspect is reached without scrolling one long page:
- Overview — the default tab, showing the tenant's slug, plan, budget limit, gateway count, ID, creation date, and the conversation- and request-log retention periods.
- Gateways — the tenant's gateways.
- API Keys — the tenant-level provider keys (tenant admin or admin only).
- Commands — the shared slash-commands (tenant admin or admin only).
- Prompt Examples — the tenant's prompt examples (tenant admin or admin only).
The Add user, Edit, Export data, and Delete Tenant buttons stay in the header above the tabs, available from any tab. The Add user button appears only for an administrator who holds the user-management permission. The selected tab is reflected in the page URL, so a specific tab can be bookmarked or shared, and the browser back and forward buttons move between the tabs visited.
For background on the multi-tenancy architecture, see Multi-tenancy.
Feature flags (platform admin)
Required role: platform admin.
At the top of the Organisations list a platform admin sees a Feature Flags card holding the deployment-wide runtime switches (DB-backed, audited, effective immediately). These are platform-wide, not per-tenant. The card covers:
- Offer paid upgrade at signup (
paid_signup_enabled) — whether the paid-plan tier grid is offered during signup and the in-app upgrade flow; off (default) keeps new customers on the free trial and routes upgrade CTAs to the contact form. - Wallet (
wallet_enabled) — the platform-wide switch for prepaid wallet credit; the wallet is offered as soon as this is on (the balance cap is retired and the top-up products live in the product catalog, so there are no companion amount keys). - Quick sign-in (
oauth_login_enabled) — the Google & Microsoft OAuth sign-in / registration switch; ships off (dark) and is turned on deliberately, alongside provisioning the provider credentials. - Platform web-search key (
trial_linkup_api_key, a plain editable setting — the name is historical) — the shared Linkup key that turns on web search for every gateway that carries a keyless Linkup block, on every plan (every new production gateway is created with one). When it is unset while such gateways exist, the Health dashboard flags it and a platform alert fires. - Active connectors / chat platforms (
active_mcp_connectors,active_chat_platforms) — the subset of the MCP connector directory and the chat-integration picker shown to non-platform-admins.
For the exact accepted values and validation of each key, see the Settings API.
Creating a tenant
Required role: platform admin.
Proceed as follows to create a tenant:
- Click on the New Tenant button at the top of the Tenants view.
- The New Tenant dialog opens.
- Enter a value in the Name text field (it holds the tenant slug). The slug must be lowercase, contain only letters, digits, and hyphens, and is used in inference URLs.
- If required, select an entry in the Plan drop-down list.
- If required, enter a value in the Tenant Budget (USD) text field.
- If a budget is set, choose Monthly, Daily, or Lifetime in the Budget Period drop-down list.
- If required, select an entry in the Default user type drop-down list. The default user type sets the chat persona for
/easy— the chip labels, example prompts, and system prompts. - If required, enter a value in the Assistant name text field. The assistant name sets how the assistant identifies itself in chat. Leave the field blank to use the platform default Myra AI.
- Click on the Create Tenant button.
-> The new tenant appears in the list. The tenant is empty; add gateways and users to make it operational.
💡 Note: A custom assistant name (up to 80 characters) white-labels the assistant. The default system prompt then identifies the assistant by the custom name and omits the Myra reference.
Editing a tenant
Required role: platform admin, or tenant_admin for their own organisation only — with the
reduced field set described above.
The Edit:
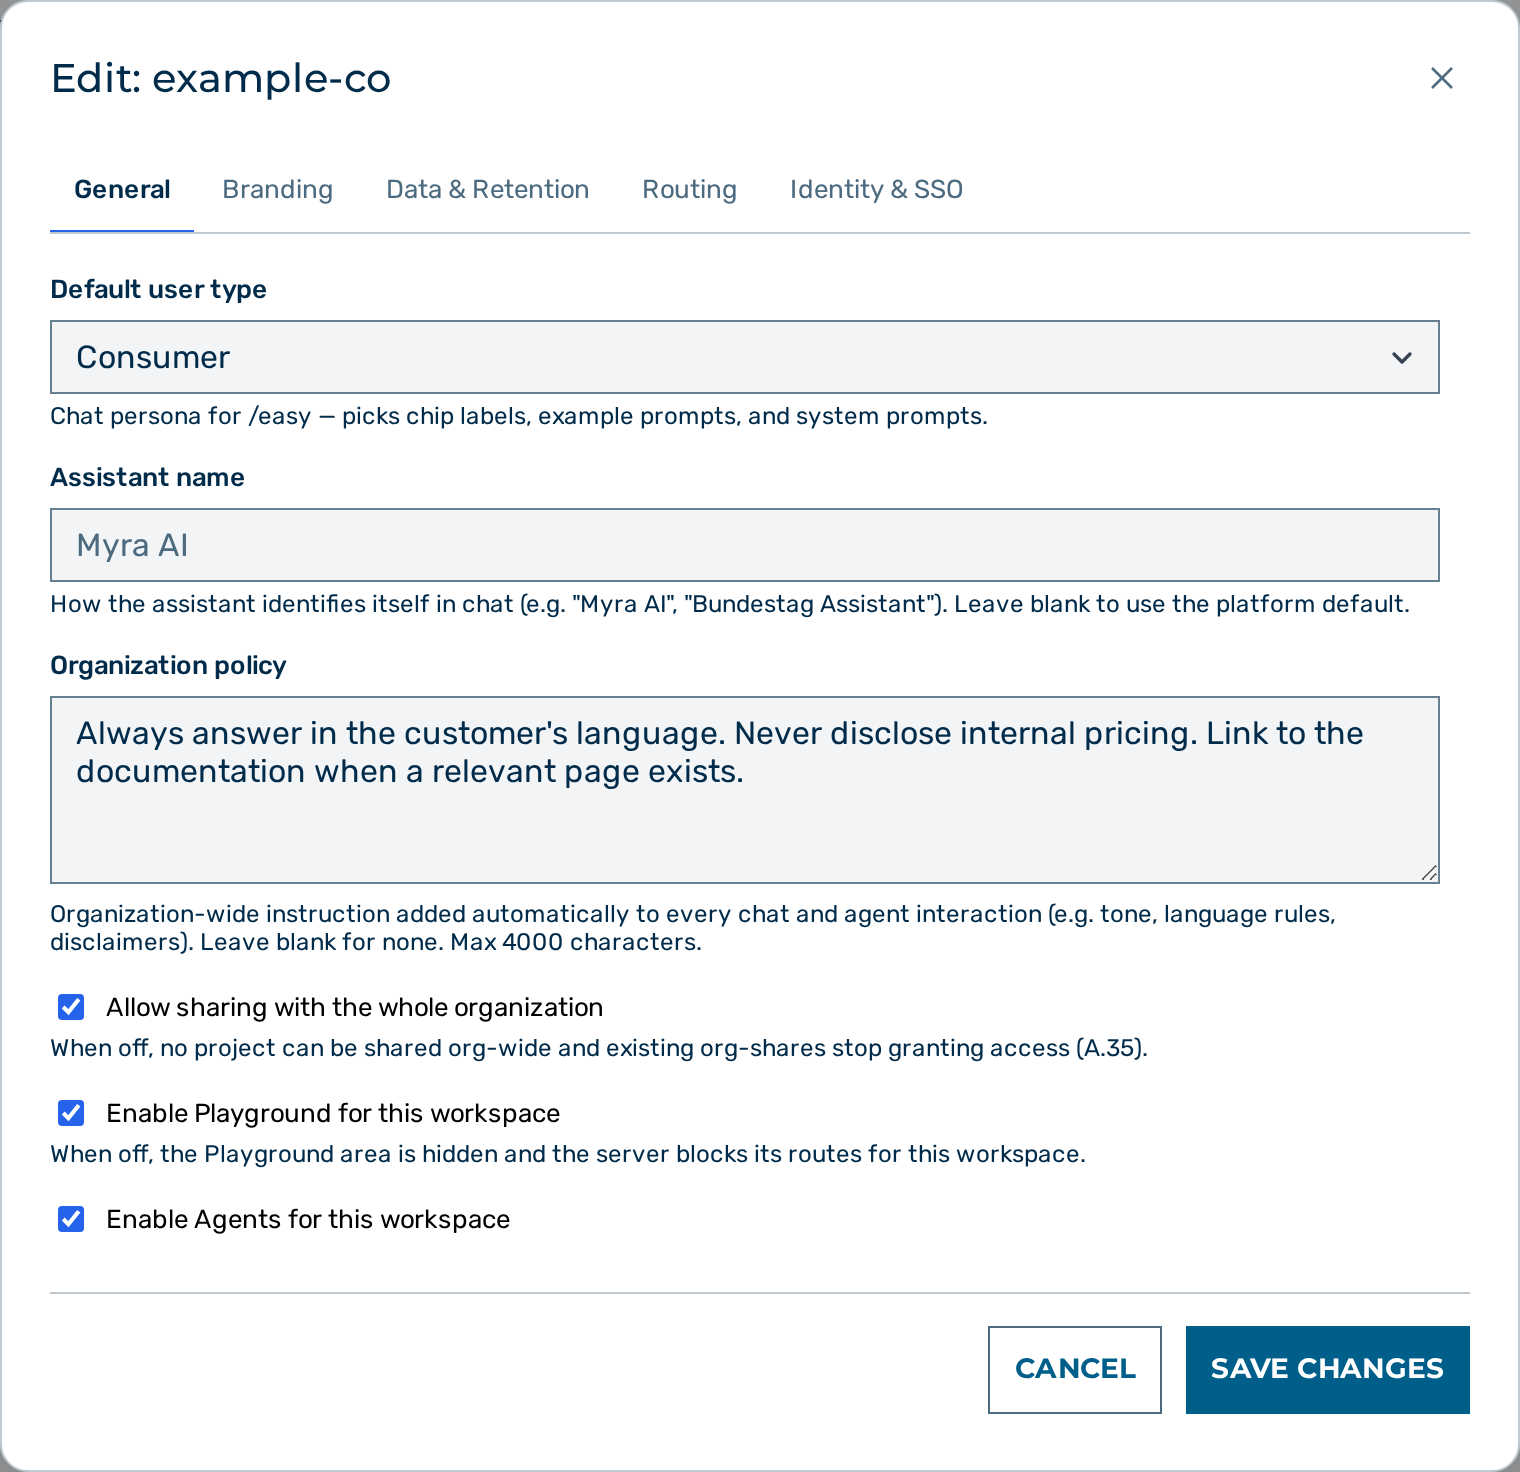
The edit dialog is organised as a row of tabs, so each group of settings is reached without scrolling one long page. Only the active tab is shown; edits made on one tab are kept when switching to another.
- General — slug, plan, budget, trial, default user type, assistant name, organization policy, the feature availability toggles, the org-wide sharing and PII-preview switches, the request-logging kill switch, and the Seats & Budget readout (per-plan, seats editable for an enterprise tenant by a platform admin).
- Branding — the branding (white-label) fields.
- Data & Retention — conversation retention and request-log retention.
- Routing — the organisation-wide EU routing floor and the EU cloud region drop-down lists.
- Identity & SSO — single sign-on and SCIM provisioning.
The General, Branding, Data & Retention, and Routing tab fields are staged locally and written in a single request when the Save Changes button is clicked; no field is saved on its own. Single sign-on and SCIM provisioning on the Identity & SSO tab are independent sub-resources with their own explicit save.
⚠️ Caution: Closing the dialog with unsaved changes — through the X button, the overlay, the Escape key, or the Cancel button — opens a Discard changes? confirmation with the message You have unsaved changes. Discard them?. Click on the Discard button to close without saving, or Cancel to keep editing. A dialog with no unsaved change closes straight away.
Proceed as follows to edit a tenant:
- Click the open action icon on the tenant's row.
- The tenant detail view opens.
- Click on the Edit button.
- The Edit:
dialog opens. - Update the Default user type, Assistant name, and Organization policy fields as required. The Slug cannot be changed after creation. The Default user type, Plan, and Budget Period fields appear only for the platform
adminrole, because the tenant plan and its billing cadence are set by the platform operator. A tenant admin instead sees Trial ends read-only, when the tenant is on a trial, and edits the organisation's budget in the Budget & governance section (below) rather than in the plan row. - If required, tick the Allow sharing with the whole organization check box. When cleared, no project can be shared org-wide and existing org-shares stop granting access.
- If required, tick the Show the PII masking preview automatically during chat check box. When ticked, the pre-send PII preview opens before each message; when cleared (the default), users open it manually.
- If required, clear the Email unmasked results to internal recipients check box. When ticked (the default), a scheduled task or a workflow run that masked PII emails the full unmasked result to the recipient, provided the recipient is an active registered user of this workspace. External addresses, other workspaces, Mattermost, and webhooks always stay masked or blocked. When cleared, a masked run does not deliver its output.
- A tenant admin also sees a Budget & governance section (migrated from the retired Workspace settings popup):
- Tenant Budget (USD) — the organisation's spend cap. It has its own Save button, separate from Save Changes: a budget change is always routed through four-eyes approval, and mixing it into the main save would hold the whole form. Saving it shows "Submitted for approval" — the change applies only once a platform admin approves it. An empty field means unlimited;
0is a real freeze that blocks every request, and is flagged with a warning rather than applied silently. An amount above the Platform cap shown beside it is refused before the request is sent. - Require a second admin's approval (four-eyes) for tenant-admin changes — when on, a tenant admin's changes to the tracked settings are held for a platform admin to approve instead of applying immediately. It saves with the same button.
- Tenant Budget (USD) — the organisation's spend cap. It has its own Save button, separate from Save Changes: a budget change is always routed through four-eyes approval, and mixing it into the main save would hold the whole form. Saving it shows "Submitted for approval" — the change applies only once a platform admin approves it. An empty field means unlimited;
- The General tab also shows a Seats & Budget section, visible to both platform and tenant admins and rendered per plan:
- Free — the fixed trial allowance: the seat cap and budget are shown read-only for everyone (no one edits a trial's cap here).
- Custom — the self-serve wallet plan: the seat count is shown read-only, and the budget reads "Custom" with a tooltip pointing to the wallet under Billing and plans (the budget follows the top-up amount, not a fixed cap).
- Enterprise — the seat cap and budget are shown. A platform admin can edit the seat count here (a whole number from 1 to 100000) and save it with the section's own Save seats button; the budget stays read-only (its one editor is the Tenant Budget (USD) field above). A tenant admin sees both read-only. Saving seats writes through the entitlements API; the server re-validates and refuses a value below the tenant's active-user count, so an over-low figure is reported inline rather than silently applied.
- An unknown seat cap (the resolver could not be read) shows as
—, distinct from an explicit Unlimited; any other plan is shown read-only.
- Update the additional configuration sections as required (see the sections below).
- Click on the Save Changes button.
-> The updated tenant settings appear in the list.
Adding a user to a tenant
Required role: an administrator with the user-management permission (admin or tenant_admin).
The tenant detail view adds a user directly to the tenant being viewed, without a detour via the Members page. The Add user button appears in the header only when you hold the user-management permission.
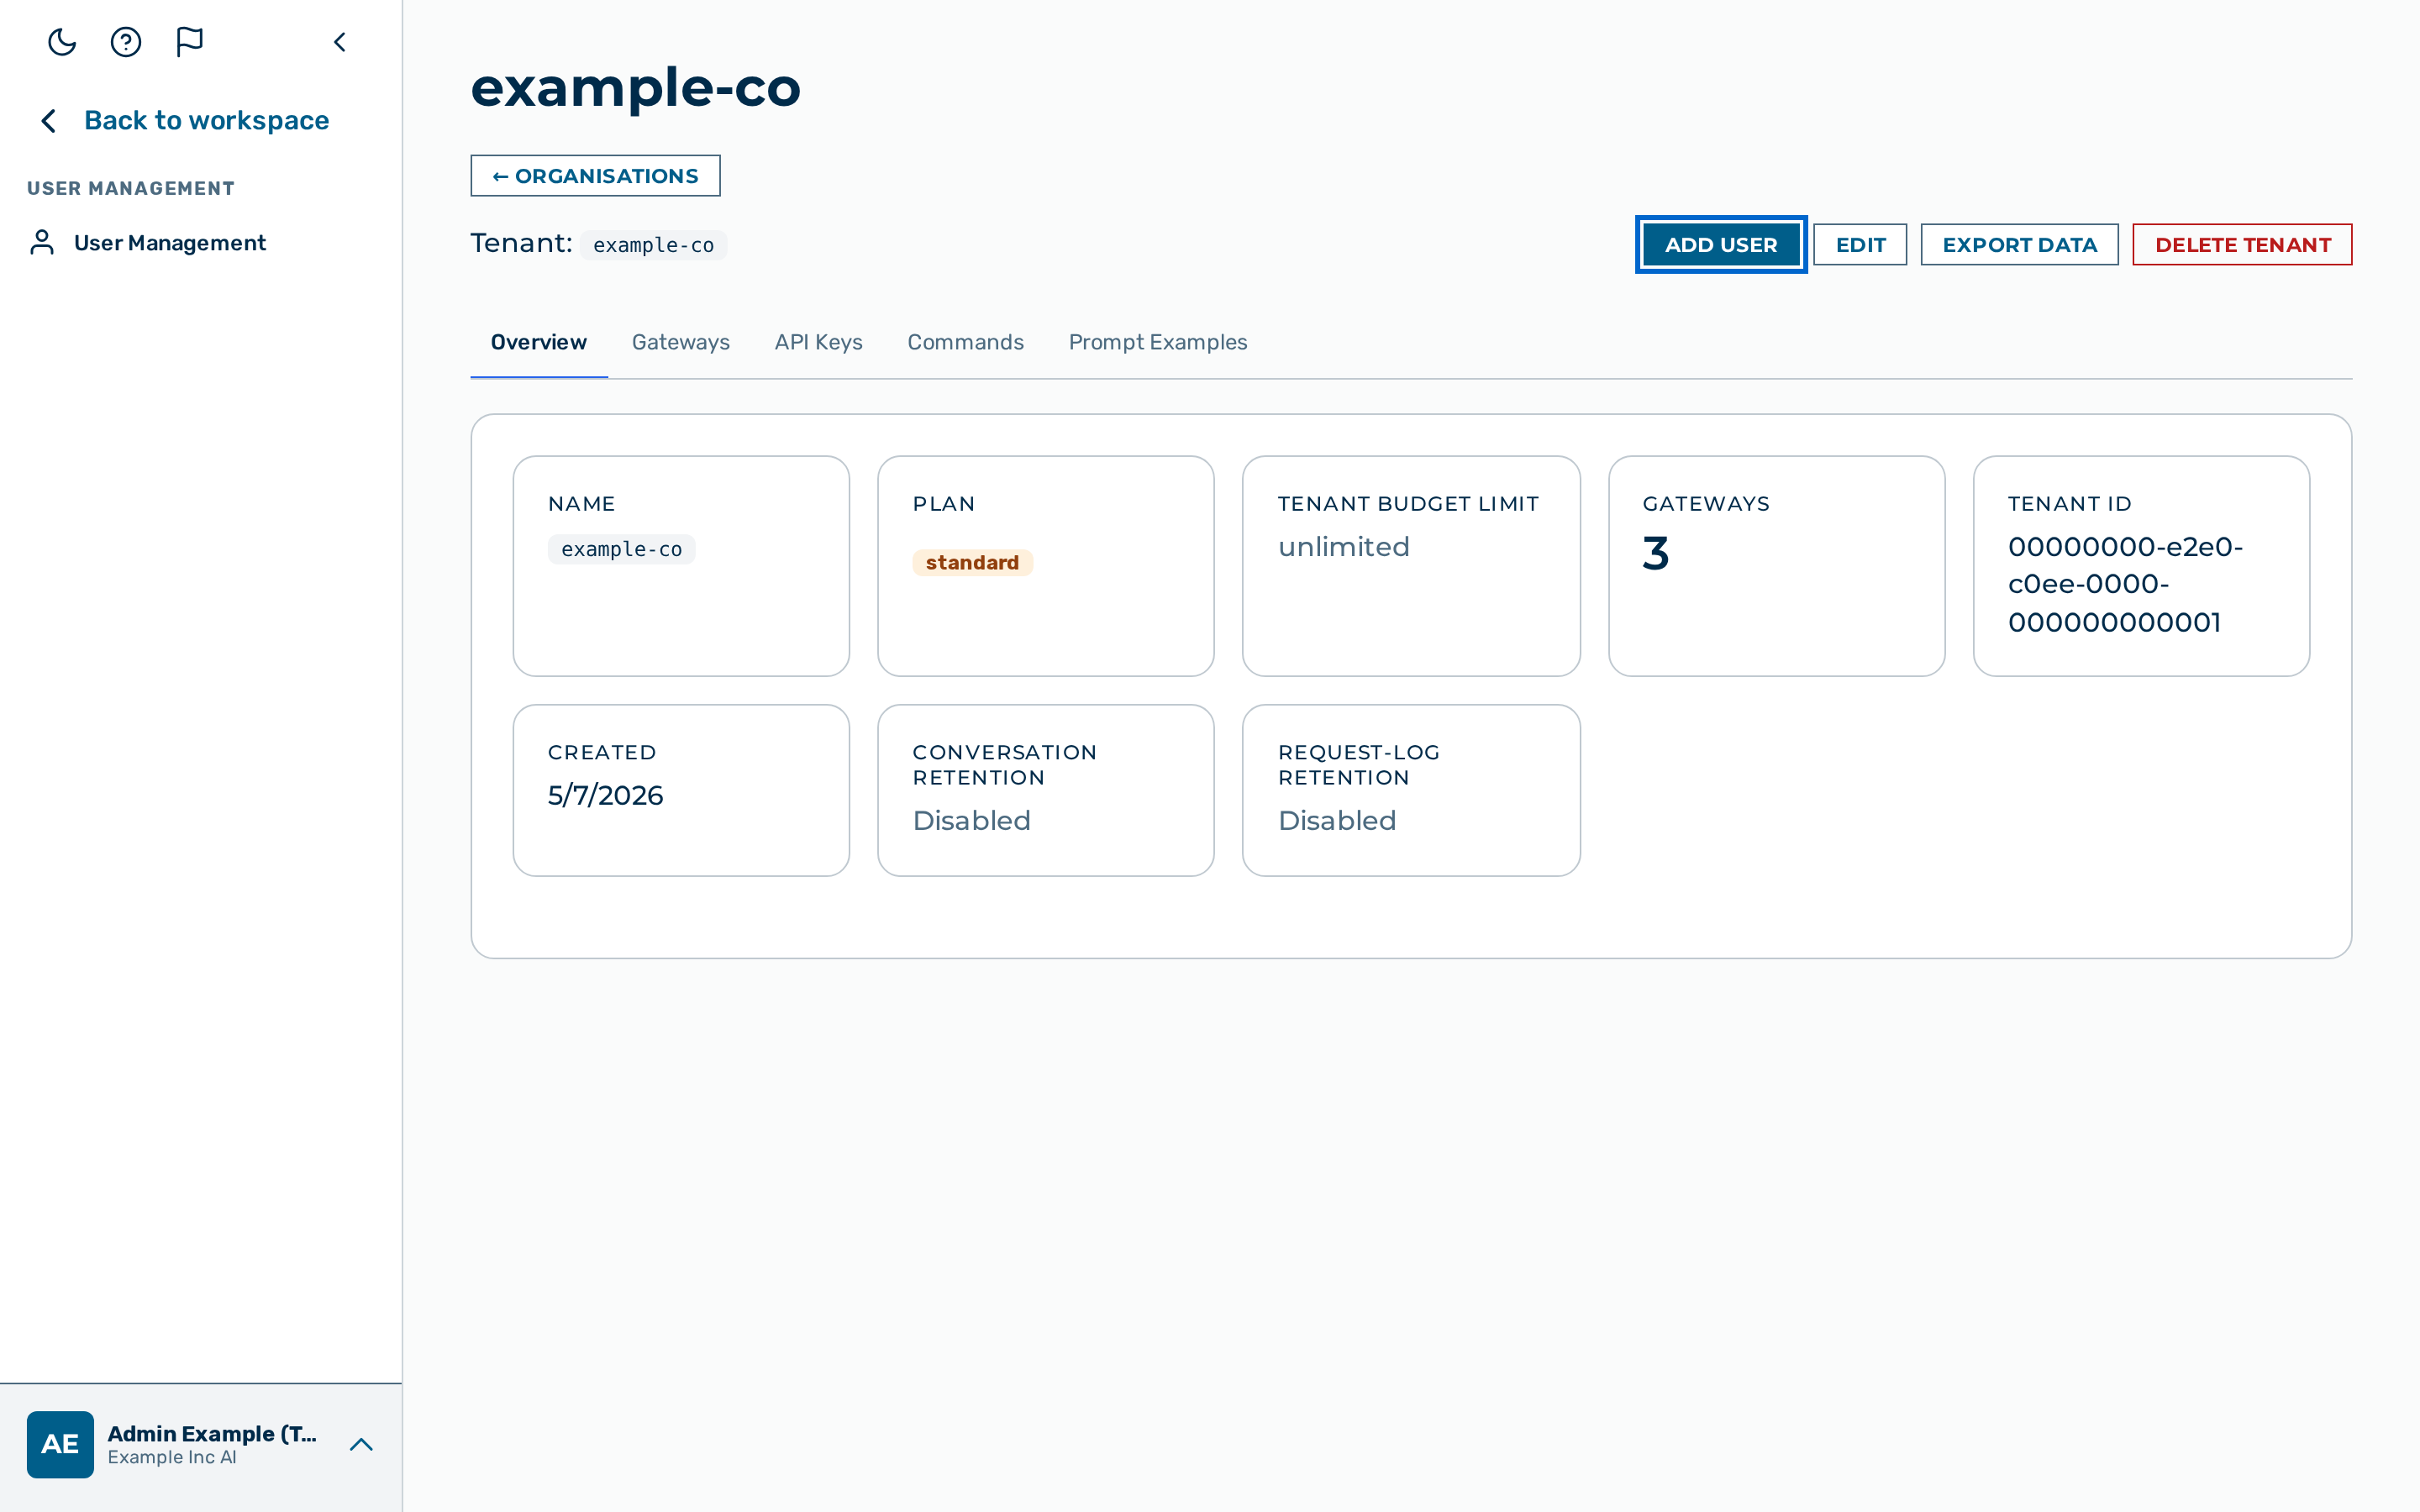
Proceed as follows to add a user to the tenant:
- Click the open action icon on the tenant's row.
- The tenant detail view opens.
- Click on the Add user button in the header.
- The New User dialog opens with the Tenant field fixed to this tenant.
- Enter the email address of the user in the Email text field.
- If required, enter a display name in the Name text field.
- Select a role from the Role drop-down list.
- Click on the Create User button.
-> The new user is created in this tenant and can sign in via the login page.
Feature availability
The edit dialog carries per-tenant switches that enable or disable whole product areas for the
tenant. When a feature is disabled, its routes refuse access, and its rail entry stays visible but
locked — a Premium badge. For the three workspace features Workflows, Agents and Playground,
clicking the locked entry opens a shared upgrade pop-up whose call to action leads to the
contact form; a direct deep-link to a locked page still redirects (to /upgrade/<feature> for
Agents/Workflows, to chat for Playground, which has no upgrade page). Scheduled tasks keeps its
/upgrade/scheduled-tasks page on click.
| Toggle | Default | When off |
|---|---|---|
| Playground | Off | The Playground entry is locked (Premium badge, shared pop-up on click; a deep-link bounces to chat) and its search route returns 403 feature_disabled. Ordinary chat is unaffected — chat and the Playground share the token-mint route, which stays available. |
| Agents | Off | The Agents entry is locked (Premium badge, shared pop-up on click; a deep-link redirects to /upgrade/agents) and agent routes are refused. |
| Workflows | Off (fail-closed) | The Workflows entry is locked (Premium badge, shared pop-up on click; a deep-link redirects to /upgrade/workflows) and workflow routes are refused. |
| Scheduled tasks | Off | The Scheduled tasks entry is locked (Premium badge, click lands on /upgrade/scheduled-tasks) and its routes return 403 feature_disabled. |
Defaults for new tenants. All four workspace features ship off for every newly-created tenant — trial, admin-created and paid alike. A platform admin enables them per tenant in this dialog. Existing tenants are not changed.
See Tenants and gateways API for the underlying
playground_enabled / agents_enabled / workflows_enabled / scheduled_tasks_enabled fields.
Organization policy
Required role: tenant admin or admin.
An organization policy is an organization-wide instruction added automatically to every chat and agent interaction of the tenant — for example a tone rule, a language rule, or a disclaimer. The policy is set in the Organization policy text field of the edit dialog (up to 4000 characters). Leave the field blank for no policy.
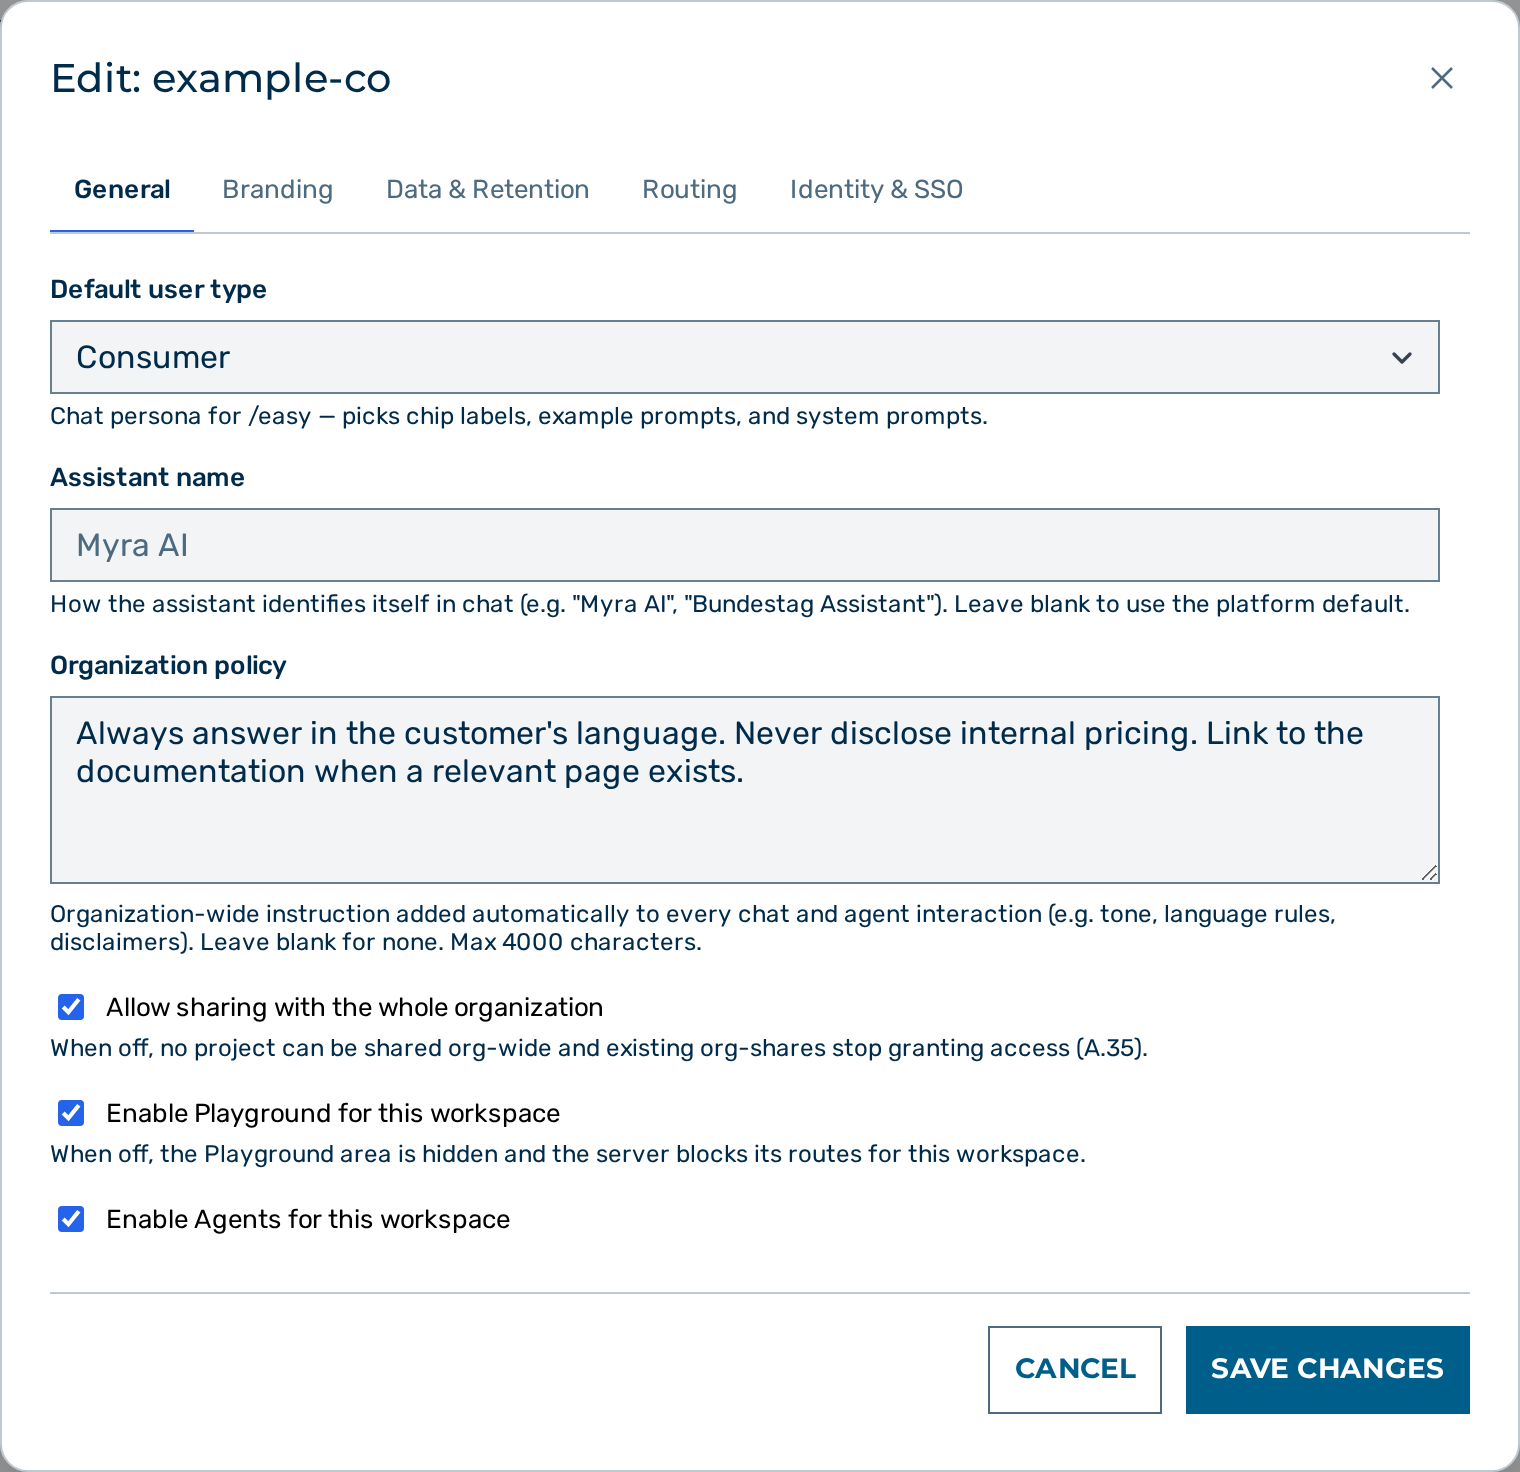
⭐ Example: Always answer in formal German and never disclose internal cost figures.
Organisation-wide EU routing
Required role: platform admin.
The Routing tab has an Organisation-wide EU routing setting that applies EU-only model routing to every gateway in the organisation — including gateways created later, which would otherwise start with the per-gateway setting switched off. That is the point of it: it closes the gap where a newly created, not-yet-configured gateway silently routed outside the EU. It is the setting the gateway editor refers to when it says "When your organisation enforces EU routing platform-wide, this gateway is always EU-only regardless of this setting."
It is a floor, not an override: a gateway can raise itself to EU-only, but it can never go below the organisation setting. There are three states:
| Option | Meaning |
|---|---|
| No organisation setting | No organisation-wide default. Each gateway's own EU-routing setting governs it. |
| Enforced — every gateway is EU-only | Every gateway of this organisation is EU-only, regardless of its own setting, now and in future. |
| Not enforced | Recorded as a deliberate decision not to enforce. Behaves like "no organisation setting" for routing, but is distinguishable from never having chosen. |
Changing it takes effect immediately on every gateway of the organisation, and the change is written to the audit log. It is restricted to platform admins because turning it off lowers the residency guarantee an organisation may be contractually bound to; raising an individual gateway to EU-only remains available to tenant admins on the gateway itself.
EU cloud region
Required role: tenant admin or admin.
A tenant can pin the EU cloud region used for Amazon Bedrock and Google Vertex models, so that traffic to those providers stays within the European Union. The region is set with two drop-down lists in the edit dialog:
- Bedrock region (AWS) — the EU region used for Amazon Bedrock models.
- Vertex region (Google Cloud) — the EU region used for Google Vertex models.
Both drop-down lists offer only EU regions. Leave a drop-down list on Deployment default (inherited) to inherit the platform setting instead of pinning a region. A per-gateway region overrides the tenant region.
💡 Note: The tenant region is inherited by any gateway of the tenant that sets no region of its own. The region choices decide which EU region is used; they do not by themselves enforce EU-only routing — that is Organisation-wide EU routing above, or the per-gateway EU routing setting. See EU data residency and Gateways.
Conversation retention
Required role: tenant admin or admin.
A tenant can enforce a retention period (Löschfrist) on its chat content: conversations with no activity for longer than the period — and all of their messages, attachments, and generated images — are permanently and automatically deleted.
The retention period is set in the Conversation retention (days) field of the edit dialog. Enter a whole number between 30 and 3650 days to arm retention, or leave the field blank to disable it (the default). The tenant detail view shows the armed period, or Disabled, in the Conversation retention stat card.
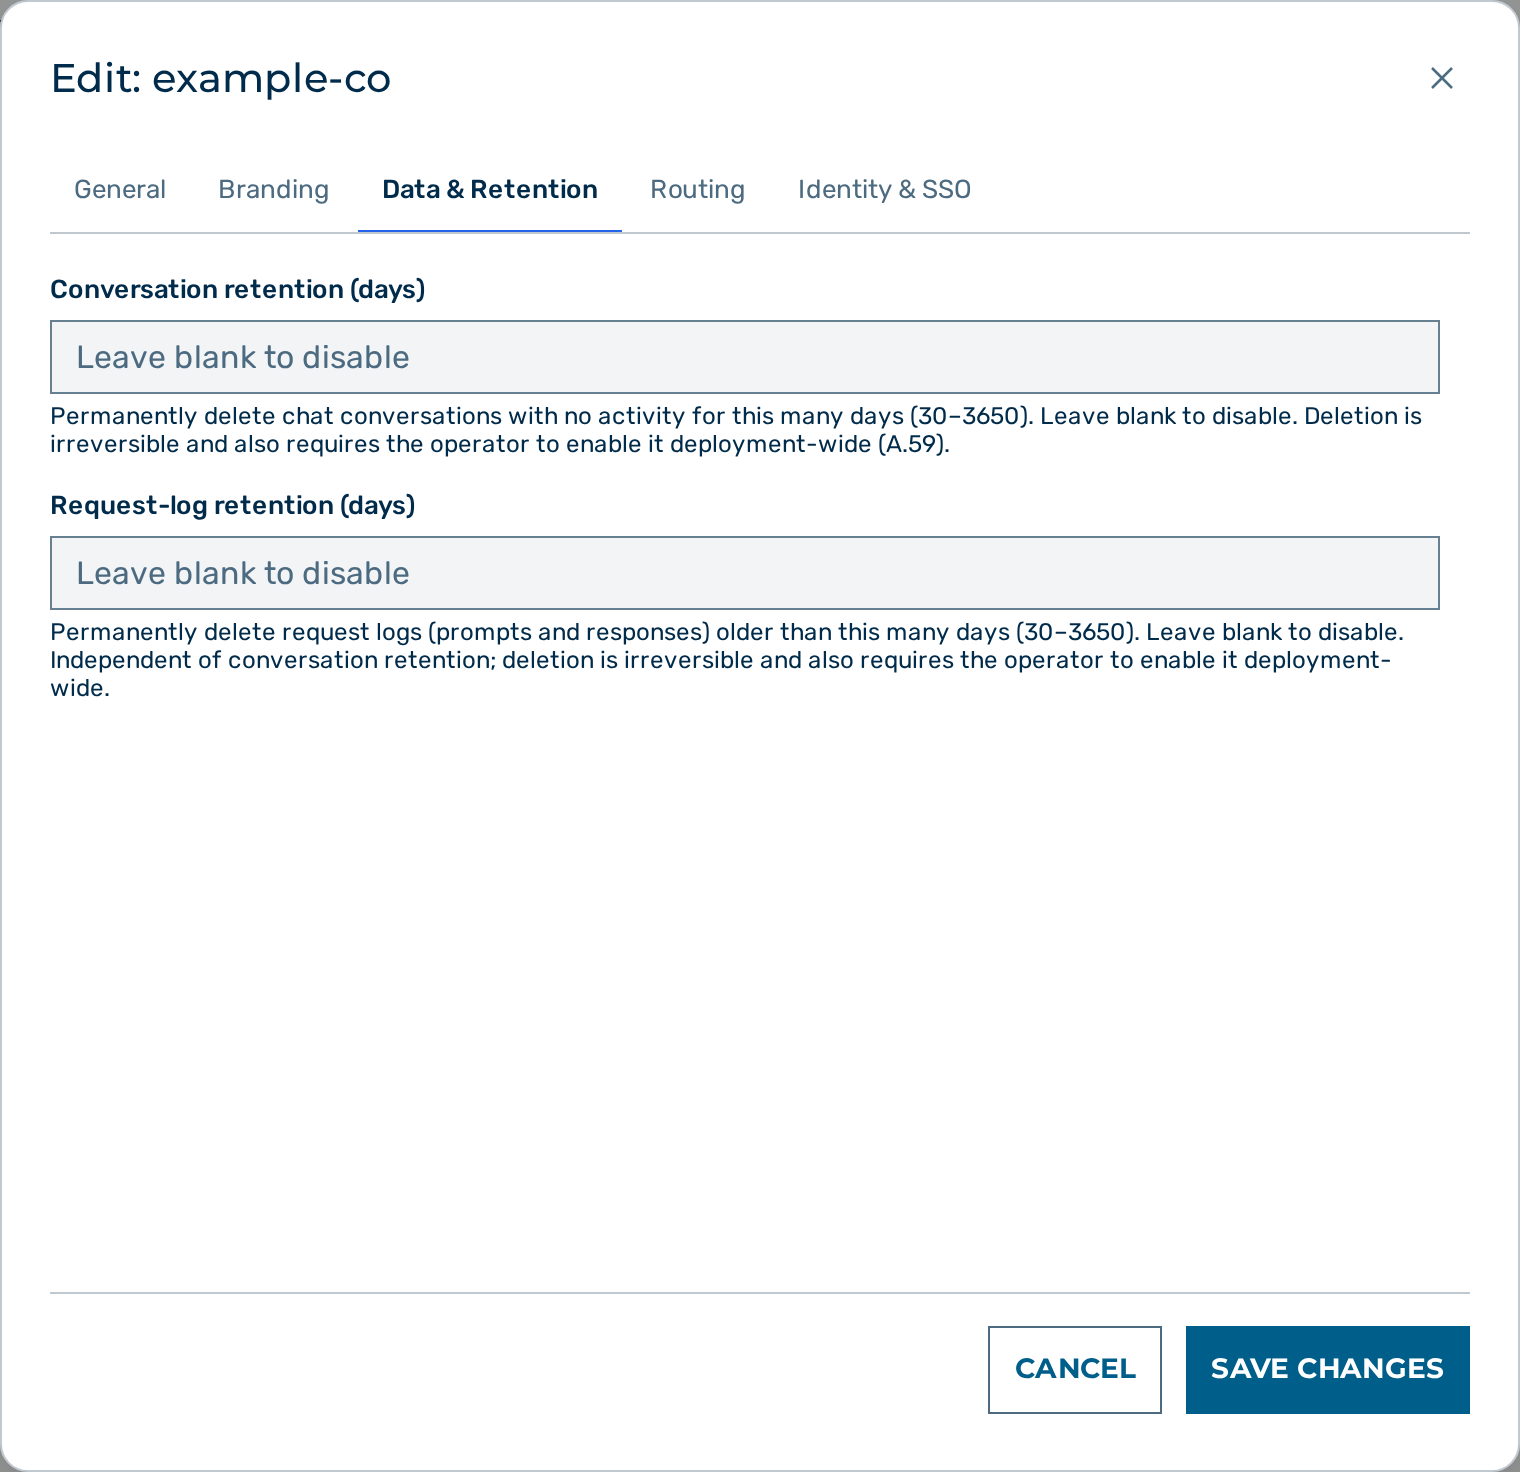
Proceed as follows to arm conversation retention:
- Open the Edit:
dialog for the tenant. - Enter a number between 30 and 3650 in the Conversation retention (days) field.
- Click on the Save Changes button.
-> The retention period is armed. Conversations with no activity for longer than the period are deleted automatically, and each automatic deletion is recorded in the audit log with counts only.
⚠️ Caution: Retention deletion is irreversible and disabled by default. Arming it also requires the operator to enable retention deployment-wide. For the full Lösch- und Archivkonzept — what is deleted, the deletion log, responsibilities, and the accepted value range — see Conversation retention and deletion.
Request-log retention
A tenant can enforce a separate retention period (Löschfrist) on its request logs — the stored prompt and model response of each inference request. This control is independent of conversation retention: it deletes the raw request-log records, not the chat conversations.
The retention period is set in the Request-log retention (days) field of the edit dialog. Enter a whole number between 30 and 3650 days to arm it, or leave the field blank to disable it (the default). The tenant detail view shows the armed period, or Disabled, in the Request-log retention stat card.
Proceed as follows to arm request-log retention:
- Open the Edit:
dialog of the tenant. - Enter a number between 30 and 3650 in the Request-log retention (days) field.
- Click on the Save Changes button.
-> The retention period is armed. Request logs older than the period are deleted automatically, and each automatic deletion is recorded in the audit log with counts only.
⚠️ Caution: Deletion is irreversible and disabled by default. Arming it also requires the operator to enable request-log retention deployment-wide. The append-only cost ledger is preserved. For the full behaviour see Request-log retention.
Branding (white-label)
Required role: tenant admin or admin.
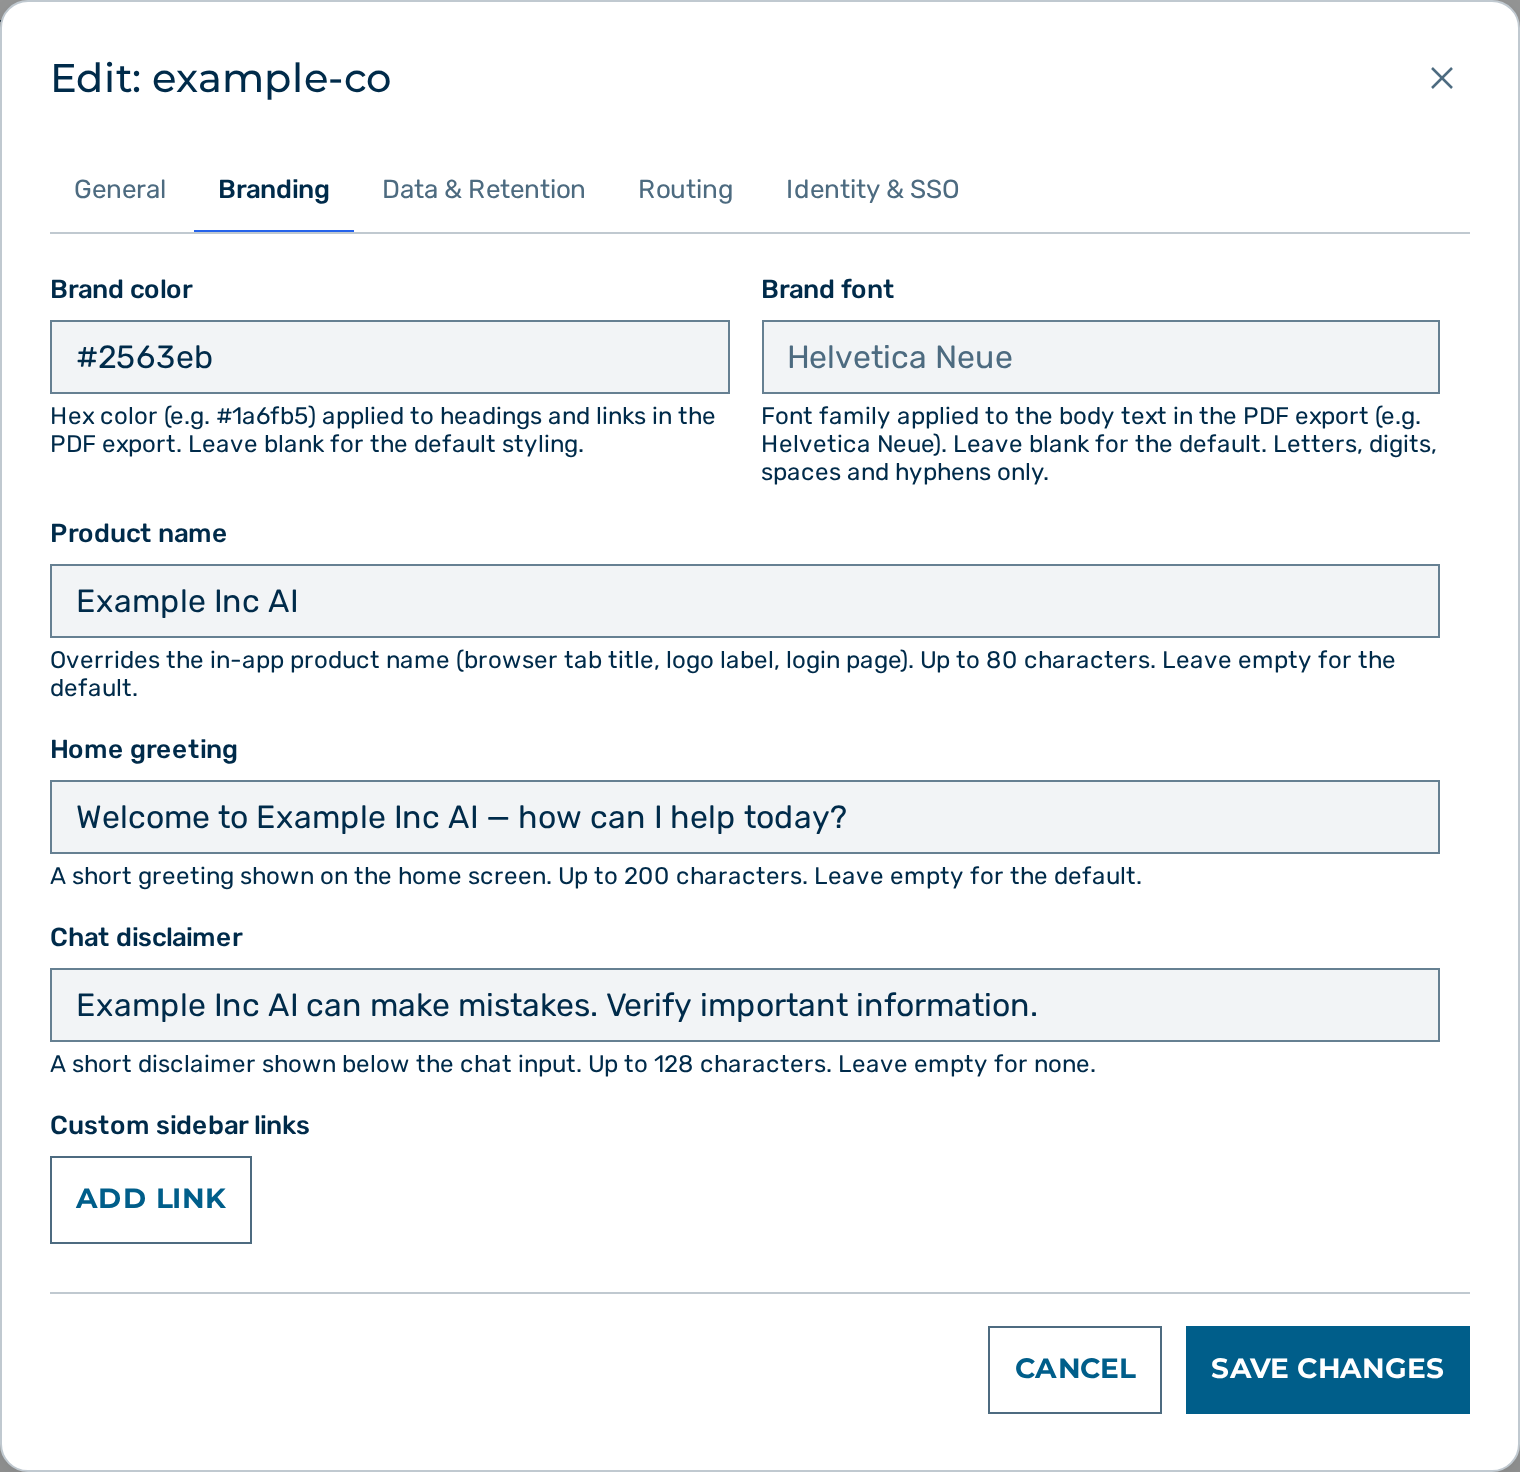
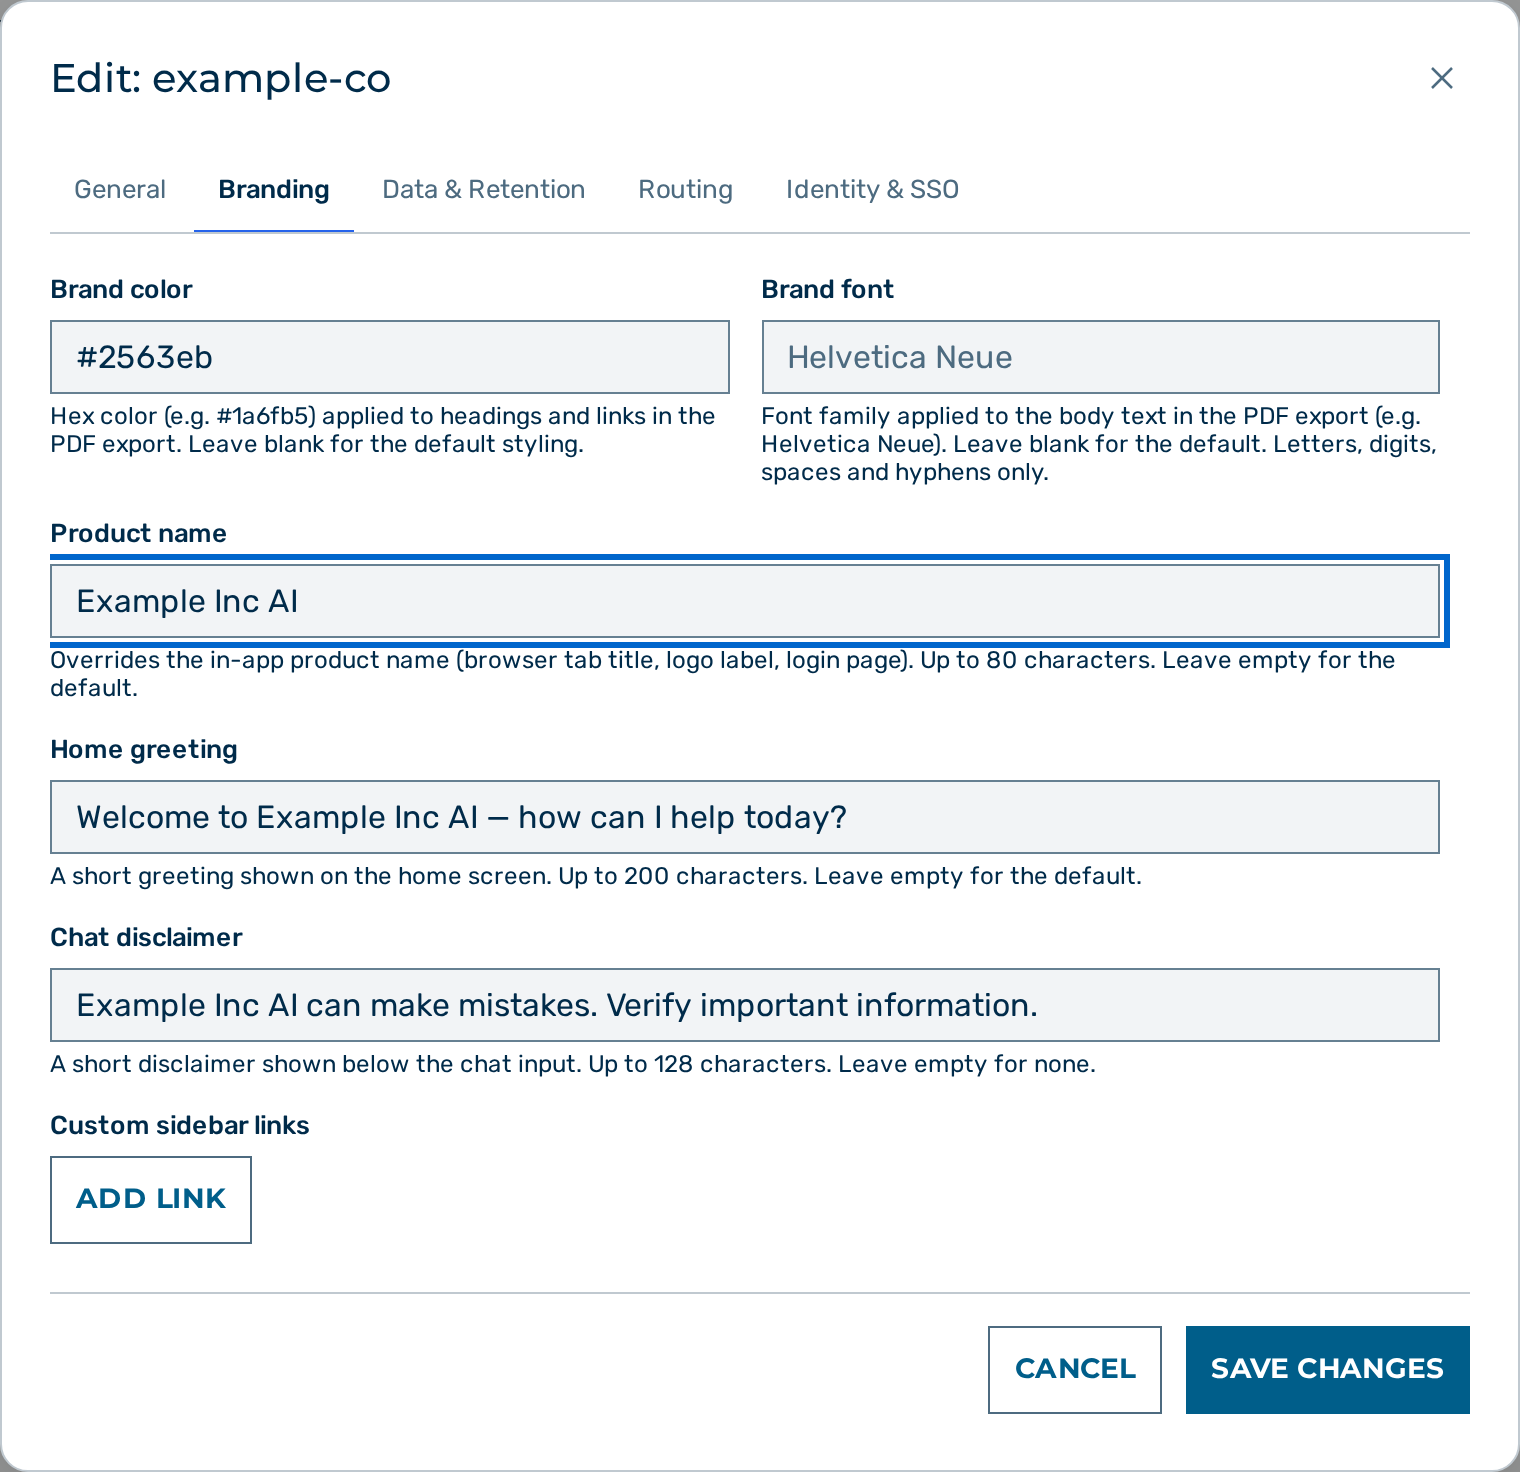
The edit dialog white-labels the application for the tenant. The branding settings are grouped below; each is optional, and leaving a field blank falls back to the platform default.
Images
Three image sections upload the tenant assets. Each accepts a PNG or JPEG up to 512 KB; SVG is not accepted.
- Application logo (dark theme) — shown in the sidebar, chat header, and login page in the dark theme, and as the fallback for the light theme.
- Application logo (light theme) — shown in the light theme. Optional; if unset, the dark-theme logo is used in both themes.
- Favicon (browser tab icon) — the icon shown in the browser tab.
Text and links
- Product name — overrides the in-app product name in the browser tab title, the logo label, and the login page (up to 80 characters).
- Home greeting — a short greeting shown on the home screen (up to 200 characters).
- Chat disclaimer — a short disclaimer shown below the chat input (up to 128 characters).
- Custom sidebar links — up to four navigation links, each a label and an
httpsURL. The links appear in the LINKS section of the sidebar. See Interface overview.
Document export
- Brand color — a
#RRGGBBhex colour applied to headings (and, in the PDF, the top-heading rule and links) in the PDF, Word, and PowerPoint exports. Only#RRGGBBis accepted. The same colour is the in-app accent (links, highlights) for the tenant. In the dark theme the application automatically lightens the accent just enough to stay readable (WCAG AA) on the dark surfaces — the stored colour is unchanged, light theme and the document exports always use it exactly as entered. - Brand font — the body font family for the document exports (letters, digits, spaces, and hyphens, up to 120 characters).
The tenant logo is also placed on the generated documents. Each branding element degrades independently when it is unset or invalid.
Where branding appears
- In-app — the product name, greeting, logos, favicon, and sidebar links render across the application for signed-in users of the tenant.
- Login page — a link of the form
/login?tenant=<slug>renders the tenant product name, greeting, and logo before anyone signs in. See the public login branding reference for how the branding is resolved fail-closed. - Transactional emails — the sign-in code email is branded with the tenant product name when it is set.
- Document export — the brand colour, font, and logo style the PDF, Word, and PowerPoint exports.
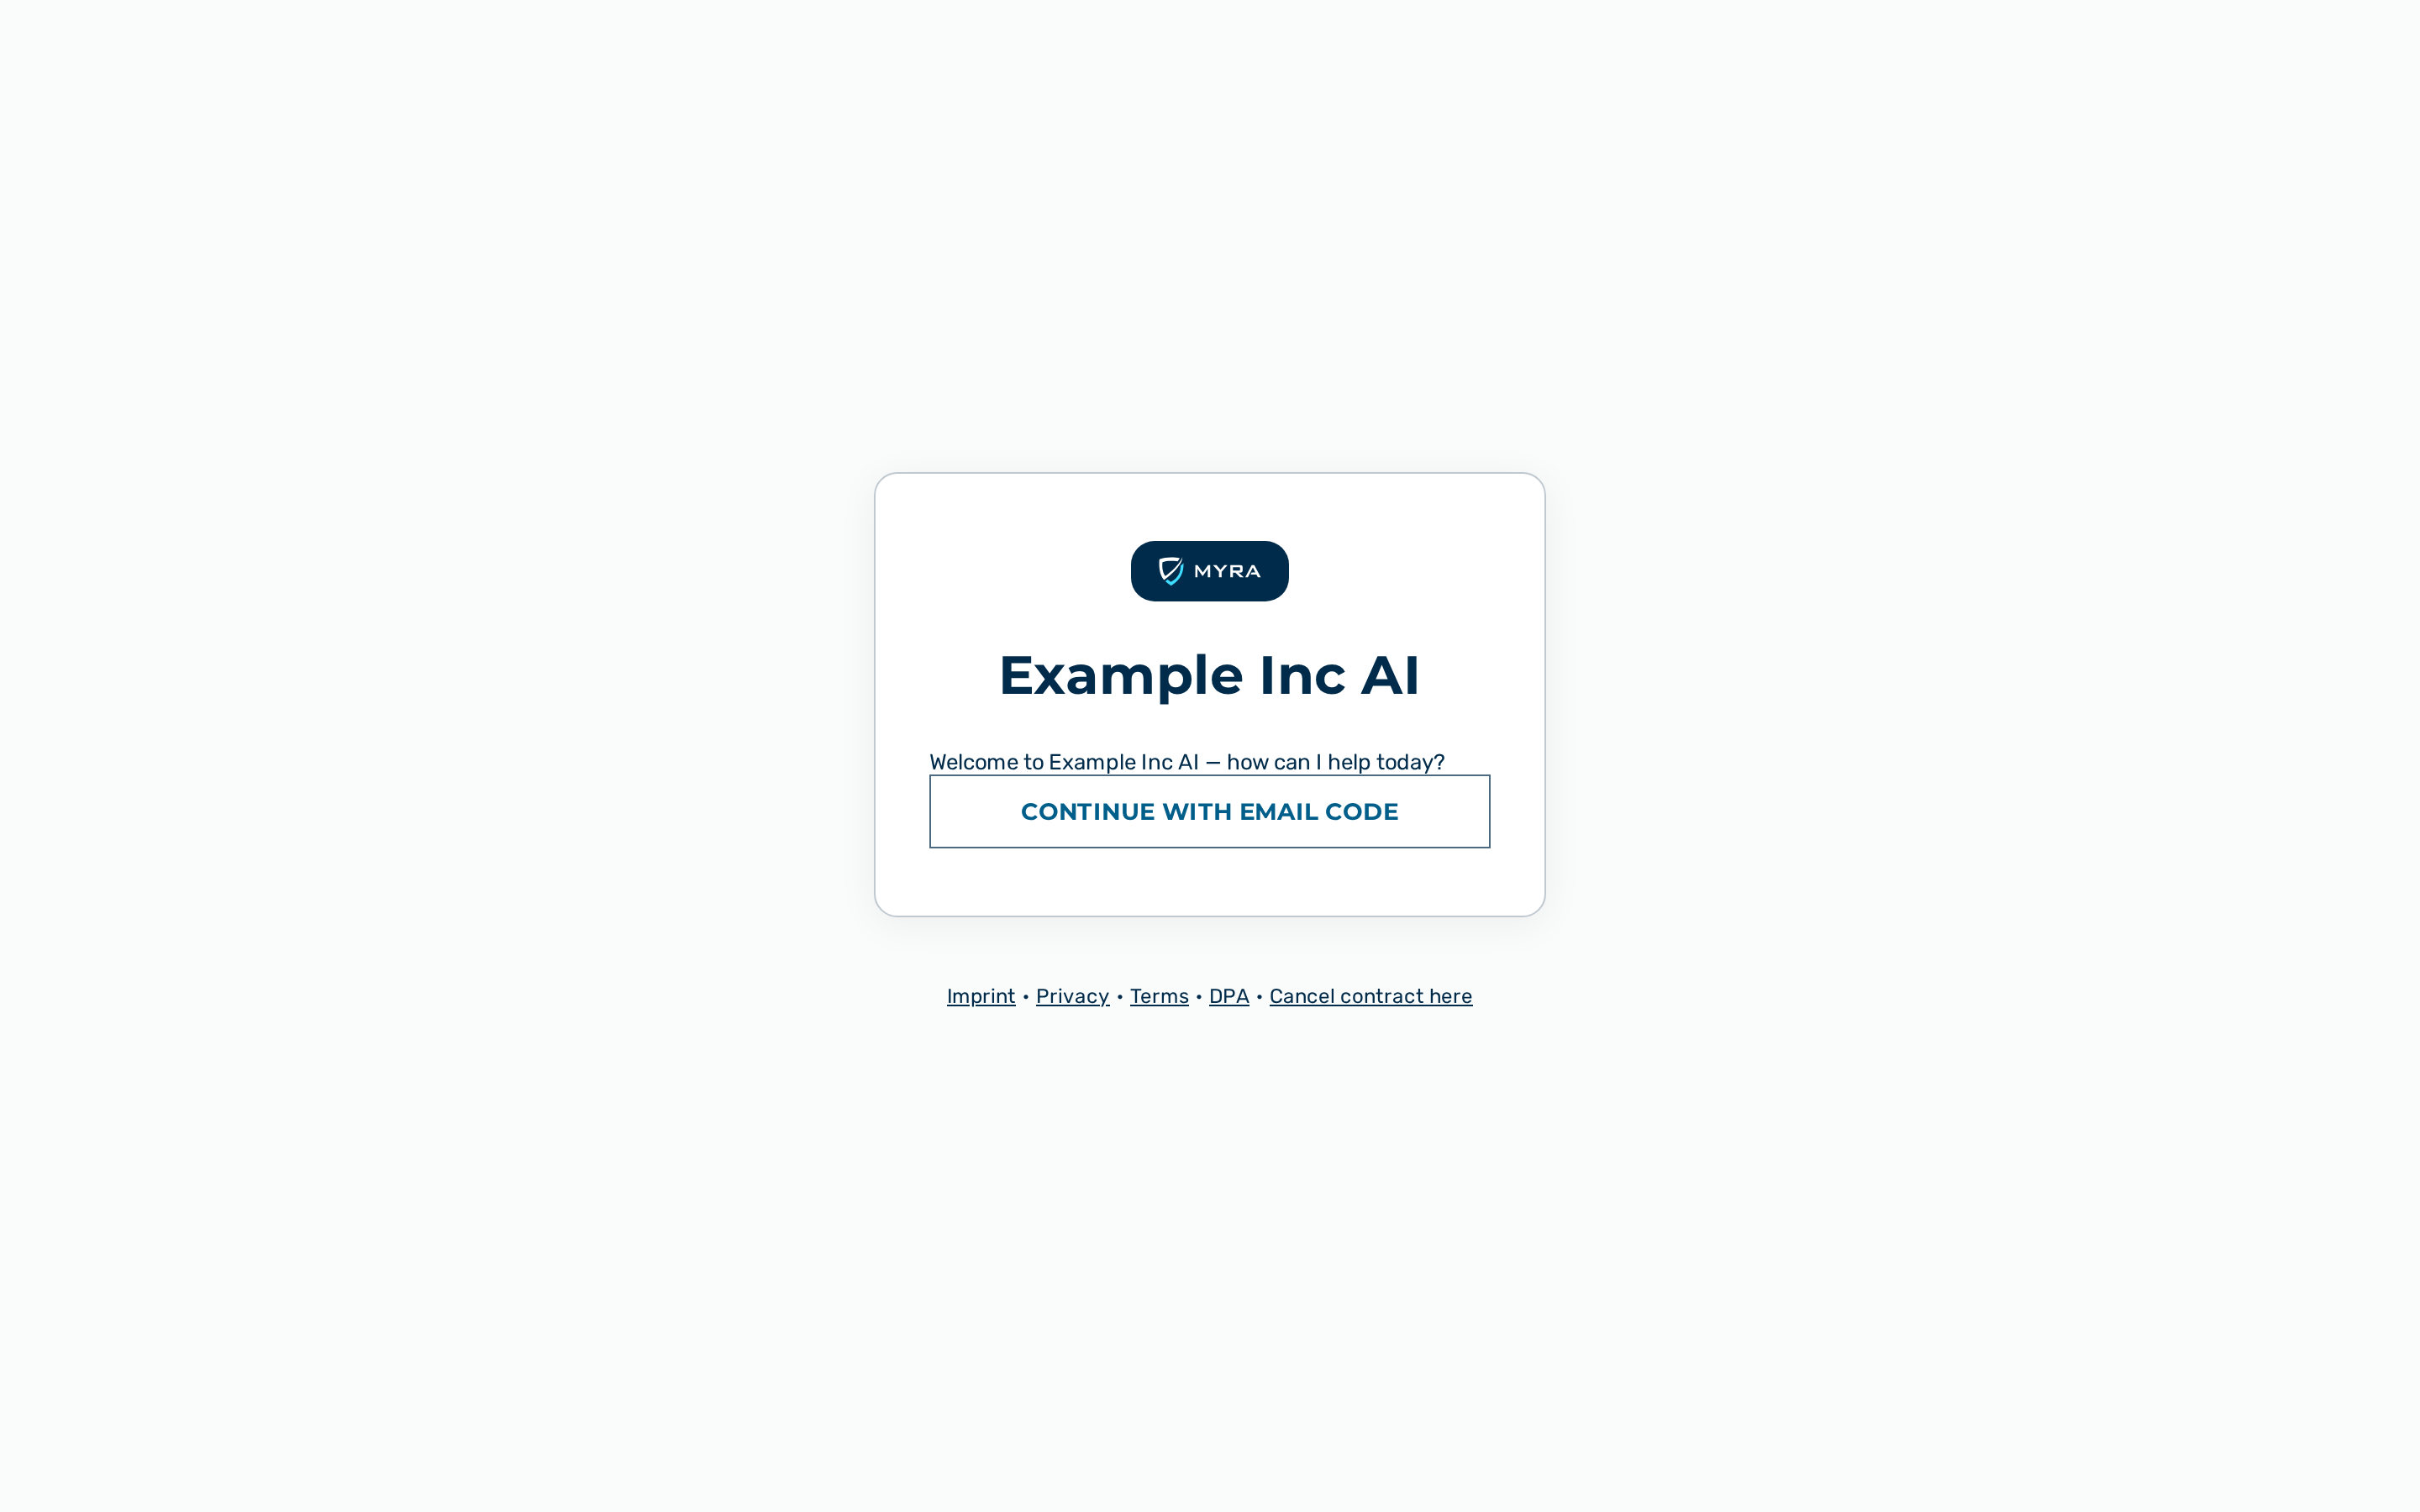
💡 Note: Precedence — the dark-theme logo is used in the dark theme and as the fallback in the light theme; the light-theme logo is used in the light theme only. Every branding field falls back to the platform default when it is blank.
See Conversation export for the accepted and rejected shapes of the document-export fields.
Single sign-on (SSO)
Required role: tenant admin or admin.
The edit dialog configures single sign-on so that the tenant's users can sign in through the organization's identity provider. Two independent panels are available; a tenant can enable either or both.
- Single sign-on (OIDC) enabled — a generic OpenID Connect provider (for example Microsoft Entra ID or ADFS). The panel holds the Issuer URL, Client ID, Client secret, Subject claim, Allowed email domains, an optional Entra directory ID (the Microsoft Entra directory GUID — when set, only tokens from that directory are accepted), the Allow guest sign-in option (off by default; permits Entra B2B
#EXT#guests), and an optional Group attribute and Group mapping that map an identity attribute (for exampledepartment) to internal groups. The panel also displays the OIDC redirect URI to register at the identity provider —https://ai-api-admin.myra.eu/admin/auth/oidc/callback(a single, non-tenant-keyed callback on the admin-API host). - SAML 2.0 SSO — a SAML 2.0 identity provider. The panel holds the IdP entity ID, IdP SSO URL, IdP signing certificate (PEM), NameID format, Allowed email domains, an optional Single Logout URL, and the Sign authentication requests option, plus the same group mapping. The panel also displays the service-provider (SP) values to register at the identity provider — the SP entity ID / metadata URL and the ACS (Assertion Consumer Service) URL. These are served on the admin-API host over HTTPS (for example
https://ai-api-admin.myra.eu/admin/auth/saml/<tenant>/metadataand…/acs), not the application hostai.myra.eu. Register the displayed ACS URL as the IdP's reply/ACS URL and the entity ID as the SP identifier exactly as shown; the SP metadata is authoritative.
Each checkbox reflects what is actually stored for the tenant. On a tenant with no single sign-on configured both panels open with their checkbox cleared, and if a stored configuration cannot be read the panel shows a load error with a Retry button instead of the form — so an unreadable configuration is never presented as an empty one, and a save cannot overwrite settings that were merely unreadable.
Single sign-on authenticates existing accounts only — it does not create users. The Allowed email domains list is the domain-to-tenant mapping that the sign-in page uses to offer the Continue with SSO button. When a domain is configured for both OpenID Connect and SAML, OpenID Connect is used.
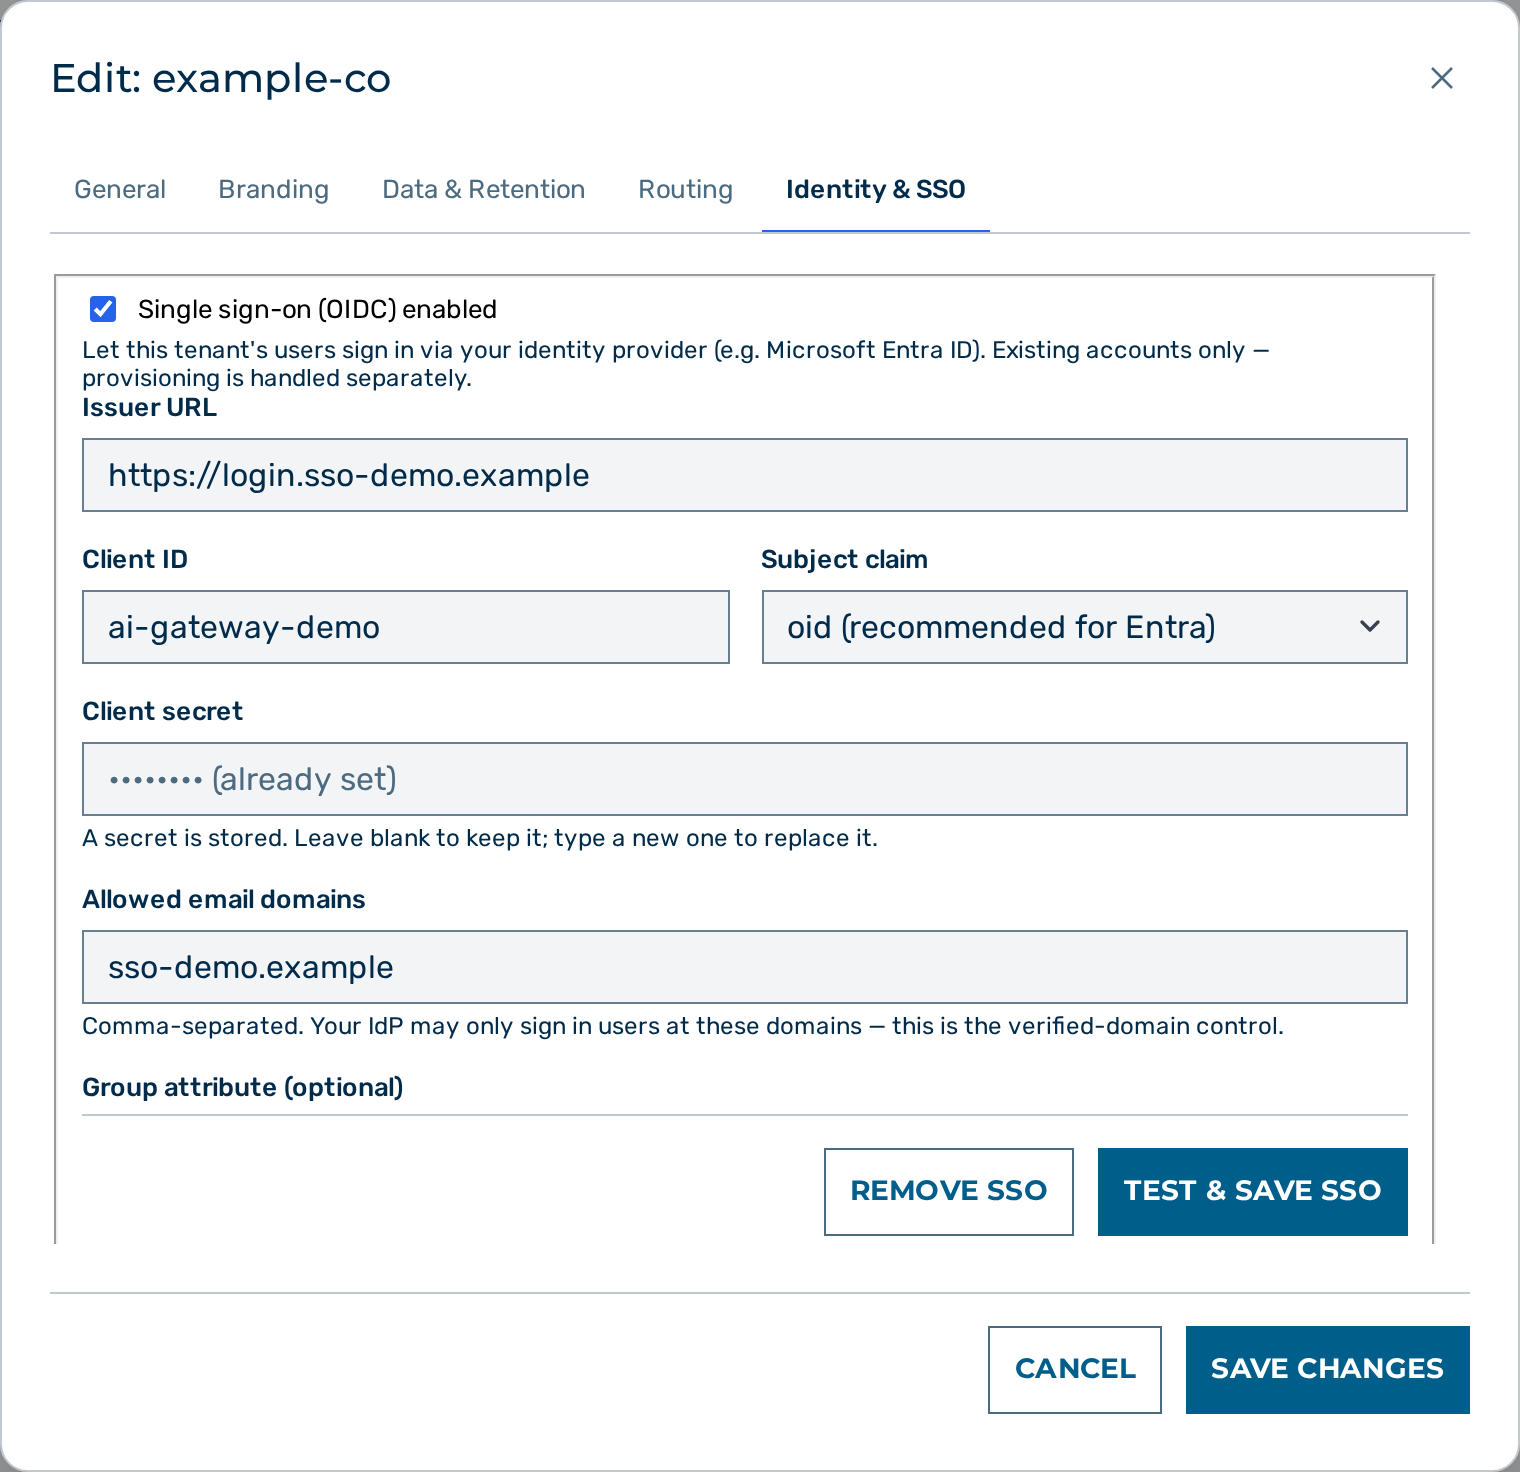
For a step-by-step provider walkthrough — Microsoft Entra ID, or a generic OIDC or SAML provider — see Single sign-on. The Entra directory pin (Entra directory ID / entra_tenant_id) and the guest sign-in policy (Allow guest sign-in / allow_guest_signin) are set in the OIDC panel, or through the admin API (see OIDC SSO configuration).
For the runtime endpoints, the identity-provider requirements, and the fail-closed token verification, see Admin API authentication. For the end-user sign-in flow, see Signing in.
SCIM provisioning
Required role: tenant admin or admin.
SCIM provisioning lets the tenant's identity provider create, update, and deactivate the tenant's users — and sync groups — automatically. The SCIM provisioning panel of the edit dialog issues a bearer token that the administrator pastes, together with the base URL, into the identity provider's provisioning settings.
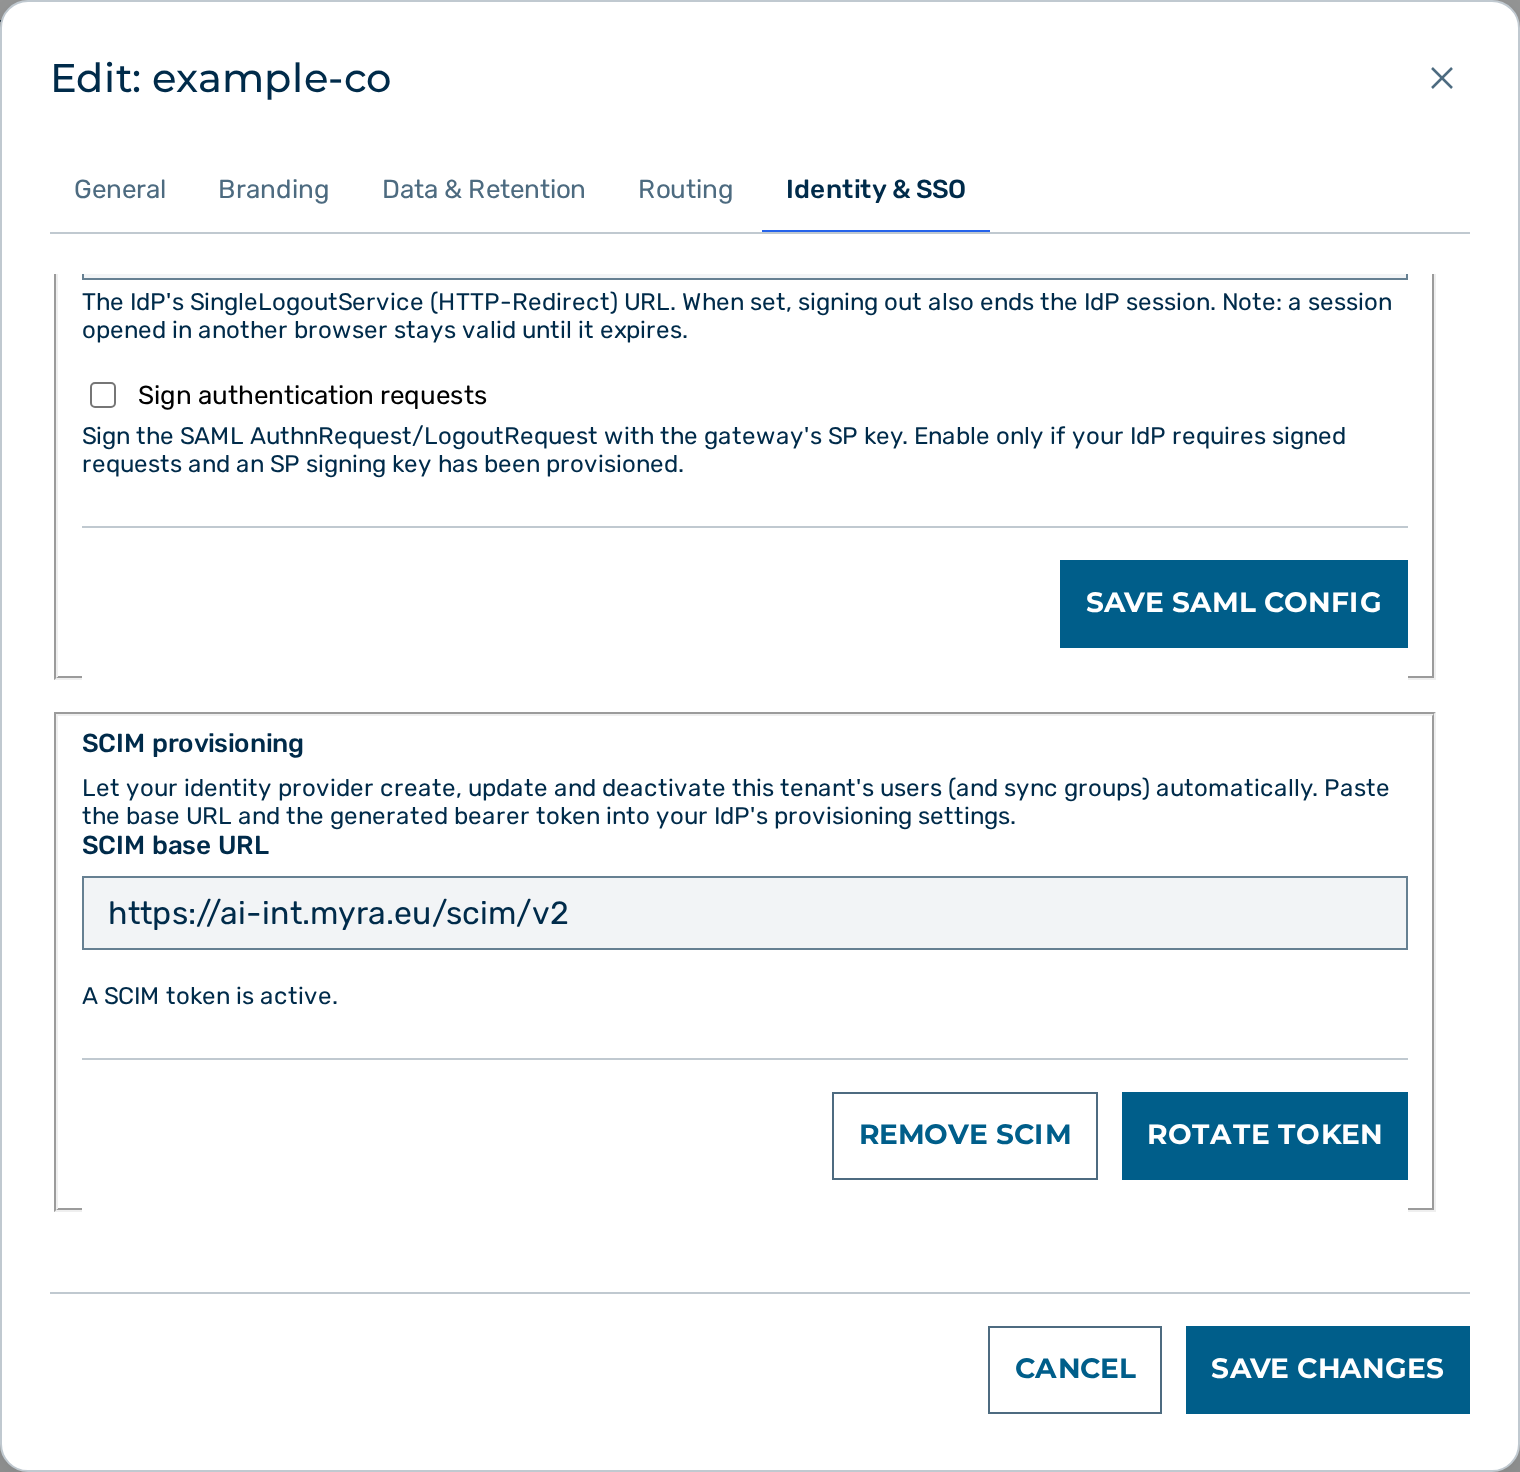
Proceed as follows to enable SCIM provisioning:
- Open the Edit:
dialog for the tenant. - Scroll to the SCIM provisioning panel.
- Click on the Generate token button.
- The generated bearer token appears once in the Bearer token (shown once) field.
- Copy the token immediately.
- The warning reads Copy this now — it is not stored and will not be shown again.
- Copy the value of the SCIM base URL field — it is the full HTTPS URL on the admin-API host (for example
https://ai-api-admin.myra.eu/scim/v2, not theai.myra.euapplication host). Use it exactly as shown. - Paste the base URL and the bearer token into the identity provider's provisioning settings.
-> The panel shows A SCIM token is active. The identity provider can now provision users and groups for the tenant.
💡 Note: Click on the Rotate token button to replace the active token with a new one, or the Remove SCIM button to revoke provisioning. A rotated or removed token stops working immediately.
Exporting a tenant
Required role: tenant admin or admin.
A tenant admin can export a full, machine-readable copy of the tenant's data — for a contract-end handover or a compliance record. The export bundles the tenant's configuration (gateways, agents, policies, roles, connectors), conversations, statistics, and logs into a single ZIP that contains both JSON and CSV. Internal structures (vector and embedding indexes, knowledge blobs) are excluded, and provider keys and SIEM credentials are never exported.
Proceed as follows to export a tenant:
- Click the open action icon on the tenant's row.
- The tenant detail view opens.
- Click on the Export data button.
-> The browser downloads the export as a ZIP named tenant-<slug>-export.zip.
💡 Note: Export the tenant before a purge — a purge erases the data and it can no longer be exported. For the endpoint contract and the JSON manifest, see Exit data export.
Deleting a tenant
Required role: tenant admin or admin.
Deleting a tenant from the admin UI is a soft delete (decommission): it sets a deletion marker on the tenant and disables it. The tenant's gateways stop routing, its tokens stop authenticating, and its users can no longer sign in. Every row is retained, so the tenant can still be exported before it is purged. A soft delete is reversible by a platform admin only — via the restore API POST /admin/v1/tenants/{id}/restore (clears the deletion marker and resumes routing; 409 once the tenant has been purged). There is no restore button in the admin UI, and a tenant admin cannot undo a delete.
⚠️ Caution: Soft delete disables every gateway, user, token, and provider key of the tenant. Scheduled runs and pending inbound-webhook runs of the tenant stop firing.
Proceed as follows to delete a tenant:
- Click the open action icon on the tenant's row.
- The tenant detail view opens.
- Click on the Delete Tenant button.
- A confirmation modal opens. To guard against an accidental delete, the Accept button stays disabled until you type the tenant's exact slug into the confirmation field (the request carries that slug as a
{"confirm":"<slug>"}token, which the backend re-checks). - If you are deleting your own tenant, the modal shows a distinct warning that everyone — including you — immediately loses access and only a Myra platform admin can restore it.
- Type the slug, then confirm the deletion.
-> The tenant is decommissioned and disabled.
Purging a tenant
Purging irreversibly erases every row that belongs to the tenant and writes a Löschprotokoll (deletion-protocol) audit entry with the per-category counts. Purge has no button in the admin UI — it is performed through the admin API and requires the tenant to be soft-deleted first:
curl -X DELETE https://<your-gateway-host>/admin/v1/tenants/{id}/purge \
  -H 'Content-Type: application/json' \
  -d '{"confirm": "<tenant-slug>"}'
The purge is platform-admin only, requires the tenant to be soft-deleted first, and needs the confirmation body to match the tenant slug exactly.
-> The tenant data is permanently and irreversibly removed.
⚠️ Caution: A purge cannot be undone. Export the tenant data with the Export data button on the tenant detail view before purging. For the full deletion lifecycle and the endpoint contract, see Deleting a tenant (soft delete).
Resetting a tenant budget
Resetting the tenant spend counter allows requests previously blocked with quota_exceeded again, up to the configured budget.
The tenant detail view has no Reset budget button — the tenant spend counter is reset through the API only:
-> The tenant spend counter is reset to zero for the current period.
🔒 Platform-admin only. Both the tenant reset above and the gateway-level Reset Spend button are reserved for platform administrators — resetting a ledger re-opens the platform-set
platform_cap_usdceiling, so a tenant admin receives403and the reset is audited. Ask your platform operator to reset spend on your behalf.💡 Note: The Reset Spend button in the admin UI is gateway-level only — it appears on the gateway detail view and calls
DELETE /admin/v1/gateways/{id}/budget. It does not reset the tenant-wide counter.
Managing tenant-level provider keys
A tenant-level provider key is a BYOK key shared by every gateway of the tenant. The key is used when the active gateway has no key for the requested provider.
Tenant-level keys are managed from the API Keys tab of the tenant detail view. The procedure for storing and rotating keys is the same as for a gateway. See Provider keys (BYOK) for the full procedure.
Managing prompt examples
Required role: tenant admin or admin.
A prompt example is a ready-made prompt that appears under the Prompt Examples tile on the start screen of the chat interface. Prompt examples are managed on the Prompt Examples tab of the tenant detail view. The tab lists each example with its Label, Model matchers, Effort, and enabled state.
When a tenant has at least one prompt example, those examples replace the built-in curated examples for that tenant. When a tenant has none, the built-in curated examples are shown instead.
Adding a prompt example
Proceed as follows to add a prompt example:
- Click on the tenant in the list.
- Open the Prompt Examples tab and click on the Add Example button.
- The prompt-example dialog opens.
- Enter a value in the Label text field.
- If required, enter an icon in the Icon text field.
- Enter the prompt in the Prompt text field.
- If required, enter a steering instruction in the Steering system prompt text field. The steering instruction is applied at inference and is not shown to the user.
- If required, enter one or more models in the Model matchers field. The first model available to the tenant is used. Leave the field empty to keep the example on Auto.
- If required, select the Extended thinking checkbox.
- If required, select an entry in the Effort drop-down list. The Effort list is nested under Extended thinking and stays disabled until the Extended thinking checkbox is selected.
- If required, select the Recommend web search checkbox.
- Leave the Enabled checkbox selected to make the example visible.
- Click on the Add Example button.
-> The new prompt example appears in the list. Repeat this process for all required examples.
Editing a prompt example
Proceed as follows to edit a prompt example:
- Open the Prompt Examples tab and locate the prompt example.
- Click on the Edit button on the row.
- The Edit dialog opens with the current values.
- Update the fields as required.
- Click on the Save button.
-> The updated prompt example is saved.
Deleting a prompt example
Proceed as follows to delete a prompt example:
- Open the Prompt Examples tab and locate the prompt example.
- Click on the Delete button on the row.
- A confirmation dialog opens.
- Confirm the deletion.
-> The prompt example is removed from the list.
Shared commands
A shared command is a slash-command available to every user of the tenant. The procedure mirrors the personal commands described in My commands, but the command is created from the tenant detail view and visible to all users.
Adding a shared command
Proceed as follows to add a shared command:
- Open the tenant detail view.
- Open the Commands tab.
- Click on the Add Command button.
- The Add Shared Command dialog opens.
- Enter a value in the Name text field. The command is invoked as
/<name>in the chat input. - If required, enter a value in the Description text field.
- Enter the prompt body in the Template text field. Use
{{variable}}placeholders for fill-in fields. - Click on the Add Command button.
-> The new command appears in the Shared Commands list and is available to every user of the tenant.
Editing a shared command
Proceed as follows to edit a shared command:
- On the Commands tab, locate the command in the Shared Commands list.
- Click on the Edit /
entry. - Update the fields as required.
- Click on the Save button.
-> The updated command is saved.