Interface overview
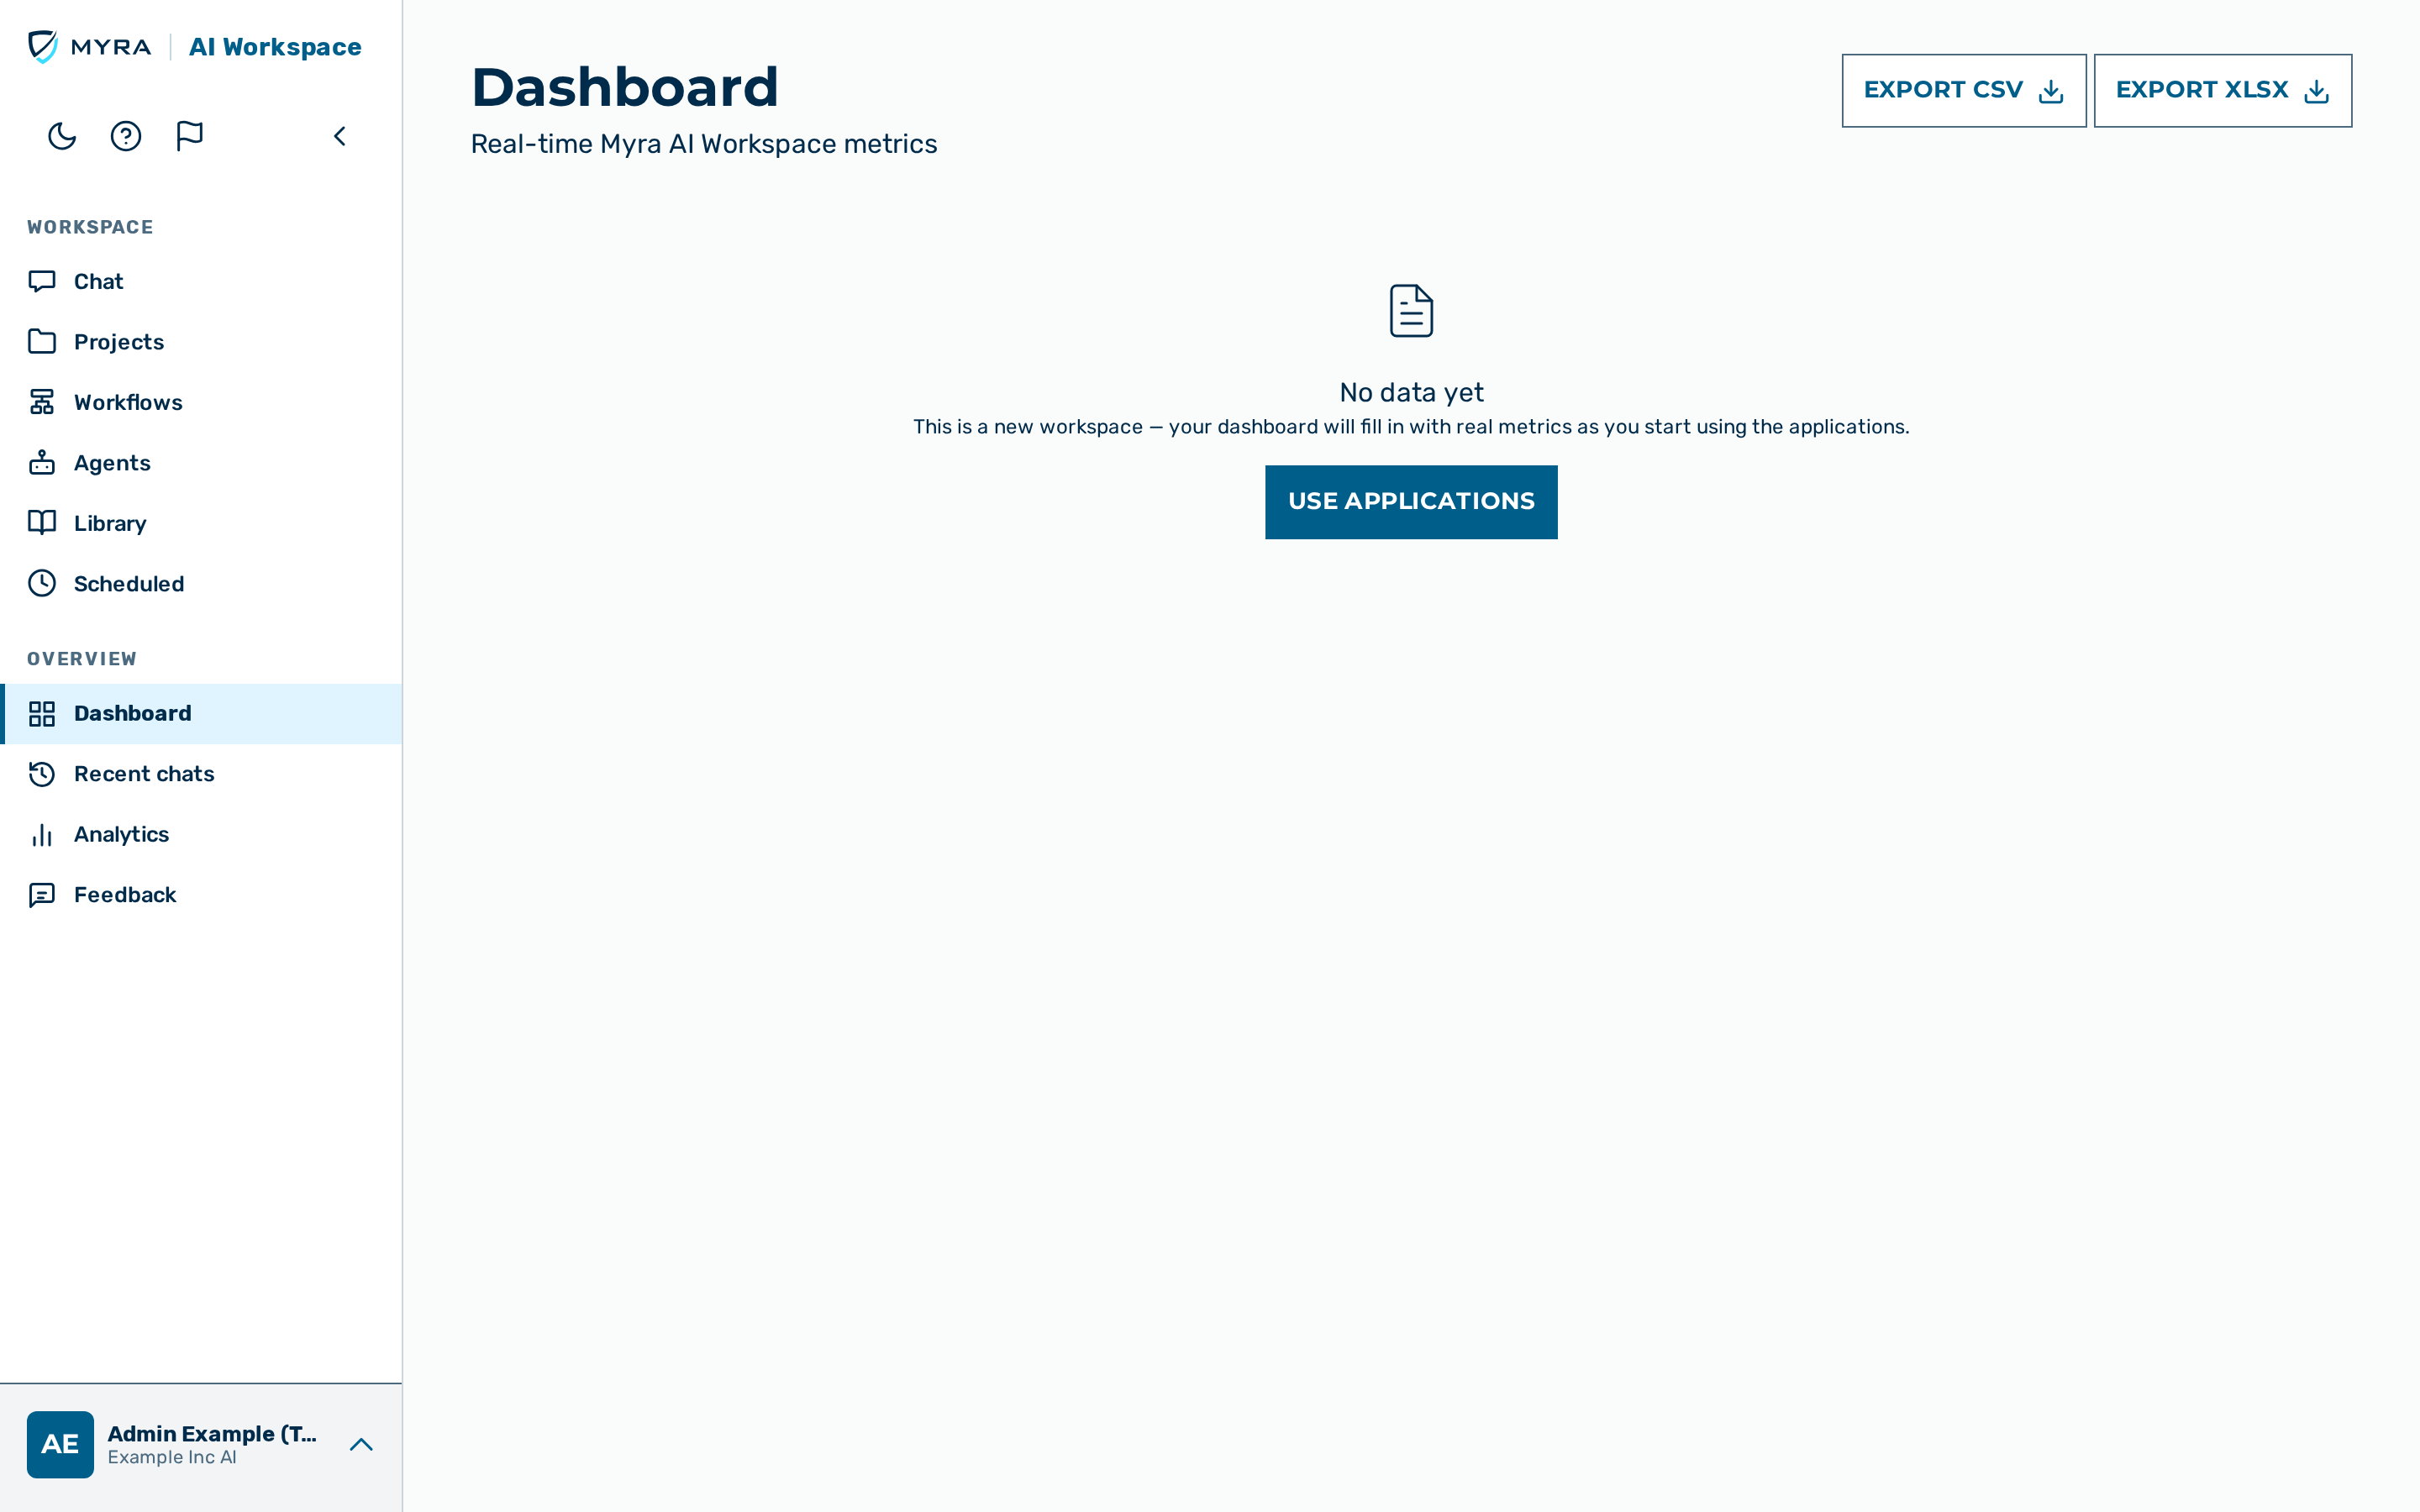
Description
Myra AI Workspace is a browser-based application served at https://ai.myra.eu. After
signing in, the application opens at the Chat view (members and viewers) or at the
Dashboard (admins, tenant admins, and KI-Managers). Every other view is reachable from
the left navigation rail.
On first sign-in, a short welcome walkthrough ("a quick look around") introduces the main surfaces as a carousel; you can step through it, Try it, or Skip — it does not reappear once dismissed.
Layout
The application has three structural areas:
| Area | Description |
|---|---|
| Navigation rail | The main navigation on the left. Shows one of two modes — Workspace or Settings. The brand logo + AI Workspace sub-label sit at the top; the user block sits at the bottom. |
| Top bar | Mobile/tablet only for normal users — a slim bar with the hamburger (opens the rail drawer), the notifications bell, and Send feedback. On /easy chat it also carries the chat controls (the web-search globe, the ⋯ overflow, and — before the first message — the ghost toggle), merged in so the chat has no separate second toolbar row on a phone. On desktop there is no top bar: the side rail is the only navigation, notifications + feedback move into the sidebar's icon row, and the chat controls sit in the chat pane's own top-right. Demo users (who have no rail) keep the top bar on every viewport, showing Log out. |
| Main area | The content area to the right of the rail. Displays the active view. |
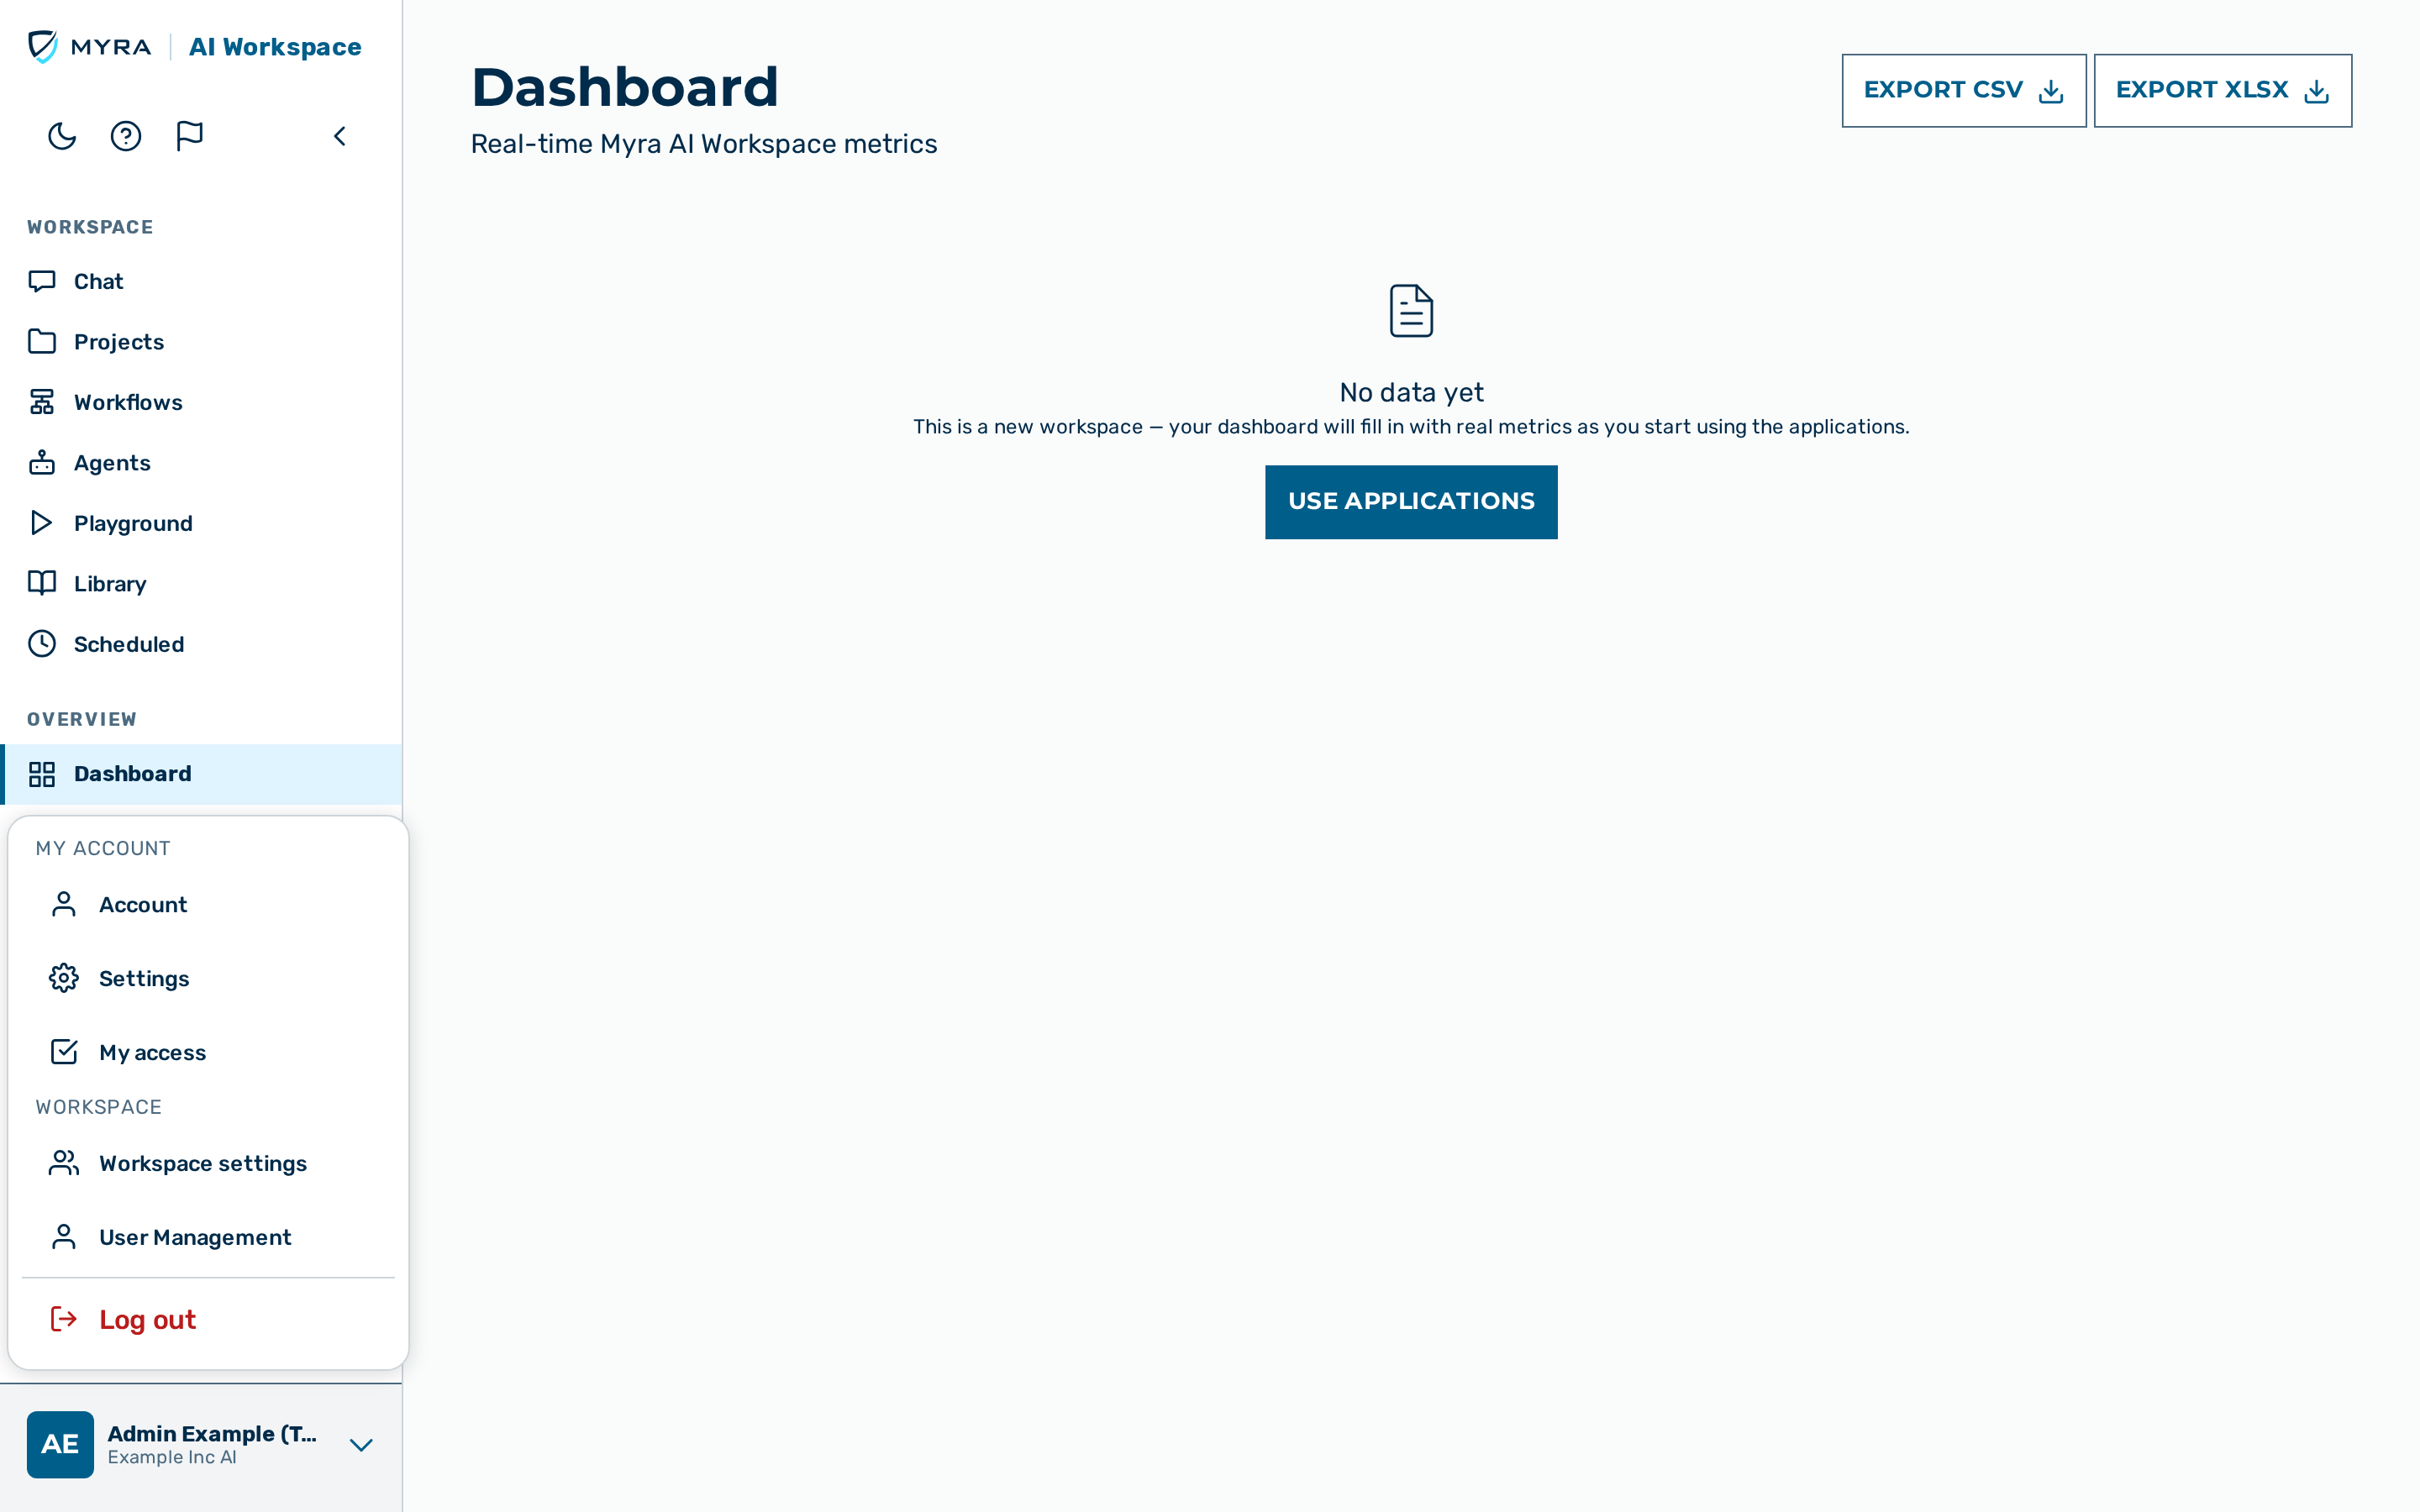
The user block at the bottom of the left sidebar — your avatar, name (role), and an
up-caret — opens a menu, upward, grouped into two labelled sections. The My Account section
lists Account, Settings, and My access; the Workspace section lists User
Management. Below the sections,
What's new opens the changelog, and Log out ends the session. An
empty section is not shown — a member, for example, sees no User Management entry. Directly
below the brand logo a small icon row carries the light/dark theme toggle, the Ask the
docs button, the rail collapse control, and — on desktop — the notifications bell and Send
feedback button. The Ask the docs button opens an in-app assistant that answers questions
about the product in the language of the question, with links to the relevant documentation.
Two navigation modes
The single left rail shows one of two modes, driven by the current route. Workspace mode is the default and holds the everyday work surfaces (the brand logo + the WORKSPACE and OVERVIEW clusters). Settings mode — entered by choosing Settings, User Management, or Account from the user-block menu at the bottom of the sidebar — replaces the workspace clusters with a single focused settings area (the one that owns the current page) and shows a Back to workspace link at the top to return. A breadcrumb above each tabbed page shows Home › Section › Current and is derived from the same navigation model.
List rows (Recents, Projects, Agents, Workflows, and the admin tables) open via an explicit action icon on the row — open / edit / run / more. Clicking the rest of the row does not navigate. Data tables also support optional keyboard row navigation.
Workspace mode
Workspace mode has two clusters: WORKSPACE and OVERVIEW.
WORKSPACE
The everyday work surfaces.
| Entry | URL | Visible to |
|---|---|---|
| Chat | /easy |
every role |
| Projects | /projects |
every role |
| Workflows | /workflows |
every role — carries a Premium badge and opens a shared upgrade pop-up on click when the workflow builder is not entitled for the tenant |
| Agents | /agents |
every role — carries a Premium badge and opens a shared upgrade pop-up on click when the Agents feature is not entitled for the tenant |
| Playground | /playground |
every role — carries a Premium badge and opens a shared upgrade pop-up on click when the Playground feature is not entitled for the tenant |
| Library (group) | /tenant-prompts |
tab: Prompts (/tenant-prompts, manage roles) |
| Scheduled tasks | /easy/tasks |
every role — carries a Premium badge and leads to the upgrade page when the feature is not entitled for the tenant |
💡 Note: The workspace order is Chat → Projects → Workflows → Agents → Playground → Library → Scheduled tasks. Workflows, Agents, Playground, and Scheduled tasks are always shown in the workspace rail. When the tenant is not entitled to one of them, its entry carries a Premium badge. For Workflows, Agents, and Playground a click opens one shared conversion pop-up — the feature's summary plus a call to action that leads to the contact form (until self-service payment is configured); a direct deep-link to a locked page still redirects (to
is a premium feature upgrade page for Agents/Workflows, or to chat for Playground, which has no upgrade page). Scheduled tasks keeps its dedicated upgrade page on click. These teaser entries render for every role, including the read-onlyvieweranddemouser— a not-entitled viewer still sees the badged entry and its pop-up. The Library group's single focused tab reads Prompts. The Agent catalog — a searchable list of organization-wide shared agents, each cloneable into your own — is reached from the Agents page via its Agent catalog button (a modal), not a rail entry; the button is hidden when organization-wide agent sharing is disabled.
OVERVIEW
| Entry | URL | Visible to |
|---|---|---|
| Dashboard | /dashboard |
every role |
| Recents | /easy/recents |
every role |
| Analytics (group) | /analytics |
tabs: Cost Analytics (/analytics, tenant admin/admin/KI-Manager), Live Monitor (/monitor, tenant admin/admin), Health (/health, admin only) |
| Feedback (group) | /feedback |
tabs: Inbox (/feedback, admin), Sessions (/chat-feedback, admin), Reports (/reports, tenant admin) |
💡 Note: Recents nests under OVERVIEW, right after Dashboard. A
ki_manager's cost analytics are scoped to the groups they manage, not the whole tenant. Governance is not in Analytics — it lives in Settings › Security (see below).
Settings mode
Switch to Settings mode from the user-block menu at the bottom of the left sidebar. It has three areas —
SETTINGS, USER MANAGEMENT, and ACCOUNT — and the rail shows one at a time: the area that
owns the page you are on. Picking Settings from the menu lands you on My preferences
(/preferences) — the same for every role — and shows the SETTINGS area; picking User Management
lands on the user list (/users; KI-Managers → Groups) and
shows the USER MANAGEMENT area; picking Account lands on Profile and shows the ACCOUNT area. Each area
is shown on its own — never stacked inside another.
SETTINGS
| Entry | URL | Visible to |
|---|---|---|
| Preferences (group) | /preferences |
tabs: My preferences (/preferences, all), My Commands (/commands, all), My PII configuration (/profile/pii, all) |
| Approvals (group) | /approvals |
tabs: Personal (/approvals, all), Agents (/agent-approvals, tenant admin), Tool reviews (/review-items, egress-approval holders), Configurations (/config-approvals, manage roles) |
| Connections (group) | /mcp |
tabs: MCP Connectors (/mcp, tenant admin), Chat Integrations (/chat-bridge, tenant admin), My MCP Connectors (/connectors, all) |
| Request Logs | /logs |
tenant admin, admin |
| Billing & plans (group) | /billing |
every customer-tenant role (trial, self-serve, manual/enterprise; owner and member — not the platform super-admin or a demo account) — tabs: Your plan (/billing, all of the above), then the upgrade-funnel tab (Contact us, /billing/contact, while self-serve paid checkout is not yet open — the current default; Upgrade, /billing/upgrade, once it is enabled — a self-serve/trial workspace owner only), Wallet (/billing/wallet, anyone whose account carries a wallet balance — a paid owner, and a trial owner or member), Invoices (/billing/invoices), and Providers (/billing/providers, the tenant admin only — the model providers powering the workspace). The tabs are an affordance only; the summary/wallet/checkout endpoints stay owner- and self-serve-gated server-side. |
| Gateways | /gateways |
tenant admin, admin |
| Providers | /providers |
admin only — provider key + status config (not costs) |
| Security (group) | /governance |
tab: Governance (/governance, manage roles) |
| Costs (group) | /finance |
tabs: User Costs (/finance, finance permission), Provider Costs (/model-prices, admin), Providers (/provider-pricing, admin — external-model markup pricing) |
💡 Note: Provider Costs is the renamed Model-Prices page (per-model pricing/cost). Governance returned to Settings under the new Security group. Guardrails have no standalone page — they are configured per-gateway under Gateways.
USER MANAGEMENT
| Entry | URL | Visible to |
|---|---|---|
| User Management | /users |
tabs: Users (/users, tenant admin), Groups (/groups, manage roles), Roles & permissions (/roles, ROLE_MANAGE), Tenants (/tenants, admin only) |
💡 Note: User Management is its own top-level area in the user-block menu (not nested under Account) so it is easy to find, especially on mobile. Tenants (the cross-tenant company list) is admin only — tenant admins manage users/groups/roles within their own organization, and reach their gateway flow via Settings › Gateways.
ACCOUNT
| Entry | URL | Visible to |
|---|---|---|
| Account (group) | /profile |
tabs: Profile (/profile, all), Plans (/plans, admin), Catalog (/catalog, admin — the product catalog with live Stripe prices and sync status), Vouchers (/vouchers, admin) |
| My access | /my-access |
every role — a read-only explainer of your own platform role, tenant custom-role grants, and group and project membership |
💡 Note: Personal access tokens live on the Profile page. The account menu groups its entries into a My Account section (Account, Settings, My access) above a Workspace section (User Management), followed by What's new and Log out.
Custom rail links
When the tenant has white-label branding configured, a LINKS section appears at the
bottom of the Workspace rail with up to four custom navigation links. Each opens an external
https address in a new browser tab. The links are set per tenant in the tenant branding
configuration. See Tenants.
Role summary
| Role | Workspace | Overview | Settings | User Mgmt | Account |
|---|---|---|---|---|---|
admin |
full | full (incl. Health) | full (incl. admin-only entries) | full (incl. Tenants) | full |
tenant_admin |
full | Analytics (no Health), Feedback (Reports) | most (no admin-only entries) | Users, Groups, Roles (no Tenants) | Profile |
ki_manager |
Chat, Projects, Workflows, Library, Agents | Dashboard, Recents, Cost Analytics | Preferences, personal Approvals, My MCP Connectors, Governance, Config approvals | Groups | Profile |
member |
Chat, Projects, Workflows, Agents | Dashboard, Recents | Preferences, personal Approvals, My MCP Connectors | — (hidden) | Profile |
finance |
Chat (no authoring) | Dashboard, Recents | Costs (User Costs), Preferences, personal Approvals, My MCP Connectors | — (hidden) | Profile |
viewer |
Chat (read-only), Projects | Dashboard, Recents | Preferences, personal Approvals, My MCP Connectors | — (hidden) | Profile |
A viewer cannot make inference requests; the Chat and Playground views remain reachable but
reject token creation and message sending.
What's new (changelog)
The What's new view at /changelog lists the recent per-release notes, newest first.
Each release is shown as its own entry with the user-facing summary of what changed. The view
is reachable by every signed-in user. It has no rail entry; open it from What's new in the
user-block menu at the bottom of the left sidebar (demo users, who have no user menu entries,
do not see it).
When a newer version of the application has been deployed while a tab is still open, a new-version notice appears in the bottom-right corner. It offers a Reload action to pick up the new build and a What's new link that opens the changelog. Following the What's new link does not dismiss the notice — the Reload action stays available.
Moving between views and modes
- Within a mode: click an entry in the rail. The selected view opens in the main area, the active entry is highlighted, and no page reload occurs (client-side navigation).
- Into Settings / User Management / Account: open the user-block menu at the bottom of the left sidebar (it opens upward). The menu is grouped into a My Account section (Account, Settings, My access) and a Workspace section (User Management), with What's new and Log out below them; choose a settings entry and the rail switches to Settings mode and lands on that area's primary page (Settings → My preferences for everyone; User Management → the user list; Account → Profile).
- Back to Workspace: click Back to workspace at the top of the settings rail (or the brand logo). The rail returns to the workspace clusters.
Installing the app on a phone or tablet
Myra AI Workspace can be added to the home screen of a phone or tablet and opened as a standalone app, without the browser address bar. The installed app opens directly on the Chat view.
Proceed as follows to install the app on iOS (Safari):
- Open
https://ai.myra.euin Safari. - Tap the Share button in the browser toolbar.
- Select the Add to Home Screen action.
- Tap the Add button.
-> The Myra AI Workspace icon appears on the home screen. Opening it starts the app on the Chat view in a standalone window.
💡 Note: On Android, open the same address in Chrome and select Install app (or Add to Home screen) from the browser menu. The installed app shows the name MYRA AI under its icon.
See also
- Signing in — sign-in flow and supported credentials
- Profile — the
/profileview (holds your personal tokens)