Members
View: Members
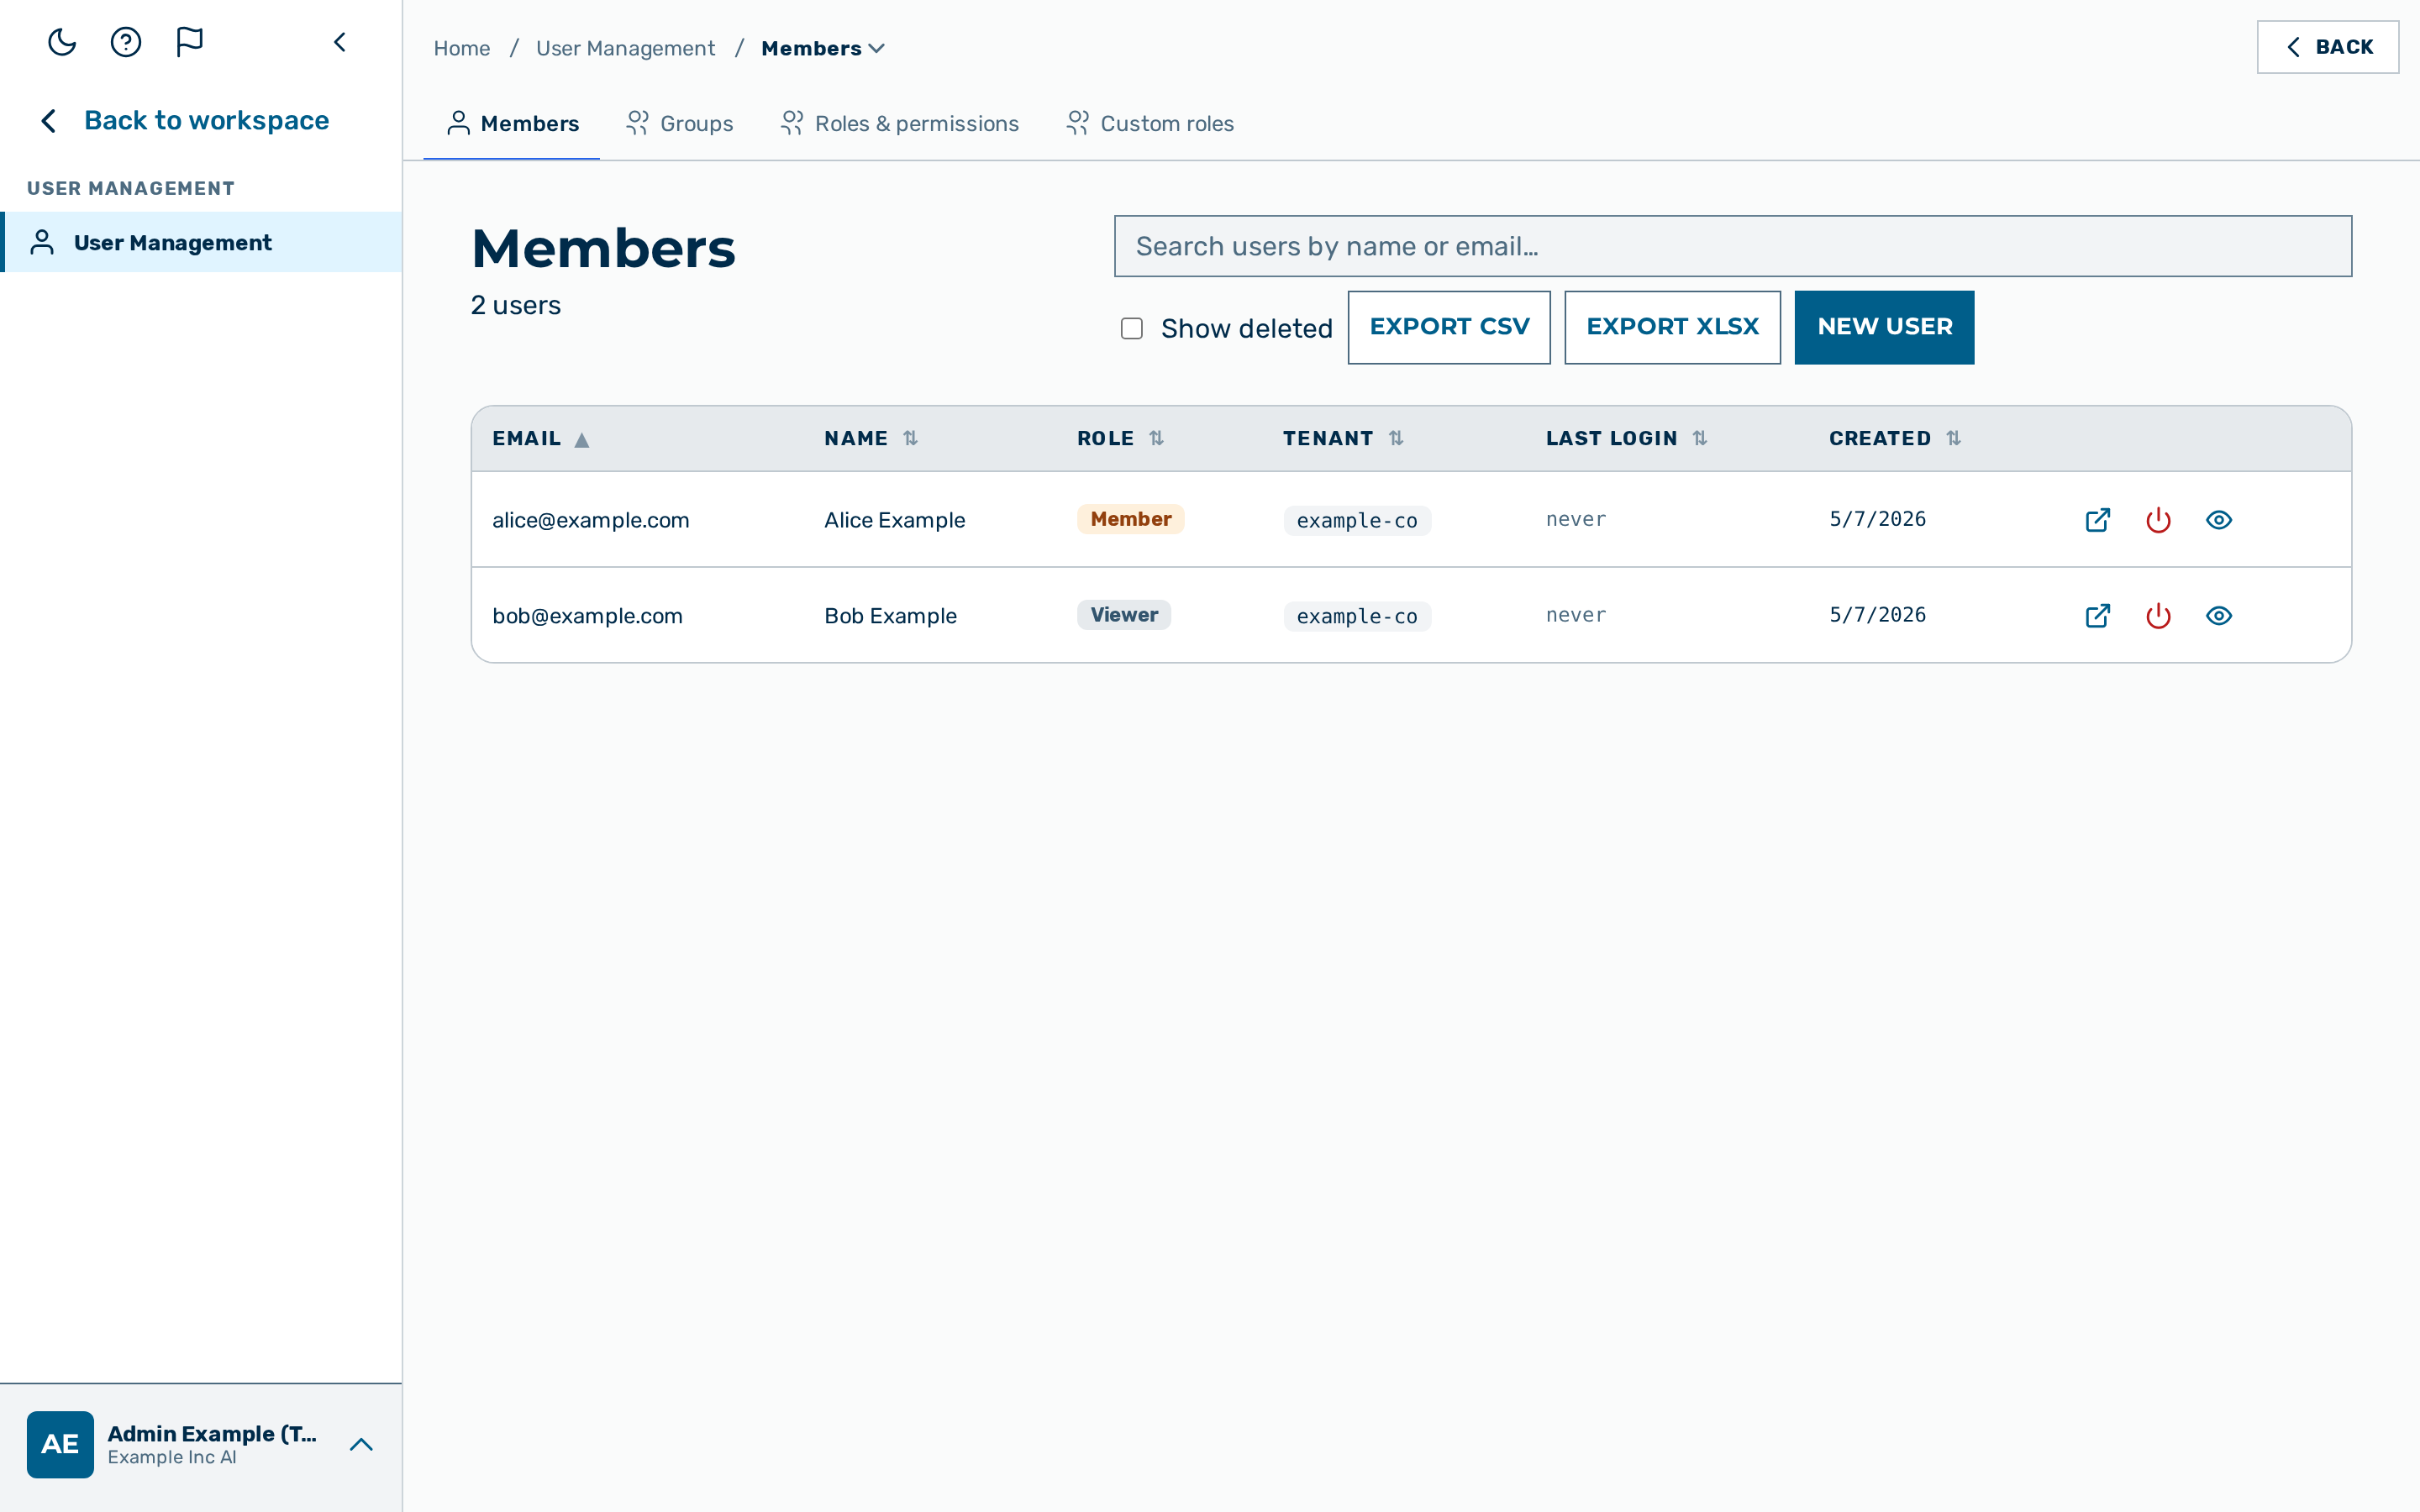 View: Members
The Members view lists every account accessible to the currently logged-in administrator —
the ki_manager, finance, member, viewer, and demouser accounts as well as the admin
and tenant_admin accounts, each labelled by role in the Role column. admin callers see
accounts across every tenant; tenant_admin callers see only accounts within their own tenant. The
separate Platform admins tab is a focused view of just the admin and
tenant_admin rows.
The view is the Members tab of User Management, reached from the user-block menu at the bottom of the left sidebar → User Management → Members. It is visible only to users with the admin or tenant_admin role.
The table shows the following columns:
| Column | Description |
|---|---|
| The email address of the member | |
| Name | The display name of the member, if set |
| Role | admin, tenant_admin, ki_manager, finance, member, viewer, or demouser |
| Tenant | The tenant the member belongs to |
| Last Login | The timestamp of the member's most recent login, if any |
| Created | The account creation timestamp |
All column headers are sortable. Click a header to sort ascending; click the same header again to sort descending. The active sort column shows a ▲ (ascending) or ▼ (descending) indicator next to the header label. Sorting is applied server-side. On a phone the list shows one card per member, with each column as a labelled row, in the default order (e-mail A→Z) — the sort headers are a desktop control.
Open a member's detail page by clicking the row (or its open action icon); on a phone the whole card is the tap target.
The search field at the top of the view filters the table as you type, matching the entered text against the member's name or email address (case-insensitive). The empty field shows all members. When no member matches, the table is replaced with a short "no match" message; clear the field to show the full list again. The search only narrows the visible table — the member count and the Export CSV download continue to cover the full loaded list. The entered filter persists across navigation and reloads until you clear it.
The table is paginated at 10 members per page (matching the Tenants and Projects lists); use the Previous/Next controls under the table to move between pages. A per-page selector next to them switches the page size between 10, 25, and 50 — the choice persists per browser. Changing the sort, the tenant filter, the deleted-members toggle, the search text, or the page size returns you to the first page. Lists that fit on a single page of the smallest size show no pagination controls at all.
The Export CSV and Export XLSX buttons at the top of the view download the currently-listed members as a .csv file or an .xlsx workbook. Both are disabled when the list is empty.
Access control
| Role | Can access Members view | Can manage other members |
|---|---|---|
admin |
Yes — all tenants | Yes |
tenant_admin |
Yes — own tenant | Yes (own tenant only) |
ki_manager |
No | — |
finance |
No | — |
member |
No | — |
viewer |
No | — |
demouser |
No | — |
User roles
Every account has exactly one role. The role is set in the Role drop-down list of the user dialog and controls sidebar visibility and permitted actions. admin and tenant_admin accounts also appear in the Members view; the Platform admins tab is a focused view of just those administrator rows.
| Role | Description |
|---|---|
admin |
Platform superadmin. Full access to every tenant, gateway, and user. See Platform admins. |
tenant_admin |
Manages the users, gateways, and settings of the account's own tenant. See Platform admins. |
ki_manager |
Manages groups and workflows within the tenant and sees group-scoped cost analytics. No tenant, gateway, or user administration. |
finance |
Billing-scoped role: manages billing and reads cost data only. No other admin surface. |
member |
Everyday workspace use: chat, projects, and personal tokens. No administration. |
viewer |
Read-only access; cannot send inference requests or create tokens. |
demouser |
No-login demo identity, limited to /easy with capped trial prompts. Provisioned for the public demo entry point, which is disabled (AGF-2997) — the role is retained for pre-cutoff live sessions and a future re-enable. |
Not every administrator can assign every role — the Can assign column on Platform admins shows this per-row, computed server-side:
- An
admincan assign any of the 7 roles, includingadminanddemouser. - A
tenant_admincan assignki_manager,finance,member, andviewerwithin their own tenant.tenant_admin,admin, anddemouserare never offered — a tenant_admin cannot promote anyone to admin, themselves included.
Creating a user
Before you begin, ensure the following conditions are met:
- ☑ You have the
adminortenant_adminrole.
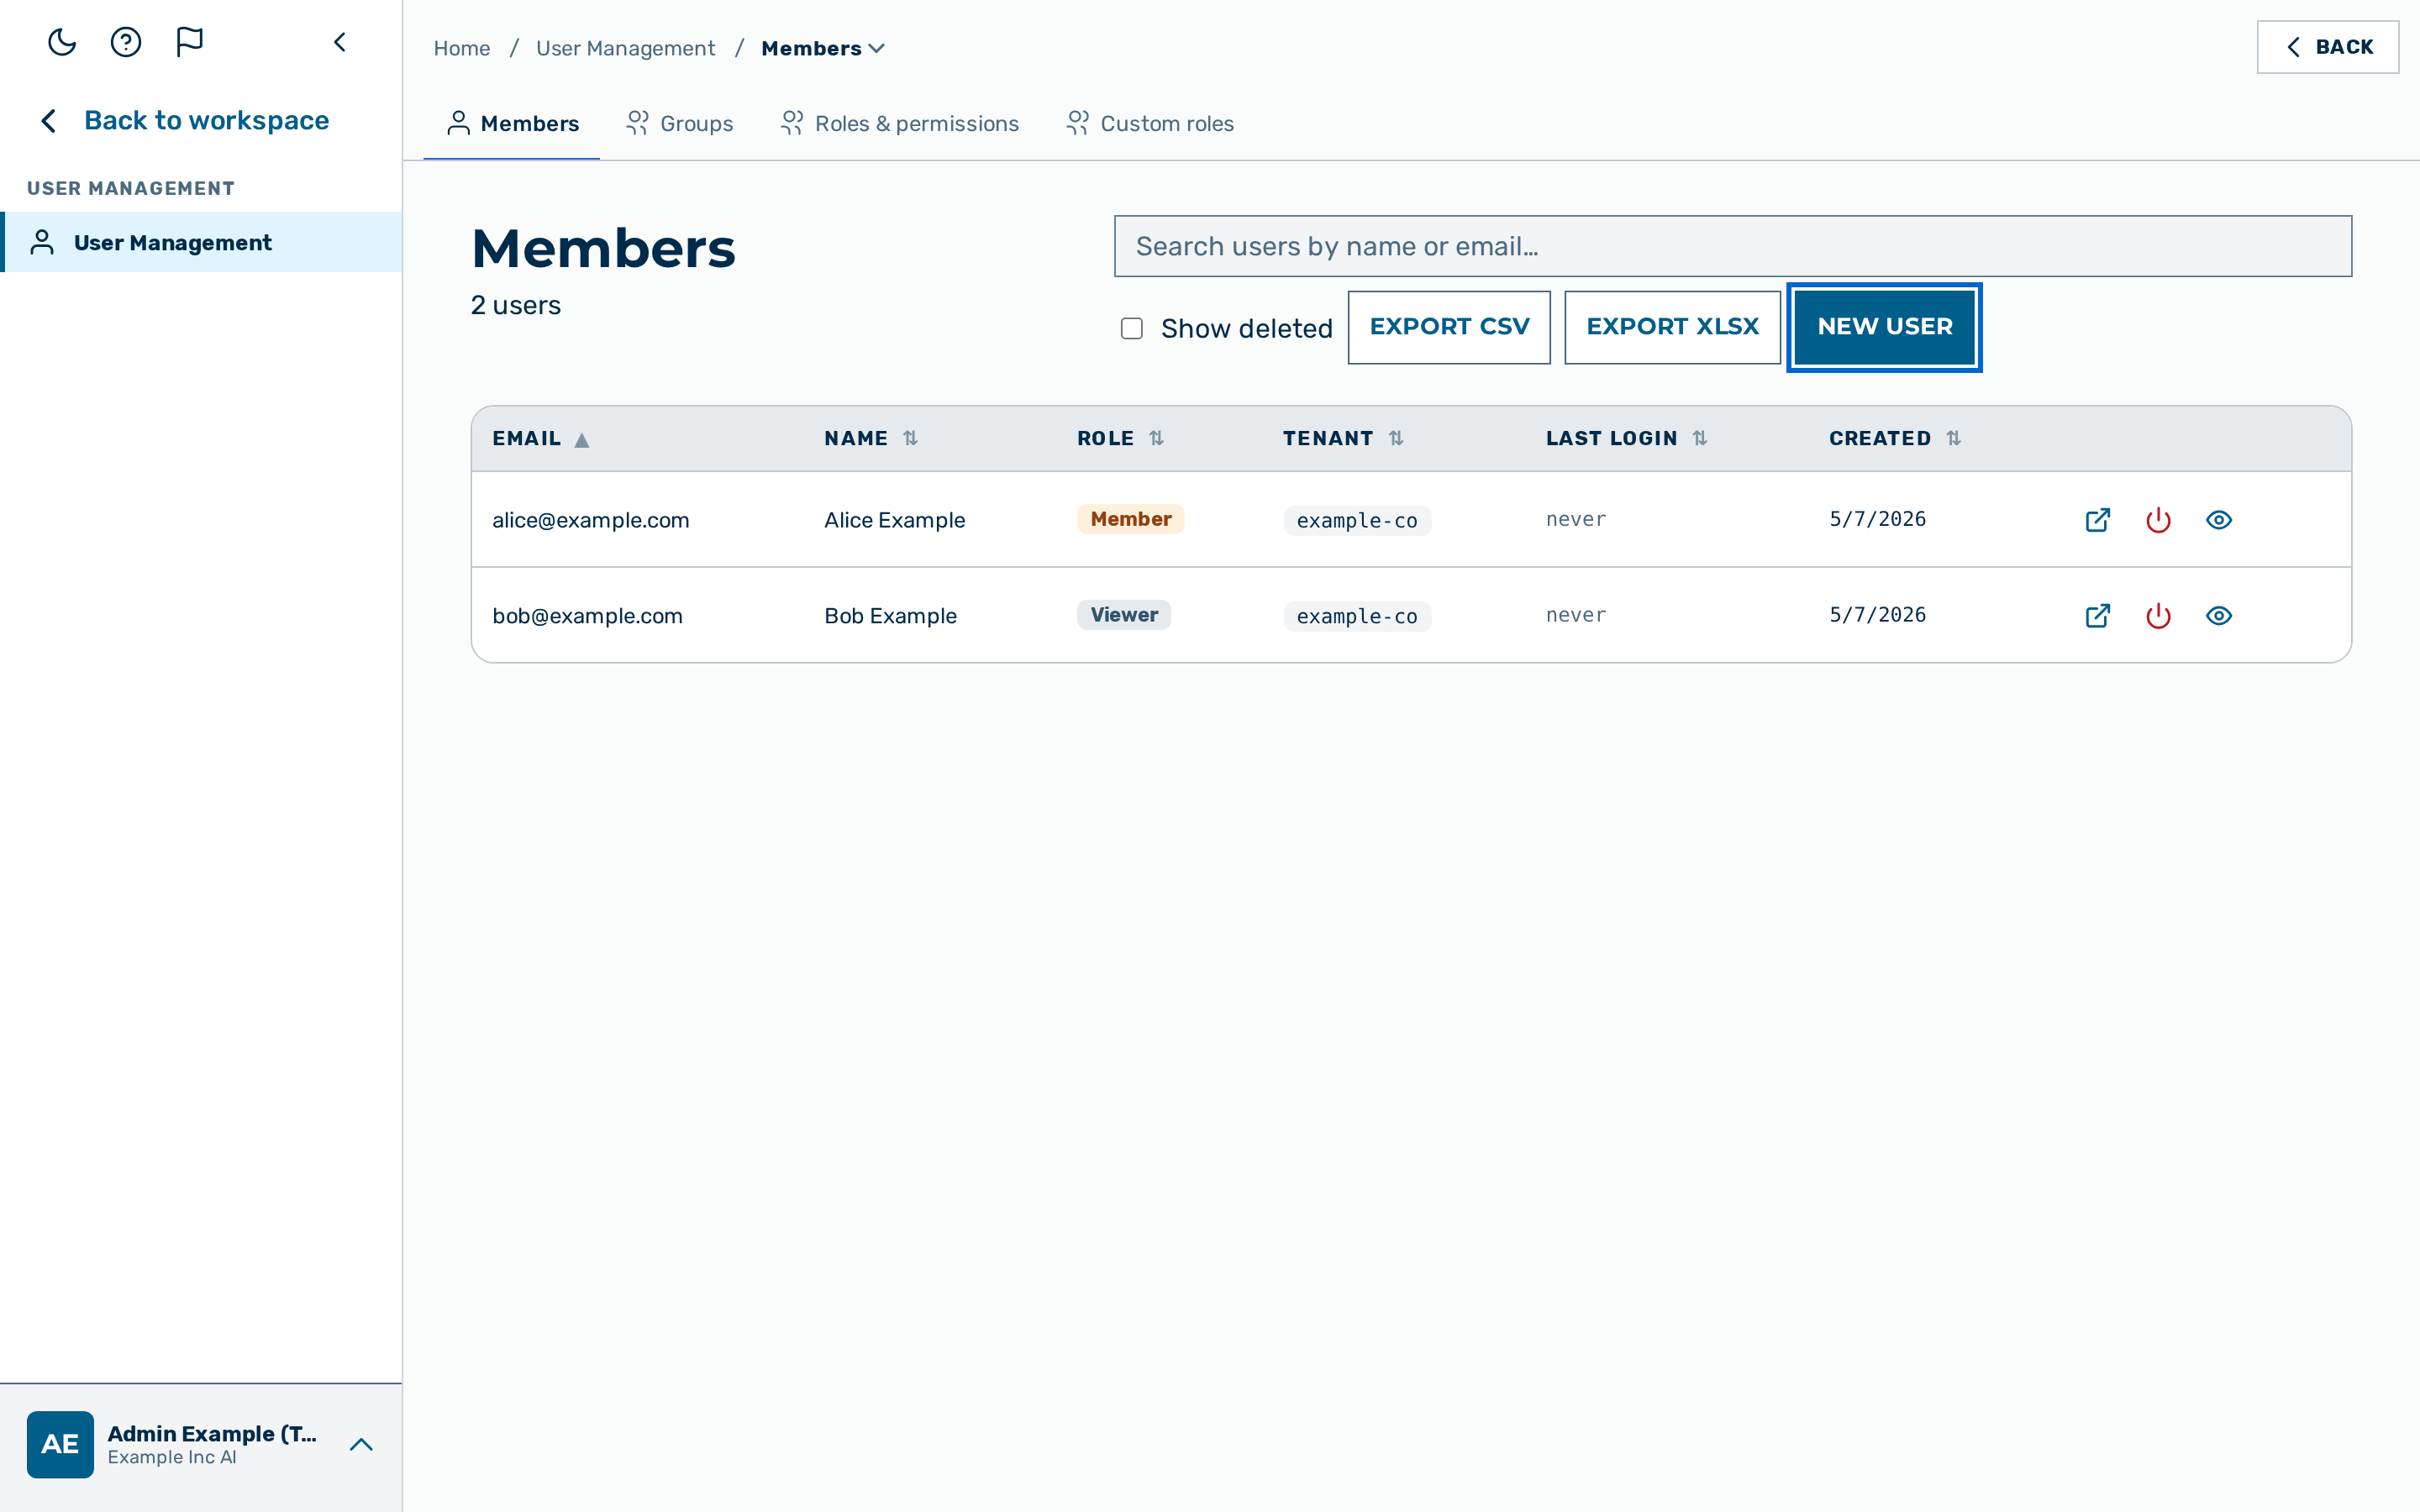 The + New User button in the Members view.
Proceed as follows to create a user:
- Click on the + New User button.
- The New User dialog opens.
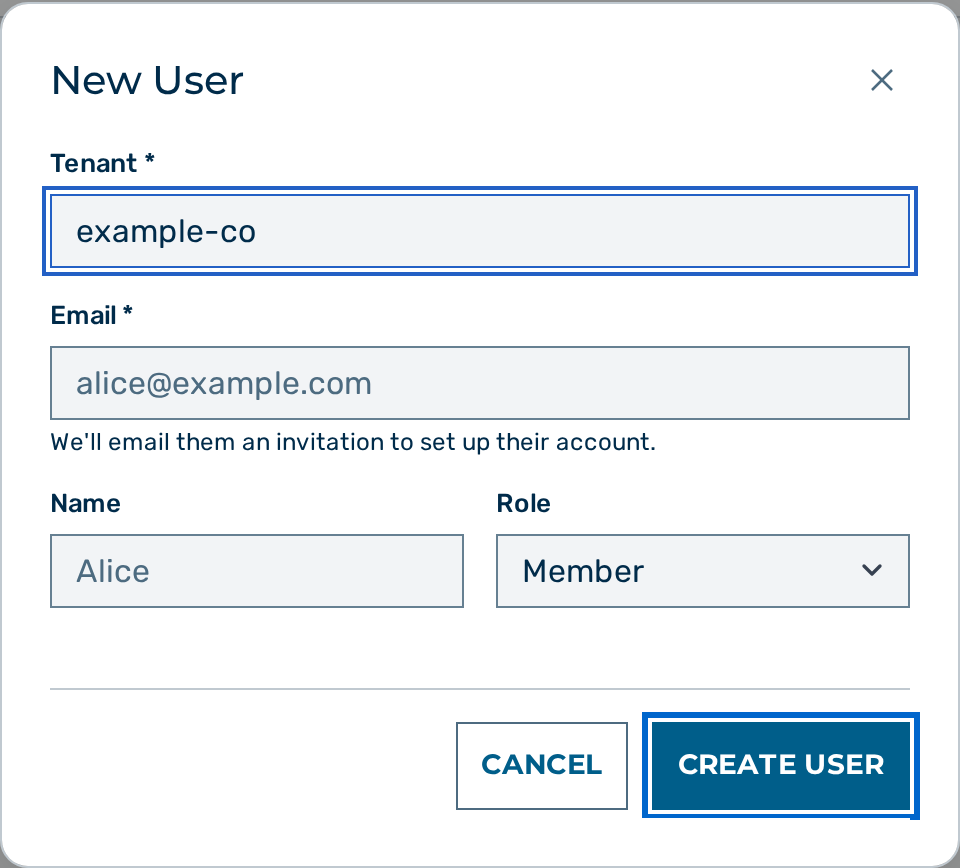 The New User dialog.
- Select the tenant the user belongs to from the Tenant drop-down list.
adminusers can choose any tenant; fortenant_adminusers the field is read-only and fixed to their own tenant. - Enter the email address of the user in the Email text field.
- If required, enter a display name in the Name text field.
- Select a role from the Role drop-down list.
- Click on the Create User button.
-> The new user appears in the table and can immediately log in via the login page.
Editing a user
Before you begin, ensure the following conditions are met:
- ☑ You have the
adminortenant_adminrole.
Proceed as follows to edit a user:
- Click the open action icon on the row for the user you want to edit.
- The user detail panel opens.
- Click on the Edit button.
- The edit form opens.
- Update the Email text field, the Name text field, or the Role drop-down list as required.
adminusers can additionally select a different tenant from the Tenant drop-down list.tenant_adminusers cannot change a user's tenant.- Editing your own record: when you open the Edit form on your own user row and you are not a platform
admin, the Role and Tenant fields are shown read-only — you cannot change your own role or tenant. This prevents a tenant admin from accidentally demoting themselves out of administrator access (there would be no in-product way back). To change your role, another administrator must edit your record; the server rejects a self role or tenant change even if the request is crafted directly. - The Restrict processing (GDPR Art. 18) check box is available in the edit dialog only. See Restricting processing.
- Click on the Save Changes button.
-> The updated details appear in the user table. A role change applies on the user's next admin request — open sessions included; the user does not need to sign in again (and is not signed out).
Restricting processing (GDPR Art. 18)
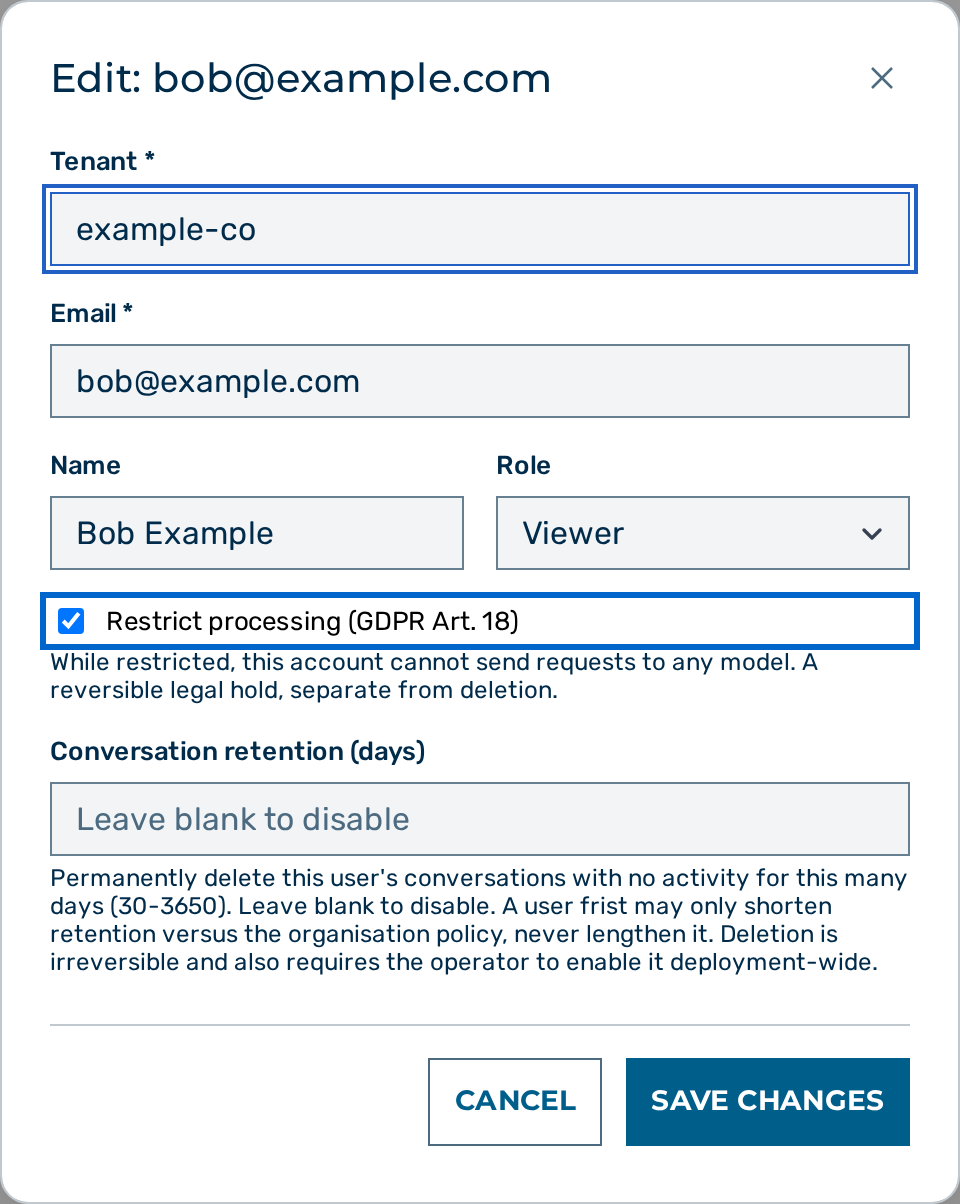
Article 18 of the GDPR gives a data subject the right to have the processing of their personal data restricted. The Restrict processing (GDPR Art. 18) check box places a soft, reversible legal hold on an account: while the hold is active, the account cannot send requests to any model. The hold is separate from deletion — the account still exists and can be released again by clearing the check box.
Before you begin, ensure the following conditions are met:
- ☑ You have the
adminortenant_adminrole.
Proceed as follows to restrict processing for a user:
- Click on the row for the user you want to restrict.
- The user detail panel opens.
- Click on the Edit button.
- The edit form opens.
- Tick the Restrict processing (GDPR Art. 18) check box.
- The hint reads While restricted, this account cannot send requests to any model. A reversible legal hold, separate from deletion.
- Click on the Save Changes button.
-> The account is placed under the legal hold. Every inference request from the account is rejected until the hold is released.
Proceed as follows to release the hold:
- Open the edit form for the user.
- Clear the Restrict processing (GDPR Art. 18) check box.
- Click on the Save Changes button.
-> The account can send inference requests again.
Deleting a user
Before you begin, ensure the following conditions are met:
- ☑ You have the
adminortenant_adminrole.
⚠️ Caution: Deleting a user is a soft delete. The account is locked out and cannot be reactivated by the user. An administrator can restore the account from the Members view.
Proceed as follows to delete a user:
- Click on the row for the user you want to delete.
- The user detail panel opens.
- Click on the Delete User button.
-> The user is marked as deleted. The user can no longer sign in, and all inference tokens issued to that user are rejected.
Restoring a deleted user
Soft-deleted users are hidden from the table by default.
Proceed as follows to restore a deleted user:
- Tick the Show deleted check box at the top right of the Members view.
- Deleted users appear in the table marked with a Deleted badge and a Restore button in the action column.
- Locate the user.
- Click on the Restore button in the row.
-> The deleted badge disappears and the account can sign in again. The previously issued tokens remain revoked; create new tokens if needed.
Disabling and re-enabling a user
Before you begin, ensure the following conditions are met:
- ☑ You have the
adminortenant_adminrole.
Disabling is a reversible suspension: unlike deletion, a disabled user stays on the tenant roster and remains visible in the Members view, marked with a Disabled badge. While an account is disabled:
- it cannot sign in through any method (email OTP, SSO/SAML/OIDC, Google), and any existing admin session or inference token is rejected on its next request — access is revoked promptly, fail-closed, on every device, and permanently: re-enabling does not bring old sessions or API tokens back (see below);
- its scheduled agents and Mattermost-bridge messages stop running, and it no longer receives workflow email deliveries.
Two safeguards protect against locking a tenant out:
- you cannot disable your own account;
- you cannot disable the last active administrator (
adminortenant_admin) of a tenant while other users remain — promote another administrator first.
Proceed as follows to disable a user:
- In the Members view, locate the user's row (use the search box to filter by email).
- Click the Disable button in the action column.
-> The row shows a Disabled badge and the action changes to Enable.
Proceed as follows to re-enable a user:
- Locate the disabled user's row.
- Click the Enable button.
-> The Disabled badge disappears and the account can sign in again. Re-enabling restores the ability to sign in, but does not revive the sessions or API tokens that existed before the disable — those were ended for good on every device. The user signs in afresh, and any integration mints a new API token.
Disabling vs. deleting. Disable is a reversible suspension of access — the account and its data stay in place and the user can sign in again once re-enabled. It is not reversible for live credentials: the sessions and API tokens open at the moment of the disable are ended permanently on every device, exactly as a delete ends them. Deletion is a soft delete that hides the account and starts the path toward erasure. Disable and delete are independent: the account's status appears in the users CSV export (
active,disabled, ordeleted).SCIM note. Disabling is a manual admin action and is independent of SCIM provisioning. A SCIM
active = truefrom your identity provider maps to the delete/restore lifecycle and does not clear a manual disable; clear it with Enable here.
Resending an invitation email
Proceed as follows to resend an invitation email to a user:
- Click on the row for the user.
- The user detail panel opens.
- Click on the Resend Invite button.
- The button label changes to Invite Sent ✓ while the email is queued.
-> The user receives a fresh invitation email at the address on file.
Viewing the product as a user
Administrators can open a View as user session to reproduce a problem a member has reported. The session shows the member's support context — role, plan, feature gates, and tenant and branding configuration — but not the member's private content. The action is on the member's row in the action column.
A View as user session exists for support, not for reading private data. The server refuses every personal-data request during the session. The refused content includes the member's conversations, memories, uploaded and project knowledge files, personal access tokens, billing and wallet, approvals, scheduled tasks, personal PII keywords, and MCP connectors. The member's email address is masked in the impersonation banner. For the complete boundary, see Impersonation.
⚠️ Caution: An administrator cannot read or export the private data of a member by viewing the product as that member. The server enforces this boundary, and it is verified automatically so it cannot regress.
The View as user action follows the server's impersonation guard and is not offered where the server would refuse it:
- you cannot view your own account, a demouser account, or a deleted or disabled account;
- a
tenant_admincannot view anadminaccount — only anadminmay view anotheradmin; - only
adminandtenant_admincallers see the action at all.
The server re-checks and re-derives every impersonation request independently, so a session is refused even if the control is invoked directly.
API-only operations
Two operations on a user have no dedicated control in the Members view and must be performed via the admin API:
- Setting or clearing a static OTP (platform
adminonly) —PUT /admin/v1/users/{id}/static-otpwith{"code": "..."}to set or{"code": null}to clear. A static OTP is a fixed sign-in code that replaces the email-delivered OTP. It is intended for App Store reviewer accounts and similar fixed credentials. - Clearing a user's spend —
DELETE /admin/v1/users/{id}/budgetresets the accumulated spend on every token belonging to the user.
See Users & tokens API for the request format.
Managing tokens for a user
Open the user detail panel to view, create, and revoke inference tokens for that user. For the full token management workflow, see My tokens. For the underlying API endpoints, see Users & Tokens API.
💡 Note:
memberusers can manage their own tokens without administrator assistance via My tokens.